Fixing a Synology DS1515+ not powering on
A few days ago my old Synology DS1515+ that I gave a friend wouldn’t power up. Press the power button and not a single thing would happen, no fans or lights would come on – not even for a second.
I started looking around and found there to be three common issues with several of the DSxx15 units:
- Dead motherboard battery
- Intel Atom C2000 bug
- Dead B847B transistor
Good stuff right?! Well luckily it’s not nearly as bad as it might sound at first and all three are pretty easy to fix.
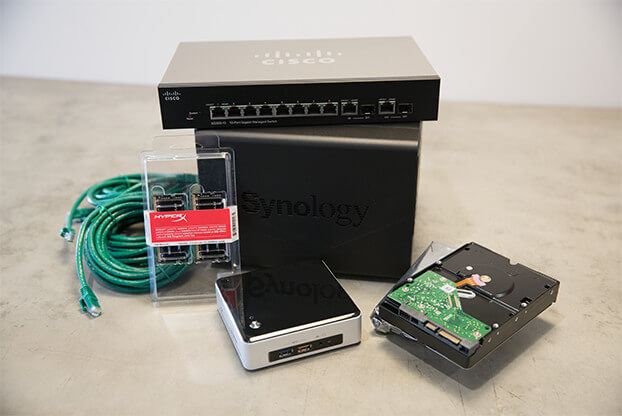
Items needed to repair the DS1515
The first thing I did was remove the cover from the Synology NAS and tested the power supply and everything checked out fine on the PSU.
Next I moved on to the transistor since it was the next closest and easiest item to get to. Using a multi-meter and setting it to 10 AMP I put the leads on the center and bottom pins as shown here:
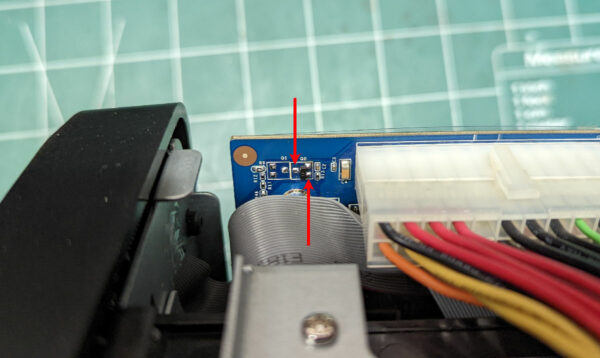
The good news is, immediately the DS1515+ powered on. So the next step was to remove the motherboard from the chassis so I could de-solder the old transistor and solder a new transistor in it’s place and I figured while I had it removed I would go ahead and address the other two known issues, more as a precautionary and so I wouldn’t have to take it apart again.
Below is a “map” of the points of interest on the Synology DS1515+ motherboard that we’ll be focusing in on.
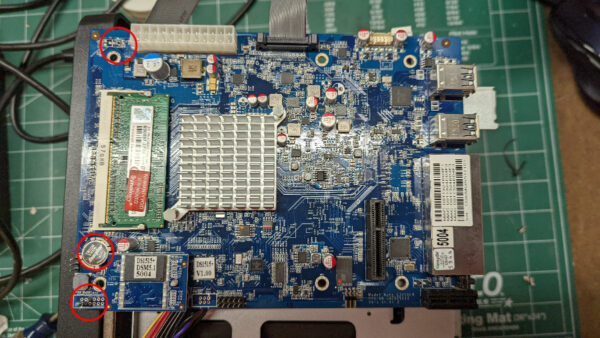
Once I had the motherboard removed from the chassis. I replaced the factory CR1220 battery with a new Energizer CR1220 battery.
Next up I solder the 100 ohm resistor in place as shown below. This resistor is said to fix the Intel Atom C2000 bug and the same fix that was being done by Synology back when these units still in their warranty period.
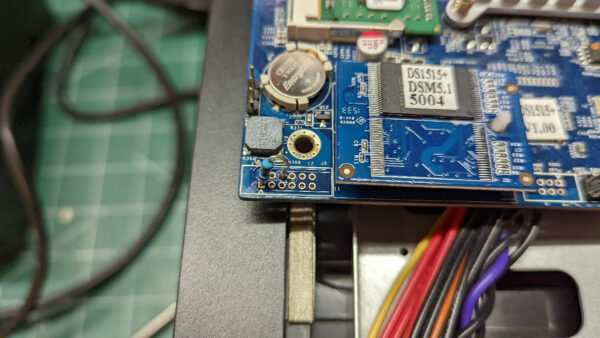
Now it was time to actually fix the root cause of this whole thing and that was to replace the failed transistor. Using a heat gun and some small pliers I removed the bad transistor.
With the old transistor removed I soldered on a new BC847B transistor just as the old one had been installed.
Finally, the only thing left to do it to reassemble the the NAS. Everything checked out fine and is fully operational now.
All in all the total cost was around $15! A lot better option than buying a brand new unit.


Great tip! It worked for my 2 NAS that stopped booting: 1513+ and 1515+. Very happy that I could solve this problem with an investment of 15€ which is most shipping costs of the very cheap components.
Glad to help!
-Michael
Bonjour Mike
ce n’est pas une question de tarif mais plutôt de gachi
Est ce que vous accepteriez de me vendre un Transistor BC847B.
Car en acheter 100 pour en utiliser un seul je trouve que c’est dommage.
Bien à vous
Gilles
Hi,
I have the same problem with a DS1513+, can you tell me where I can find this on the mainboard? Unfortunately, only instructions for the DS1515+ can be found on the Internet i’m already desperate.
Jan,
I’m sorry, I don’t have a DS1513+ nor know what that main board looks like. So I couldn’t tell you where any of the parts are located on it.
-Michael
In my case it was enough to replace a backup battery. The old one had a voltage below 2,5V.
Mike what a terrific and concise article!
I purchased my DS1515+ in 2016 and Synology replaced due to Intel flaw – I don’t recall which one. Mine recently started rebooting every few days, usually at night. I have also had issues with network adapter dropping off. I removed my motherboard tonight, replaced the BIOS battery, and put the original RAM back in. An engineer told me he had one and upgraded to the 2 sticks of 8GB DDR3L 1600 1.35V CL11 like I did, and it caused him all sorts of problems in the long run. I’ve had none until recently, but Synology’s troubleshooting pages stated that could be one of causes.
I noticed that my board (same info on board as the one in your picture) does not have the resistor that you mention in the article. Would it be advisable to add it?
I do not have problems starting up. Should I replace the transistor, even though I’m not having issues? I’m usually into preventative maintenance, but that seems like overkill (at the moment, anyway).
After this amount of time I’m willing to try things that make sense, but still suspect the power supply. I wish I had a way to test under load at home.
Thank you!
Ian,
If you don’t already have the 100ohm resister in place, then I would absolutely add it while you have it apart. This is a known bug in the CPU and it’s really just a matter of time before it shows it’s face.
-Michael
Thank you Mike. I’ll do that tomorrow. After reading through the articles linked off of your Intel Atom C2000 bug link, it makes sense (and looks like it certainly wouldn’t hurt). In the meantime, I found the power supply Manufacturer, Model, and Rev is extremely common and in use in LOTS of NAS and DVR systems. For those who wish to do some digging, they can be had very, very affordably and seem to be in stock everywhere. After 5 years of 24/7 service, I opted to replace that as well, rather than the whole NAS. Synology used a lot of top-tier components in these systems, so I figure that I could get at least another 5 years out of my investment.
Absolutely. These are still pretty solid machines for sure. Where have you found power supplies readily available?
-Michael
I updated mine to 16 GB of DDR3L Ram with no problem. You can always remove one stick and test them alternately. Test whether it’s one or the other.
Hello MIke,
I am in the same boat with my 1515+. It no longer will boot up. If I take another ATX 24pin Power Supply and hook it up to the 1515+ board, it boots up no problem, however I cannot get the hard drives to boot because I don’t have another PS with an (8 & 12pin) connector. I added the resistor but did not solder it as I don’t have an iron. I also added the new battery. For the transistor for the Q2 portion of the board, I never soldered a transistor before, and don’t have a solder iron, do you have any step by step instruction how to do that? Is there another way to take off the old transistor and add a new one?
Brian,
If you can’t get it off using a soldering iron, then using a heat gun (https://amzn.to/3nNRhm7) with a fine tip and some tweezers makes easy work for this process.
-Michael
Mike, I found a supplier on eBAY – about $70. After making the mods, it would not boot up. They’re sending me another PSU – Delta DPS-250AB-44B Rev.4. In the meantime, I’m going to use a standard ATX PSU to try to get this board going and leave the 8 and 12 pin powered from the original until I have time to figure out the specs on each wire. Hoping this bugger comes back, even if I have to continue run it on ATX PSU. From what I’ve been reading, the small Deltas can be part of the problem – even if you pay $180 for them.
Just ordered the parts for my out of warranty 1515+. Already has the 100ohm resister fix. Hopefully this will stop the improper shutdowns.
Any idea as to how long this fix works? Probably going to move to a 1520+, regardless.
Hopefully this will help with keeping a secondary NAS.
HJ,
I can’t say how long it will work. The old 1515 ran for many years without it, I can only hope it runs just as long with it now.
-Michael
Hey, great and thank you. My 1515+ didn’t die yet, but I actually got reminded of this – it just powered down unexpectedly a few times, no logs. It is a RMA’d one, but the hardware fixes are missing. And – I got 2 1517+ that would need attention, apparently – all of them host rather convenient (if not to say critical) things. For the 1517+ I need to find out if they have some of the hardware patches integrated into the PCB. The available information is a bit ambiguous.
Mike, Just wanted to thank you for this fix. When I went through the steps I found the 1/4 ohm resister had already been added at the factory. Just in case, I went ahead and replaced everything in your directions anyway. I was bit apprehensive since I never did any soldering on a board before. So my cost was a bit higher since I had to purchase a soldering iron and a few other things but it was still substantially lower then a new NAS but it was also educational and fun especially when it worked. The culprit, for me , was the B847B transistor. I tested after each step and that was the last thing I replaced since it seamed the most tedious.
Thanks again Mike
— Howard
Howard,
That’s great news and I’m glad to have helped!
-Michael
Can I do this fix on ds411+?
Replaced the transistor and my 1515+ came back to life. Thanks for the article. Wish Synology would have offered a permanent fix after these 3 issues but I guess these are built to fail rather than repair.
Thank you for saving my Synology 1515+ NAS! Fantastic information and well provided! The photos were a great help! A new battery and one tiny transistor and we are back in business. My unit had been swapped once under warranty so it already had the resistor in place. Thank you again for taking time to post such a useful article!
Mike, thank you for this. Excellent guide, much appreciated.
Changed the transistor and boom, fixed!
Fantastic! Glad I could help.
-Michael
Mike! This helped me tremendously!! It got me to bite the bullet and actually use the soldering gear I had to good use. I followed the instructions and I’m back and running. I had bought the NAS and 5 x 6TB all at the same time. The next thing I have to replace are the hard drives. I’m not looking forward to that:( Hope fully I can save up to get a whole set of them before they die. I really appreciate the information!
Mike many, many thanks this really helped me in repairing an ailing DS1515+. The easy to follow steps and links to components tipped the balance for me to even take the task on, and proved invaluable in getting it through to completed. I would add for myself, hardest part was removing the transistor in situ, for which I ended up stopping for a couple of days whilst a Chipquik SMD removal kit was ordered and shipped. That did the job although only after lots of flux and trying the wedge shaped solder tip, which heated the desoldering alloy / solder enough to work its magic.
From the gradual decline of random power offs to eventual no power at all, the 3 repairs you provide came good and the unit is now running 24 hours so far without any issue at all. Fantastic result for £30 versus the cost of a new 5 bay NAS. Again thanks for taking the time to record your repair so well for others!!
Glad to have helped!
Which chipquik SMD removal kit did you buy?
-Michael
Hi Mike appreciate the reply. When ordering I didn’t realise these kits come in lead and lead-free varieties. So I ordered the SMD1 (leaded) set, which worked just fine. DS1515+ uptime nearing 3 days now with no interruptions or issues I can discern. Thanks again!!
Link: https://cpc.farnell.com/chip-quik/smd1/smd-1-smd-removal-kit/dp/SD00632?CMP=TREML007-005
That’s great news and thanks for the link.
The DS1515+ that I repaired for this post has been going rock solid ever since. I believe we’re going to get a lot longer life out of these units now. Be sure to let me know if you do have any issues as I would be interested in hearing about it.
Thanks,
-Michael
Thank you for the excellent article. I did the resistor patch and a new battery since mine was below .2 volts and the last thing was the transistor. Once I replaced the transistor, bingo! I now have power and saved myself over $500 for a replacement NAS. Thank you very much for the information. Saved my buns.
John,
That’s great to hear your Synology NAS is back online and working again!
-Michael
Thank you so much for this guide! You saved the day!
My DS1515+ was completely broken, and I googled the symptoms and found your exact same problem. Read your guide and decided to go for it. Got the items you described, did some soldering I have never done before this small…. And some hours later I had it fixed!
Thans again!
That’s great, glad to hear your Synology NAS is back in operation!
-Michael
Great write up on the problem, I’ve been doing each fix one at a time each time it doesn’t turn on. I finally encountered the resister issue and soldered a 1000 Ohm resister as a surface mount. Do you know if this solution will be a permanent fix or will it die again?
While I’m glad this has helped, I certainly don’t make any guarantees on the fix being permanent or not. That said, the unit has been running 100% of the time since these article has been posted without a single issue thus far. Plus it is super to do should we need to do it again… let’s hope we don’t though. ;)
-Michael
Awesome, it was the transistor on mine checked with multimeter. I’ve seen some contradictory advice online re. BC847B vs BC847C. Some saying the higher gain on the BC847C is the better way to go on the 1515+. Any advice before I purchase transistor?
Sam,
I can’t comment on the BC847C as I haven’t tried it. I can say that the NAS has been in service 24/7 for nearly a year without a single issue thus far using the BC847B.
If you do try the BC847C transistor, I’d love to hear your feedback after you’ve had time to run it for a while.
-Michael
thanks, bought in both. Likely to stick to the “B” has does have more feedback.
Any tips on how to solder such a small transistor? Got a regular soldering iron.
Sam,
Unless you have a very fine tip soldering iron, I think you’re going to have some trouble getting it removed. At leats I did. I ended up using a hot air rework station with a fine tip, like this one – https://amzn.to/3zApAlZ. It made removing and adding the new transistor SOOO much easier.
-Michael
Thanks, I’ll likely get a pro to do it for me.
Frustrating night!!!
So bought this transistor (I think), got a pro to solder it in place however unit still doesn’t start up. When use the multi-meter and put the leads on the center and bottom pins (with replacement transistor) unit fires up like it did with old transistor.
Could it be that purchased transistor is the wrong one, purchased from here locally in Australia: BC847B-G
https://www.ebay.com.au/itm/362723078389
Sam,
I would think it’s one of two things, the transistor is either not the correct type or incorrectly installed. The one you linked to shows it’s model as a “BC847B-G”, which is different from the one I linked to and used in the Synology I repaired. I have extra transistors, I could send you one if you’d like?
-Michael
Just to add, I put in new battery also + motherboard previously had resistor fix performed whilst under warranty.
Hi Mike – thanks for assistance.
Checking sources online it’s not clear if the BC847B-G is different to the BC847B. In fact on this page there’s someone who’s indicated they used the BC847B-G on their synology fix and worked fine.
https://community.synology.com/enu/forum/1/post/131830?page=1&reply=448864
Doubt it was install incorrectly and this guy is a motherboard pro and install was very clean.
Well, if you find the root cause, I’d love to hear what the issue was.
-Michael
OK lucked in!
Local electronics shop had the BC847C (didn’t have BC847B) transistors (no “-G” designation on stock). Took it back to technician to soldered these in and it fired up straight after. Now can enjoy Plex again with family tonight.
Thanks for providing a great community service Mike!
I did the B847B transistor fix and replaced the battery and this worked for some months but now 1515+ won’t power on again. Will adding the 100ohm resistor fix bring it back to life again?
Paul,
I don’t think anyone could tell you with any real certainty, but it’s worth a shot.
-Michael
So I have all the fixes installed, and it still shuts down every few weeks, managed to revive it by bridging the transistor which have had replaced twice.
Should I just short the transistor and suffer with it always being on?
Hello Mike,
I was given a 1515+ which has flashing power (blue) and alert (amber) lights. After doing a little reading it appears as though my issue may be the same. Not sure though. But for $15 in parts, I am going to try it out. Thank you for the post, and what would you say about this?
Todd,
It certainly sounds like you too could benefit from the fixes. Please let me know if they do fix the NAS or not.
-Michael
Thanks for the article and fixes.
Currently tried the multimeter bridge and noticed it powered up (briefly didn’t hold for long) so decided to solder a link from the centre and bottom pin where the Q2 transistor is to get a more solid power up before I purchase any of the other items as this NAS has had issues before (already RMA’d to get the C2000 issue fixed)
Im curious to know if this would be an issue having a temporary wire bridge in place (I didn’t remove the transistor yet)?
– A video I saw explained it would render the power button non functional and be on all the time which is fine for now its always on anyway.
However in longer testing the NAS just sits with a flashing blue LED power light (no drives installed) which lead me to believe after further reading online I suspect it could be a corrupt bios or motherboard perhaps.
I guess I’m trying to ask if its worth me replacing the transistor and battery etc to see if it would fix the issue – Im basically trying to assess if the bridge wire/multimeter method didn’t initiate a full boot and beep sound in testing then the issue lies elsewhere?
Thanks.
I just wanted to say thank you so much for this.
I already had one of the warrantied 1515+ boards as my original failed, so the resistor was already present.
Anyway I replaced the transistor and the battery and it powered on immediately.
All 4 nics in the LACP interface are working correctly again too.
You’re the man.
Mike,
Thanks for the comment and I’m glad the article was able to help.
-Michael
Well I have done all 3 fixes and I still have issues with power off and not being able to power on. There is a guy selling a fix for $250 dollars if you send motherboard and power supply to him in USA, that is guaranteed to fix. Do you know anything about further fixes Mike?
Paul,
I’m not aware of any additional fixes. Is this person doing something to the motherboard or simply replacing the motherboard and power supply for you?
-Michael
Hi Mike
I managed to track down a further fix that comes from the Synology German forum. As I posted, I applied your 3 fixes and was still getting improper shutdowns and intermittent power on issues. The fix involves soldering a 4.7k Ohm resistor next to the replaced transistor. I had this done 3 days ago and I haven’t had a problem since.
Don’t know if I can past links here but happy to supply links and images if you like? Cheers Paul
Hello Paul,
Thanks for your suggestion about using the 4.7k ohm resistor next to the transistor. I’d like to give it a shot so I don’t have to continually replace the transistor, but I am having trouble understanding where the resistor should go based on your instructions. Below is a picture of my board so you can see what I mean. Do you know which pads to connect my resistor to?
https://imgur.com/a/BRmQbWc
Elizabeth,
You would add the transistor to this location – https://i.imgur.com/EerwU4z.jpg
Hope this helps!
-Michael
Mike,
My NAS DS1515+ (bought dec 2018) just stopped en indeed no leds are burning.
I removed the drives , inserted the power cord again, pressed the power button, no result, not one light.
I repeated this with the cover removed, the same result and alsoo
the little fan of the PSU was not turning at all.
Soo first I have to find out the condition of the PSU. I assume I must do some measurement on the +V side to be sure.
I have hope that I can figure it out till he works again.
Thanks
Bartel,
Try the fixed mentioned above and you’ll probably be good to go once again.
Good luck!
-Michael
Great post! Your instructions saved my 1515+. Turned out to be a bad transistor. Thank you for sharing.
I have had to replace mine 4 times already. Do you know if there is something else I am needing to check out that could be blowing this transistor??
Hello Mike,
I fixed the NAS in April this year and then it went down again a couple of weeks ago. I then replaced the transistor again and it started to power on and then suddenly it went dead again. It was blown again. Is there something else I need to look at to see if I can get it back online again? I tried the 4.7K resistor across Q2 Base to Q1 emitter and it will power on but the power light will flash blue indefinitely. I had recently uploaded a ton of data that I don’t have anywhere else and need it to power on and be available so I can copy it all off. Going to try using an ATX power supply to power the main board to see if it will come online again but could use some direction on where to look to figure this out.
Hi John
Here is where you should solder the 4k resistor adjacent to the transistor:
https://imgur.io/x9gOjVc
Cheers
I have done this and my NAS has been running without an issue for 3 weeks.
Paul
Hi John,
I seem to have the exact same symptoms as you:
the NAS would start when powered on (fans are running correctly), but the blue light keeps blinking indefinitely. And nothing else happens.
Have you manage to fix your issue? And if you did, how?
Thanks in advance.
BR
Hi John,
I seem to have the same issue as you did:
the NAS is powering up when switched on (fans are running) but it won’t finish booting. The blue light keeps blinking indefinitely and nothing else happens.
Have you managed to sort it out? And if so, how?
Thanks in advance.
BR
Hey Mike – It WORKED! But not the very first time I replaced the transistor. Guess I’m smart enough to have guessed that, despite factory-class soldering skills (hahaha), I likely fried the first transistor I replaced. Took it all apart again and tried a second transistor. BINGO! Up and running. Share this because I suspect that many of us would find working in that very small space (even with a pencil tip and low wattage iron) a bit challenging. But, hey, I could only buy the transistors in a pack of 100. ;-) ;-) Ready for the future!!! BTW, I’d appreciate your sharing your contact information on my email (which I assume you have even if it doesn’t post). May have some VMWare questions for you, as well. Thanks again! Jim
Adding another data point:
My 1515+ showed no signs of life after a power outage (7+ days in NorCal – welcome to 2023!).
*Put the meter across the two pins as shown in photo#1 and it powered up. *Took the meter away and it kept right on going (My understanding was that power would be interrupted when I removed the leads).
*Everything booted up properly and seemed good to go.
*I thought maybe the power button itself had failed, so I shutdown the unit and pressed the physical power button – the 1515+ booted right up.
*I’ll go ahead and replace the battery, but I remain a little confused as to what the problem was.
Thanks for your great description and photos, Mike.
Keith,
You’re most welcome. Glad to be able to help!
-Michael
This was extremely useful. Thanks a lot. Just tested out a friends NAS and it seems like the transistor is the culprit. Just ordered a new one and replaced the resistor in the meantime.
Linus,
Glad to hear it was useful for you. It’s always good to hear that one less NAS is going in the trash.
-Michael
Hi Mike, I’ve got this exact problem, UGH.
It would be super helpful if you could elaborate on exactly how to remove and replace the transistor and resistor. I’ve looked online and I haven’t found anything that really explains in detail how this process it done.
Also, I was wondering if you could sell me a few transistors ;-)
Many thanks for such a GREAT article!
– Rob
Rob,
Using a heat gun like this, https://amzn.to/3nNRhm7, makes removing the transistor a breeze as it’s just held in place by solder. You simply need to loosen the solder and the transistor comes right off.
I have TONS of transistors, you don’t need to buy one I’d be happy to send you some if you’d like.
-Michael
Mike,
I have a Synology DS1515+. After a power outage, it would not power on.
I found your blog and followed your instructions. I already had the resistor fix, so I just replaced the transistor and the battery. My soldering is not the greatest, but the system came up and is working again.
To be on the safe side, I purchased a UPS so the NAS can power down gracefully from here forward when the power goes out.
In all, the fix was about $7.00 (for 100 transistors) and some patience (versus $700.00 for a new NAS).
I can’t think you enough for this post. I feel I owe you a beer or a cup of coffee.
– Michael
Michael,
This is great to hear. Glad this post was able to help you save some money and prevent another NAS from going to the dump.
-Michael
Many thanks for this Mike. It’s this sort of information that proves the internet works. That and you have taken the time to share your knowledge. Clear, concise and works. Nice work!
Chris,
Thanks for the comment. I hope this has helped you.
-Michael
Hi Mike,
Thanks, very impressive article indeed. I have the same problem on my DS1019+: no powerup, the damn thing is as good as dead. But it looks like the motherboards are quite different. And also you find a lot of posts about this problem affecting DSx15 but nothing on DSx19. What would be your thoughts on this ? Thanks a million.
W.
Walfroy,
That’s a great question. Unfortunately I don’t have any experience with the DS1019+. Nor have I seen many comments about this model having the same issue. Sorry for not being much help on this one.
-Michael
Hello Mike, thanks for the post. I replaced the transistor and added the 100 ohms resistor and my DS1515+ is back in service. Did you use a BC847B transistor for the fix because that’s what was originally installed in your unit? I’m asking because mine had a “1AM” marking and according to my research it is an OnSemi MMBT3904L NPN transistor. My unit was purchased in 2017.
Christian,
Yes sir. I used the B847B transistor because that what was on the board. So far, things are still running strong.
-Michael
Many thanks for this. The transistor fix worked for my 1515+. Man those are small parts!
Glad to help Mick. Enjoy!
Today, my DS1515+ failed to power on and I found your guide and it turned out that particular transistor was faulty. Thanks to you I fixed my NAS in 15 min. Cheers!
Octavian,
That’s great news! Glad I could help.
-Michael
Hi Mike, what a great howto! It really helped to fix my DS1515+.
In the first place, my DS suffered from unforeseen, power offs & ons – multiple times a day. I was later, that I realized the issue you were focusing on (“not able to turn on”) applies for my DS too.
So again, replacing the transistor fixed both symptoms.
Thanks!
Regards,
Andres
Andres,
You’re most welcome. Glad to have helped.
-Michael
Many thanks. My first DS1515+ was replaced under warranty, but now the second one has died also. I wasn’t looking forward to the $800 bill to replace it. I found your guide and confirmed it was the transistor, so I spent $12 and crossed my fingers (I bought the battery also, but my unit already had a resistor installed). About 15 minutes of work and the machine booted up perfectly.
It seems this problem affects every DS model eventually. I’m amazed Synology hasn’t faced more criticism over this issue.
Michael,
Glad to help. Hoping your DS1515+ will last many more years for you!
-Michael
Hi Mike,
Great article! I am in the same boat with my DS1515+. Any chance you can put some instructions on how to test the PSU? Thanks!
Faisal,
You can use a multi-meter to test the power supply, or you could also use a power supply tester like this one (https://amzn.to/3nfQqNF) to test your power supply.
While I’ve heard of power supplies in the units dying, it doesn’t appear to be as a common issue as the items mentioned above.
-Michael
Thanks! The PSU looks fine. Mine didn’t boot up when I tested the transistor using my multimeter but I will go ahead and replace the transistor anyway and see if that helps. Given the alternative is to get a new NAS, I don’t have anything to loose to try it out :-). I will let you know how it goes. This is such a well-written article. Thanks again for posting this.
You saved my day! :) thank you!
My 1515+ came back from the dead :D
Alberto,
Well, you just made my day! So happy to hear another 1515+ was brought back to life.
-Michael
Hi Mike,
Thanks for the article! I had this problem with my 1515+ and I followed your guide to fix it (I got someone else to do the soldering and those bits). It worked for about 24 hours then turned itself off and now won’t turn back on.
When I had the problem before, nothing happened when you pressed the power button. Now, after the transistor replacement and it’s second failure, the power button flashes blue for a few seconds and it starts booting up and then stops and nothing else happens. So it seems it’s still getting some power. If I leave it for a little while, the light stays on longer on the first press and less and less time if I press it again after it stops, until it doesn’t light up at all.
Do you think it’s still the same issue and the new transistor is already blown or something like that, or might it be something else?
Thanks!
Tony,
My first suggestion is to do all three fixes listed in the post if you haven’t already. The second suggestion, while not as common as the three listed above, would be to replace the power supply. If none of those steps work then it sounds like you have something much more going on and in that case you might want to look else where or at newer units.
Hope this helps.
-Michael
Hi Mike!
Thanks a lot for publishing your work!
I exchanged the broken transistor for a new BC847B transistor and in addition i installed 2 new NF-A8 FLX fans and the device works like a charm again.
Thanks!
Marc
Marc,
So glad to hear another NAS has been brought from the dead. How do you like the NF-A8 fans?
-Michael
The NF-A8 FLX are much more silent than the stock fans. The DS1515+ is locatd close besides my desk, so it’s a win that it’s more quiet now.
BTW the serial of my DS1515+ starts with 18 which means the production year is 2018. I had a RMA in 2018. It’s said that since Feb. 2017 Synology used a updated version of the Atom C2000 (without the bug). However the transistor still can get broken…
Greetings, Marc
Marc,
Sounds like a good upgrade indeed. I’ve always had good luck with Noctua fans myself.
Speaking of past fixes – I’ve heard of some of these NAS’s already having the resistor fixes only to have the resistor go bad and needing replaced. While I haven’t seen that first hand, it’s a possibility.
-Michael
Hi Mike,
I have that ds1515+ unit as well.
A few years I had those symptoms:
the NAS would randomly shut down. It was still warrantied so Synology fixed it themselves. I don’t know exactly what they did.
Today I have different symptoms:
the NAS won’t finish booting. And by that I mean that it powers on when switched on, the fans are correctly running, but the blue led keeps flashing (blinking). Normally it should stay on and then turn green when the booting is complete. There is NO other light (red/orange), only this blue flashing one.
I feel those 3 fixes you point out are for when the NAS receives no power. Or maybe I’m wrong and I should process with those?
Among all the comments above the second one from John Summers seems to be exactly what I’m getting. He did the fixes but I can’t say if he managed to get out of this situation.
Thanks in advance.
BR
Hi Mike (and everyone else)!
kudos to mike, thank you very much for sharing your knowledge about repairing this type of nas!
i came to the forum both for saying thanks and asking for advice, regarding an other issue i encountered and ran out of idea what to do further.
the issue is: none of the fans are rotating (ds1515+)
history: i did only the repairs listed here. after repair the nas finally turned back on smooth as never before. got beep alarm (expected because of the battery swap). Reinstalled the dsm, then found out none of the fans are rotating. i checked both fans unplugged from the nas and attached to a 9v battery, they work. i can also meassure voltage between +- pins of each fan on the motherboard.
could anyone suggest me what to look into further, please?
thanks in advance.
-Aki
Mike,
Thanks for this thorough and helpful guide. It’s the first result on Google for “DS1515+ won’t power on” and similar – and it’s definitely deserved!
I ended up using a BC547B instead of the BC847B simply because I couldn’t easily obtain the SMD version – and from my research, those two transistors are virtually identical. The only challenge with the 547 was bending the pins into position, but once you manage to do that it’s fairly trivial to solder it on.
Anyway, I’m happy to report that the thing boots just fine now. I’m hoping this fix will keep it going for another 5+ years like it did before it died.
One question for you: I saw that you recommended installing a resistor alongside the transistor (not the 100 ohm Intel fix, but another one to prevent the transistor from dying repeatedly). I didn’t do this – do you recommend doing it anyway? This NAS is not on constantly – it turns on once a week to be available for backups and then shuts down. I’m wondering if the repeated power on/power off cycles might cause an issue.
Thanks!
Renn,
I would, if for nothing else, the NAS is already taken apart. Plus the fix only takes a few minutes to complete and incredibly cheap to do. Otherwise, if you have the NAS back together again then you could always wait until the fix is needed.
Thanks,
-Michael
Thank You, Thank You, Thank You, Thank You. Never did this kind of work before, don’t really have any electrical knowledge, but with you concise directions and links to needed parts it worked just fine. Saved me the cost of purchasing a new NAS box and got some new tools out of the experience.
Jim,
You’re most welcome. Glad to have helped.
-Michael
Very good repair tutorial. One thing I would change as a technician, don’t put the new battery in until all the soldering is done. Lowers the risk of accidental shorts. Thanks for all your hard work.
Thanks a lot for your thorough desecription on How to fix this issue.
I’m on my way to get the parts now. Looking forward to make the repair myself.
You’re most welcome Claus! Be sure to let us know how it goes!
-Michael
Mike,
Great article. Thanks. I tried to repair the FOURTH unit to fail in succession (same way) over 5 years. Synology would not reflace this fourth unit – beyond warranty period they say!
For the benefit of others who may attempt this, the transistor replacement ain’t for the faint hearted (even with fine professional soldering station and magnifier). In my case I failed. These are surface mount boards and one really needs SMT gear to replace. In my case one of the transistor pads lifted off which rendered the board unrepairable. Your instructions did however merit a gallant attempt! So off to purchase a new NAS.
Hi Mark, excellent problem description and tutorial, I just went through it and did the transistor replacement and battery replacement on my DS1515+, the resistor was already in place. It still won’t boot up if I press the power button, but if I HOLD the power button, it boots, everything spins up, and though I have no LEDs it almost seems to be working. Is there something I might have missed off the top of your head or should I maybe try replacing the resistor? Thanks for all of the detail here, even if I’m out of luck, it was worth a shot for $13 in parts and the experience of trying.
Shaun,
If it were me, I would try replacing the resistor.
-Michael
Excellent directional coverage. I’ve replaced my transistor 8 months ago and last week it was DOA.
This time I first tried just the transistor, and the replacement failed after 3 attempted power cycles.
So this time I did all 5 repairs;
1) battery
2) 4K resister
3) 100K Atom fix
4) battery change
5) transistor
My battery was showing .5v, definitely needed replacing.
It’s been up and running for a few days now. I’ll keep an eye on it and report back.
Nick,
Thanks for the comment. My NAS is still running strong after all this time. I hope the same goes for yours after the fixes!
-Michael
I am usually not leaving reviews, but this guide hit the nail on the top. My version already had the 100Ohm resistor installed, but the transistor pointed out in the guide was exactly the fault on my Synology NAS as well.
Thank you very much.
I have just replaced transistor Q2 (BC547B), and in the same time replaced the battery (as a preventive measure)… and my DS1515+ has come back to life!
Simply fantastic…
Many thanks !
Hey Mike,
Great helpful post, I’m in the process of repairing my 1515+ with the info here.
I was wondering if you could expand on how you tested the transistor on the motherboard with power. I’m new to this and all the other “how to” elsewhere, describe taking the transistor off the board. I want to try your method but without blowing up my multimeter!
Thanks, Steve
Just wanted to post another thanks to you Mike for this fix. I had an iosafe 1519+ (Fire/Waterproof DS1519+) that would not power on. I bought a replacement PS before I saw your fix here and the new PS would power it on for 10 seconds then shut off. The strange thing is once the new PS got connected, the old PS would work. for a short while..
Long story short, your 3 fixes have it up and running with the old PS!.. Thanks again!
For once the Internet proved useful.
Thank you for taking the time to detail this repair!
Mine (1515+) packed up……..or so I thought, for months. Symptoms, power button won’t turn it on. No sign of life. Fans not turning. I assumed the worse. Started searching the internet and one common theme: the chip mentioned here, the battery and the resistor thing. As in, every single forum. Found this excellent fix tutorial, proceeded to purchase everything mentioned. I should mention that all this while, strangely, the Ethernet ports still had the green light, showing this was not a power issue. Anyway, I decided to apply the fix on this tutorial. First though, I did a thorough clean (was full of dust). I randomly pressed the on button and lo and behold, it turned on. Thought it was a glitch. Put back all the drives, tried to turn it on again and after the third time, purred into life. Everything working perfectly, like nothing was wrong in the first place! 2 weeks later, still working fine. I still have the parts though and ready to fix it when the inevitable happens. Thanks for this tutorial…..made me to get started in the first place.
Just wanted to say thank you. I followed the steps above and my DS1515+ is back to life again!
Fantastic writeup! Purchased my unit in 2014, DS1515+. Had no issues until this weekend. I experianced the endless flashing powerlight and amber status lights with occasional powercycle but no bootup. I replaced the cmos battery and added the 100 ohm resistor as my unit was the original non warrantied and didnt have one. These two alone worked like a charm, I didn’t test the original battery voltage but, but figured I should just replace as it has been in service for 11 years. I did however test the resistor after soldering in place. I believe I encountered the Atom 2000 bug. Purchased resistor and transistor on amazon for $14 USD. Access to the data stored here is priceless.
Joe,
Thanks for the kind words and I’m glad this was of some use to you!
-Michael