How to fix VMware Converter error “FAILED: The VSS snapshots cannot be stored”

While moving some VM’s from Hyper-V to VMware using VMware Converter a VM failed to convert with the error: FAILED: The VSS snapshots cannot be stored.

FAILED: The VSS snapshots cannot be stored because there is not enough space on the source volumes or because the source machine does not have any NTFS volumes. Error code: 2147754783 (0x8004231F).

Come to find out the System Reserved partition was full. Our soon to be retired Appassure backup application was nice enough to fill up the volume.

Luckily Appassure is being replaced by Veeam and fixing the above VMware Converter error is an easy fix.

Steps on how-to fix VMware Converter “FAILED: The VSS snapshots cannot be stored” error message

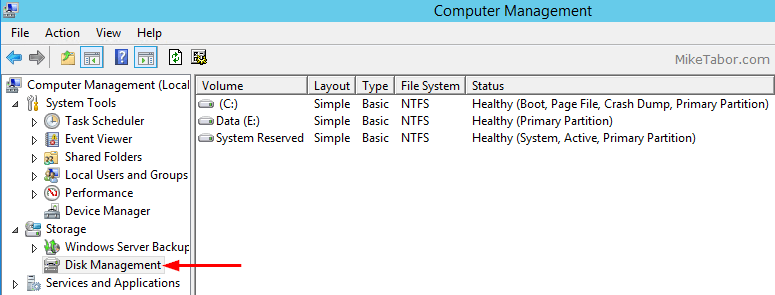
  1. Open Computer Management by pressing Windows Key+R and typing in compmgmt.msc, then go to Disk Management.
    computer management
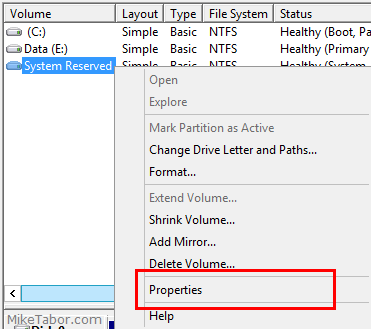
  2. Right click on the System Reserved partition and select Properties.
    system reserved properties
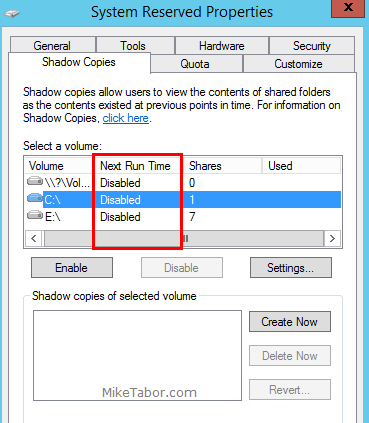
  3. Then click on the Shadow Copies tab and ensure Shadow Copies are disabled for each volume and then close the Properties window.
    system reserved shadow copies
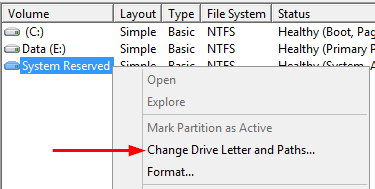
  4. Again, right click on the System Reserved partition and then select “Change Drive Letter and Path…” and assign the partition a drive letter (I’ll be using letter Z).
    system reserved drive letter
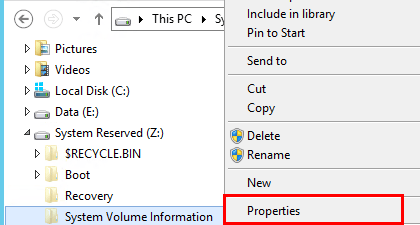
  5. Next open the Z: drive in File Explorer and right click on System Volume Information folder and select Properties.
    system reserved z drive
  6. In the System Volume Information Properties window, click on the Security tab then click on Advanced to open the Advanced Security Setting dialog box.
    system volume information advanced
  7. Now add the Everyone group Full control to the folder, subfolders and files.
    advanced security settings
  8. Right click on Start Menu icon and select Command Prompt (Admin) to open a Command Prompt as Administrator.
    command prompt as admin
  9. Now type in the following commands:
    
    Z:
    fltmc unload aafsflt
    cd "System Volume Information"
    del aalog_*
    cd ..
    fltmc load aafsflt
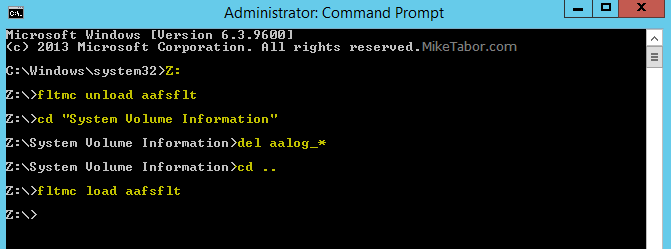
    

    delete logs commands
    Then exit the command prompt.

  10. Finally be sure to remove the Everyone access from the System Volume Information folder (steps 6 & 7) and remove the drive letter (step 4).

Now re-run your VMware Converter task again and the migration should work without issue!

Similar Posts

  • How to install VMware Workstation 10 on Linux Mint 17.1

    vmware workstation 10 linux mint

    Two goals that I would like to achieve this year is to learn how to program (likely Python) as well as learn more about Linux. So last week I completely wiped my HP laptop that used to run Windows 7 Pro and installed Linux Mint 17.1. However, I had a nested ESXi lab within VMware Workstation when I was running Windows and wanted to do the same on my new Linux install.

    I found this wasn’t just as simple as downloading an .exe and running the file, like it is in Windows. There are a few dependiences that are needed first, below is the steps I took to install VMware Workstation 10 on Linux Mint 17.1.

    Read More “How to install VMware Workstation 10 on Linux Mint 17.1”

  • VMware Workstation 12 Pro Released

    VMware has just released a new version of Workstation in VMware Workstation 12 Pro. Workstation 12 Pro provides full support for Windows 10, including features such as Cortana and universal applications. As well as even larger virtual machines with up to 16 vCPU’s and 64GB of memory. Workstation 12 Pro even supports 4K displays and DirectX 10 and OpenGL 3.3

    You can even seamlessly drag and drop virtual machines between your PC and your internal cloud running vSphere, ESXi or another instance of Workstation. In addition, easily connect to vCloud Air and upload, run, and view virtual machines right from the Workstation 12 Pro interface.

    Read More “VMware Workstation 12 Pro Released”

  • Thank you VMware Community!

    VMware vExpert 2014

    So far, 2014 has been a very rewarding year for a number of reasons, two of which has happened in just a week or two span. First, Eric Siebert (@ericsiebert) announced on March 27th, this years results of the 2014 Top VMware & Virtualization Blog voting. My first year entered into voting and made it to 71st place! A huge thanks goes out to not only Eric but just as much so to everyone who voted for me!

    To top it off, yesterday VMware announced 2014’s first quarter VMware vExpert list. While vExpert isn’t a technical certification or even a general measure of VMware expertise. The VMware judges selected people who were engaged with their community and who had developed a substantial personal platform of influence in those communities. There were a lot of very smart, very accomplished people, even VCDXs, that weren’t named as vExpert this year. VMware awarded this title to 754 people this year and on that list of many impressive names you’ll find yours truly, Michael Tabor!

    I’m both honored and humbled by both lists. It’s a great feeling to be recognized by not only my peers through the voting in the Top vBlog but also by VMware themselves through the vExpert title.

    So again THANK YOU very much to the entire VMware community, a spectacular community indeed, and congratulations to everyone else that made the Top vBlog and vExpert lists!

  • VMware P2V Permission to perform this operation was denied fix

    Just the other day we had a Windows Server 2008 R2 Standard physical server that needed to be P2V’ed, and after trying to use VMware Converter Standalone 6.1.1 we ran into the error message “Permission to perform this operation was denied” after entering the source machine details.

    vmware p2v permission denied

    Even after trying to start VMware Converter as “Run as administrator” the error persisted. Below is the workaround we performed to quickly allow us to P2V the physical server.

    Read More “VMware P2V Permission to perform this operation was denied fix”

  • How to easily add an ESXi SSH login message banner

    ESXi issues message

    Preparing for some upcoming audits, I noticed one of the checkpoints was to ensure each ESXi host was configured with a warning banner stating the machine is being monitored and audited when someone logs into the ESXi host via SSH. This type of message is something you see on most any company or government computer before you login.

    There are two message types that can be used to achieve this, the first being login banner (/etc/issue) and MOTD (/etc/motd). The difference between the two are where they are shown. The login banner is shown between the username and password inputs during login, while the MOTD is displayed after a user has successfully logged into SSH.

    Read More “How to easily add an ESXi SSH login message banner”

  • VMware VCP exam coupons, save 50%!

    VMware

    Current VCPs save 25% off any VCP exam

    All current VMware Certified Professionals can save 25% on exams taken before January 1st, 2015 on the following VCP exams:

    VMware Certified Professional 5 – Data Center Virtualization

    • Exam Code: VCP550
    • Exam Code: VCP510

    VMware Certified Professional 5 – Desktop

    • Exam code: VCP510-DT
    • Exam code: VCPD510

    VMware Certified Professional – Cloud

    • Exam Code: VCPC550
    • Exam Code: VCPC510
    • Exam Code: VCPVCD510

    VMware Certified Professional – Network Virtualization

    • Exam Code: VCPN610

    Read More “VMware VCP exam coupons, save 50%!”

Leave a Reply

Your email address will not be published. Required fields are marked *

2 Comments

  1. I resolved this issue another way. I assigned a drive letter to the recovery partition in preparation to remove suspected journal files, however that was not the problem. Opening the drive letter for the recovery partition revealed an installation of Kaspersky anti-virus taking up 73 mb. Removed that , removed the drive letter and I no longer get the Vss shadow copy error. I would recommend people assign a drive letter and see if they see data on the recovery drive which should not be there. Do not delete stuff if you do not know what it is for, such as any files with the word “boot” in them. Also, if you see only a few files which do not add up to 100 mb, google for how to remove journal files. That might be the problem.

  2. If you cannot acces to the system reserved you can open this partition by linux mint live cd. when I opened partition and I delete all recovery folder ( becouse I don’t need this folder. I made backup by acronis wd). after this operation I have 400 MB free space and I can convert machine now. Best regards. Pawel from Poland