How to install Centmin Mod with Let’s Encrypt and CloudFlare
I run several web servers for the many sites I own, like MikeTabor.com or for the sites I help run, such as LexVMUG.com. In the past these servers have always ran a traditional LAMP (Linux, Apache, MySQL/MariaDB, PHP) either installed manually or through WHM/cPanel.
For my last couple projects I’ve been using Centmin Mod instead. Centmin Mod has several benefits, the first being it installs a LEMP stack (Linux, NGINX, MySQL/MariaDB, PHP), then optimizes the installs, and secures the server. Even on the smallest of servers the LEMP stack has been amazing and FAST!
In this article I’ll be detailing how to setup a WordPress blog on a Linode VPS server using Centmin Mod to do the LEMP and WordPress auto install. Let’s Encrypt for FREE SSL certs as all sites should be using HTTPS. Then finally CloudFlare for their free CDN network, DDoS and other security protection.
Note: While I use and recommend Linode, you could also use AWS, UpCloud, Vultr, DigitalOcean or any other provider of your choice.
Prerequisites:
- Your own domain. I recommend using NameSilo or Namecheap.
- Server with CentOS 7 installed. I will be using a Linode VPS for this demo.
- Domain name servers already pointing to your server/VPS provider.
Setup CloudFlare
We’re going to start with CloudFlare first because DNS can take some time to update. So lets get that clock started now!
- Log into CloudFlare (or register, it’s Free!)
- Click on “+Add Site” and type in your domain name and click on Begin Scan, once that finishes click on Continue.

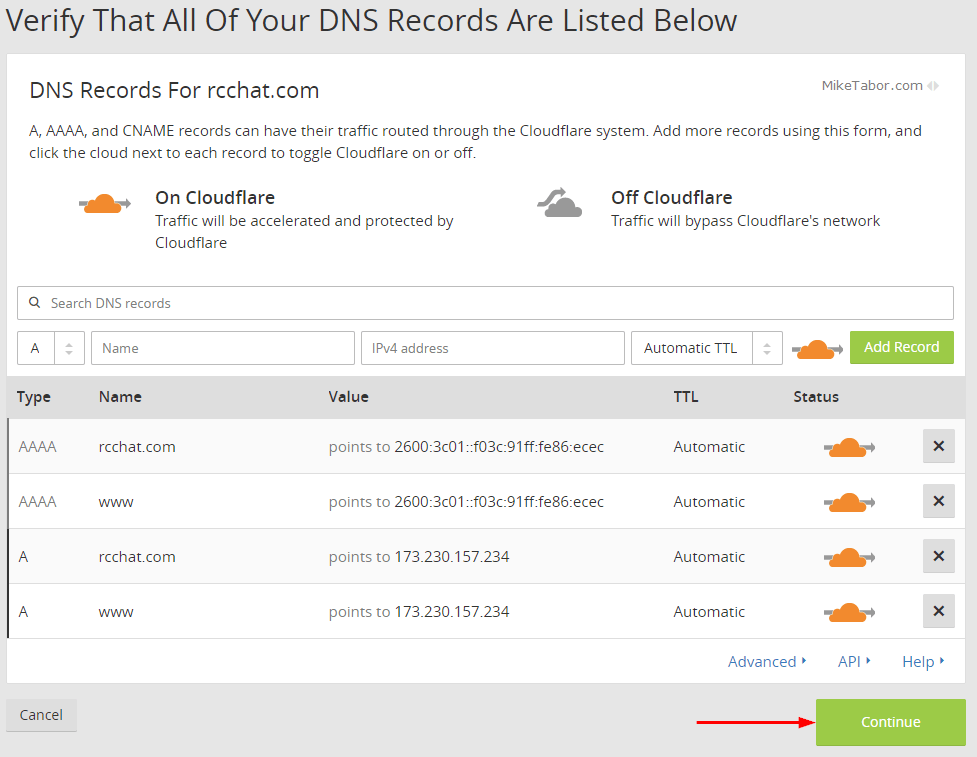
- Confirm the DNS records CloudFlare found are correct click on Continue.
- Now select the FREE plan and click on Continue.
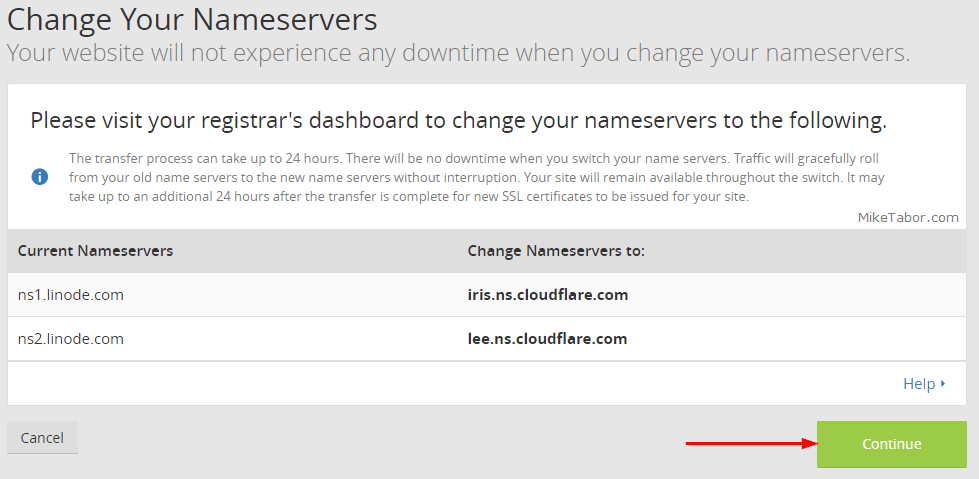
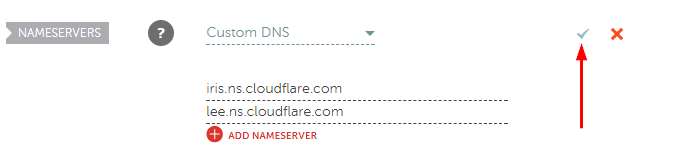
- Next CloudFlare will give you new nameservers to point your domain. Log into your domain registrar and change them to the ones provided by CloudFlare, then click on Continue.
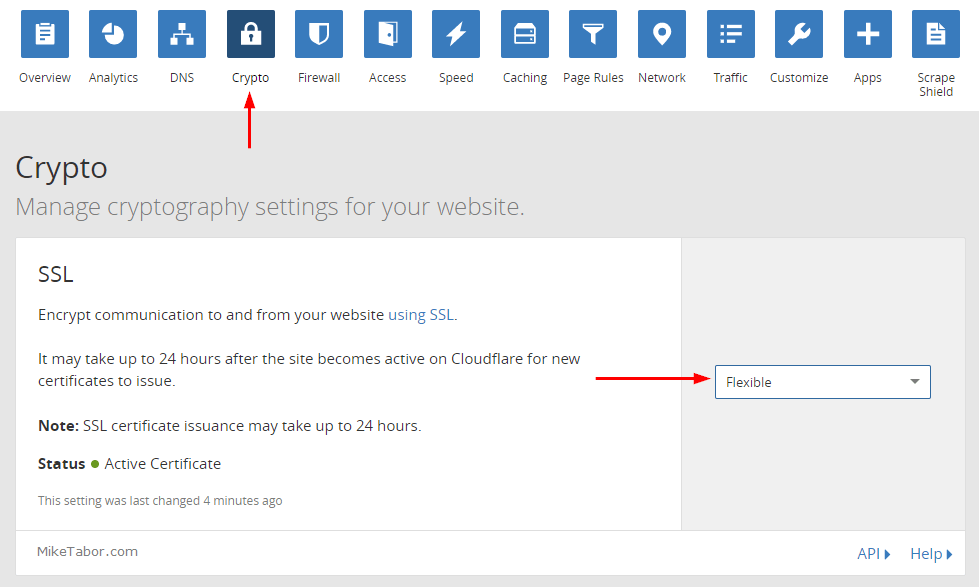
- Click on Crypto then change the SSL dropdown to “Flexible“.
We are now done with CloudFlare for the moment. Lets get rolling on installing our LEMP stack!
Installing Centmin Mod
Now lets get our updated, secured, and optimized LEMP stack install going.
- First SSH into the CentOS 7 server using PuTTY (or any other SSH client/terminal). It’s also wise to enable logging in PuTTY as Centmin Mod will output a lot of info during the install.
- Now type the following command, which will first update CentOS, then download and run the CentMin Mod installer. This could take 20-30 minutes to complete.
yum -y update; curl -O https://centminmod.com/betainstaller.sh && chmod 0700 betainstaller.sh && bash betainstaller.sh - Now enable the use of Let’s Encrypt, for free SSL certs, by typing the following two lines:
touch /etc/centminmod/custom_config.inc
echo "LETSENCRYPT_DETECT='y'" >> /etc/centminmod/custom_config.inc
So at this point we have CloudFlare setup, our LEMP stack deployed and Let’s Encrypt enabled. Now lets add a VHOST and install WordPress.
Adding a VHOST and WordPress install using Centmin Mod
- Still in your SSH session type the following two lines to enter the Centmin Mod menu:
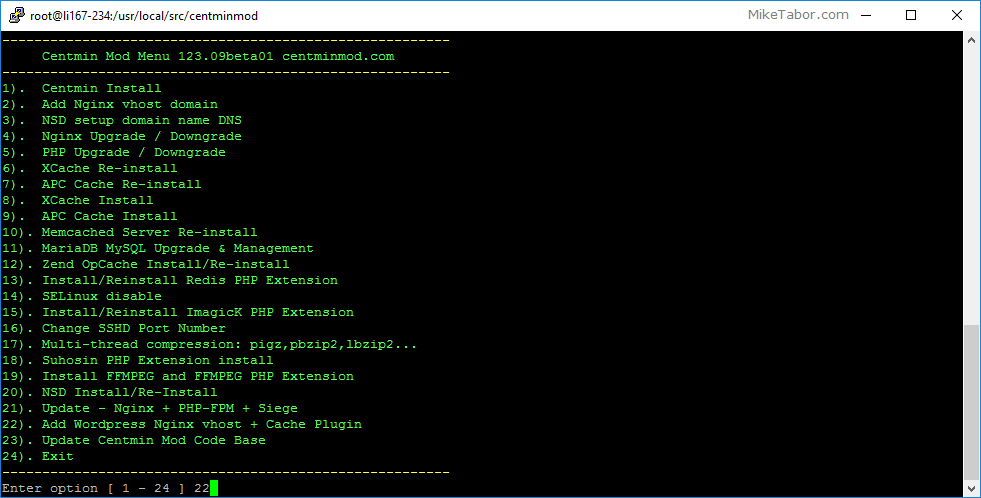
cd /usr/local/src/centminmod ./centmin.sh - At the Centmin Mod menu, type 22 to start the WordPress install. (If you want a blank vhost, without WordPress, setup then select option 2.
- Next Centmin Mod will soon present a few questions for you to answer:
Do you want to continue with Nginx vhost site createion: Y
Enter vhost domain name you want to add (without www. prefix): Type in your domain name
Create a self-signed SSL certificate Nginx vhost? Y
Get Letsencrypt SSL certificate Nginx vhost? Y
Cert issue type: 4 (issue live cert with HTTPS default (trusted)
Install CyberChimps Responsive Theme: N
Set custom WP Admin display name?: N
Install WordPress in subdirectory /blog?: N
Disable Auto Generated WP Admin Username / Password?: N (this will auto create an admin user/pass)
Disable wp-login.php password protection?: Y (For added security select N)
Enter email address for Admin User for WordPress Installation: Enter your email address
Select a WordPress Caching option: 3 - I'll install WordPress Super Cache
Create FTP username for vhost domain: Enter your desired username.
Do you want to auto generate FTP password?: Y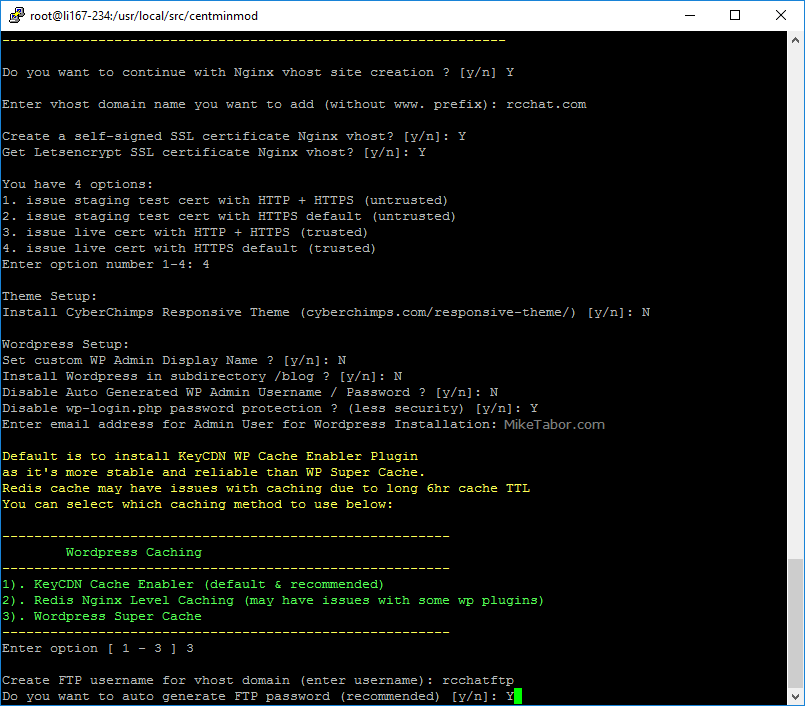
- After Centmin Mod configures a VHOST, installs WordPress and some plugins, it will prompt you that the Lets Encrypt acmetool.sh is in beta and asks to continue. Type Y and your Lets Encrypt SSL will be install.

- Once everything is done, Centmin Mod will output your FTP and WordPress Admin login and DB information. Then take you back to the Centmin Mod menu. Type 24 to exit Centmin Mod.
Finishing Up
We’ll finish up by setting the CloudFlare SSL settings to Full and create a few page rules and finally force the usage of WWW.
- Log back into CloudFlare.
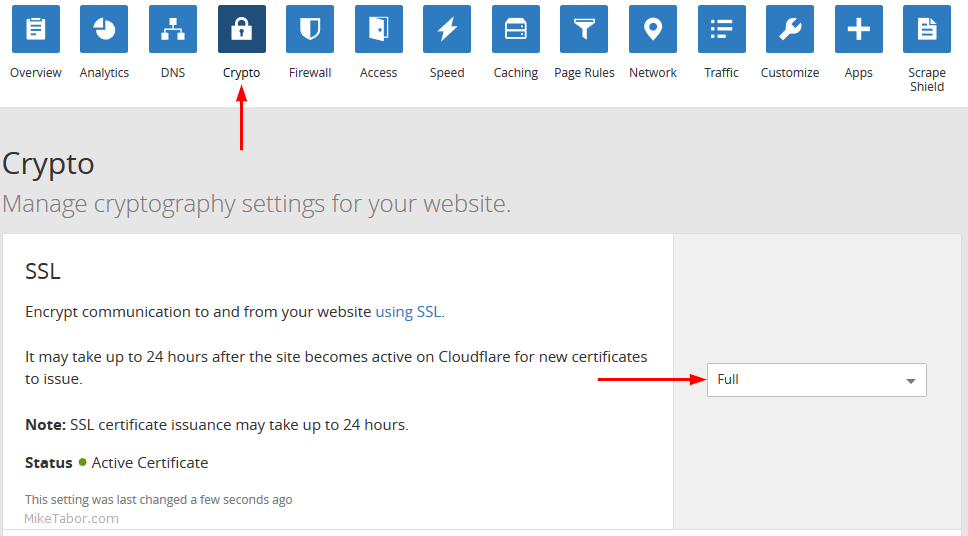
- Click on Crypto then change the SSL dropdown to “Full“.
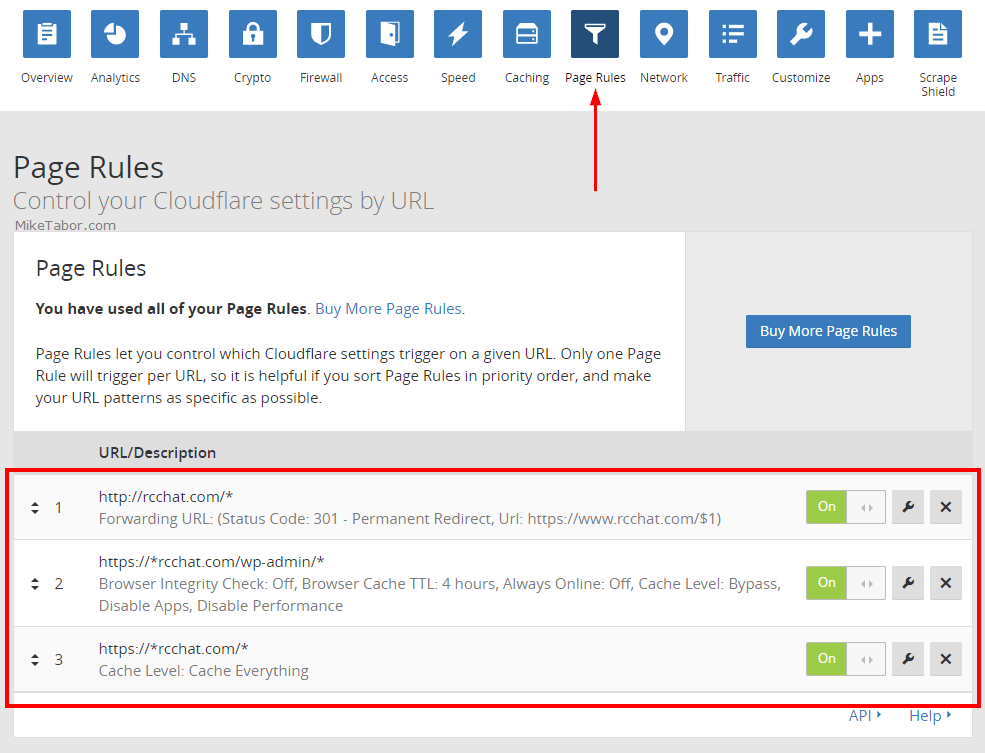
- Then click on Page Rules and create the three below page rules. Replace “rcchat” with your own domain name.
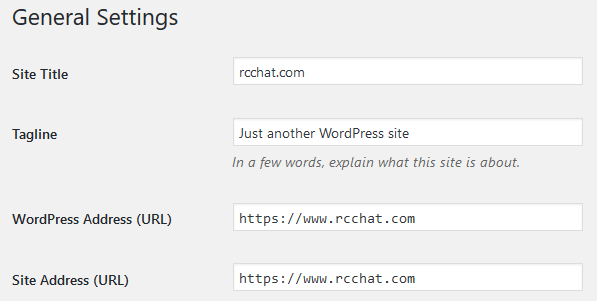
- Next log into your wordpress admin panel (https://yourdomain.com/wp-admin) and then to Settings > General and change the WordPress and Site Address URL by adding a “www”.
- Lastly, install the CloudFlare WordPress plugin.
Note: If would rather not use www then edit the first page rule redirect to: https://YOURDOMAIN.com/$1 and ignore step 4 in “Finishing Up”.
And with that you now have a fully updated and super FAST LEMP stack that’s not only been optimized, but also has the latest version of WordPress which is served via HTTPS – all in less than an hour!
This setup of course means you’re in charge of everything else going forward: updates, security patches and so on. If this isn’t something you’d rather mess with, then check out my Be social! How to start a blog post to see about getting start with BlueHost who will manage the server for you.
Otherwise, in my opinion, this is an ideal setup!

hello Mike I know its few years ago, but did you compare speed SlickStack script or you still believe its Centminmod is the way to go for WP servers…… cheers bro
Armin, I use Centminmod daily and yes I still highly recommend it. I’ve known George (the author of Centminmod) for many years now and I know he really knows his stuff. Centminmod does a great job configuring and optimizing the server on a per install basis as to be highly optimized for whatever server you’re deploying it on.
If you want something with a bit more of a GUI interface then I would also recommend checking out Runcloud.io (https://runcloud.io/r/O90WxM2MYqRD – my referral link). From my testing between the new stacks, Centminmod does a bit better in performance area where as Runcloud can be far easier to manage.
I have used a number of other stacks but the ones I have tried never really sold me or just didn’t perform in the same way Centminmod or Runcloud has for me. Slickstack looks promising but I haven’t tried it.
-Michael