Update vCenter Server Appliance from 6.5 to 6.5 Update 1

VMware just released VMware vCenter 6.5 Update 1 just last month, in case you’ve missed it check out the release notes as there are a lot of fixes, improvements and additions.

In this post we’ll see just how easy it is to update the VMware VCSA. Before you do any VMware update I’d highly recommend checking out the VMware Interoperability Matrices to check compatibility of other VMware products. Once you’ve done that, lets begin!

How to update VCSA to 6.5 Update 1

  1. Log into the VCSA VAMI by opening your browser and going to: https://FQDN-of-VCSA:5480 and entering your root credentials.
  2. Click on Update on the left side menu (A), and clicking on Check Updates (B) and then clicking on Check Repository (C).
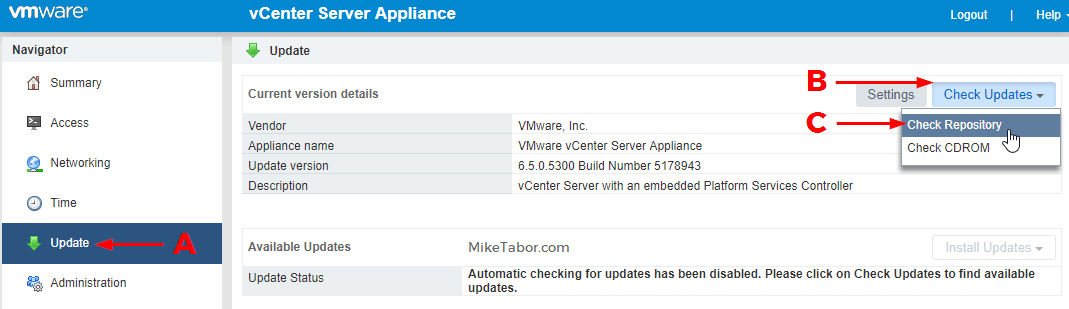
    Update VMware VCSA 6.5 to 6.5 u1
  3. From the Install Updates drop down menu select Install All Updates.
    Update VMware VCSA 6.5 to 6.5 Update 1 install updates
  4. Accept the EULA and click on Install.
  5. After a few minutes, VCSA 6.5 Update 1 should be installed. Click on OK.
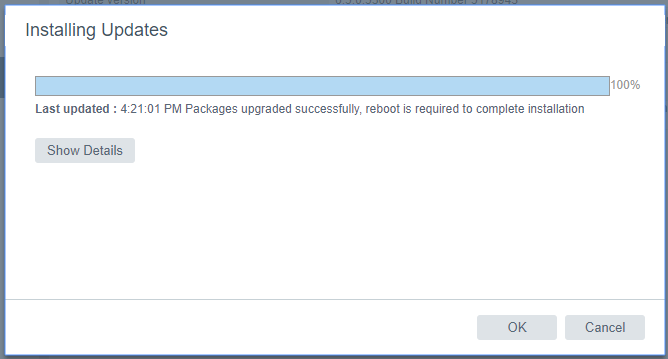
    Update VMware VCSA 6.5 to 6.5 u1 update complete
  6. Now go back to the Summary page and click on Reboot to complete the VMware vCenter Server Appliance update.

    Update VMware VCSA 6.5 to 6.5 update 1 update reboot

That’s it! Once the vCenter appliance has rebooted you’re all one and your VCSA build should read 6.5.0.10000 Build 5973321 (or better). VMware really can’t make updating the VCSA any easier than this!
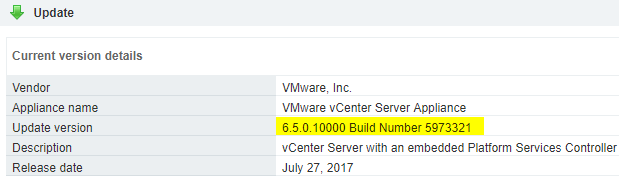
VMware VCSA Update to 6.5 Update 1 completed

Now that your VMware VCSA is running 6.5 U1, lets take a look at how to update VMware ESXi 6.5 to 6.5 Update 1.
Similar Posts

  • VMware View client now availabe for Android!

    VMware has announced that they have released a View Client for Android tablets available on the Android Market now. Here are just a few of the features found on the new client.

    • A new look and feel – The View Client for Android features the NEW blue look and feel of the VMware View clients!
    • Multiple broker support – If you have more than one VMware View broker in your organization, you can can easily access your desktop from all of them via the Android client
    • Desktop Shortcuts – Quickly connect with as many as four recent desktop via shortcuts
    • Virtual trackpad – Control your desktop on a granular level just like you would control the mouse on a laptop
    • Custom keyboard toolbar – Super easy access to all of the special keys not found on the Android default keynboard
    • Honeycomb 3.x support – Made from the ground up for the new generation of Android tablets
    • Custom gestures – Invoke keyboard, scrolling, etc are as easy as ever and simple to use
    • VMware View Security Server support (best experience) – No need to have VPN when you use VMware View Security Server
    • Background tasking – Switch between apps on your tablet and come right back
  • How to upgrade Synology DS1815+ to 16GB RAM

    Synology DS1815+ upgraded to 16GB

    Just last week I replaced my Synology DS412+ to with a Synology DS1815+, which has twice the drive bays with the addition of supporting two expansion units, a much more powerful CPU, and 2GB RAM out of the box.

    I’ve seen some people mention with very mixed results that both the Synology DS1515+ and Synology DS1815+ can be upgraded to 16GB of RAM, the biggest issue seems to be around what memory modules to use. So I figured I’d document how I upgraded my DS1815+ to 16GB RAM and what memory I used with success.

    Read More “How to upgrade Synology DS1815+ to 16GB RAM”

  • Increase incremental backup speed by enabling CBT

    In a recent VMware environment I was working in, we noticed that our incremental backups was taking a long time (like up to 7-8 hours) to complete. After digging around it was found that VMware actually has a feature built-in since version 4 called Change Block Tracking (CBT). CBT will track any blocks that were changed since the last backup and tag them and stores the information in a -CTK file. The obvious benefit is that now the third party software only backs up the changed block and not the entire VM each time, reducing the amount of data being backed thus speeding up backups and even lowers the CPU utilization on the VM host.

    CBT is disabled by default though there are some backup tools that will enable it automatically or you can enable it manually which can easily be done following these steps:

    Read More “Increase incremental backup speed by enabling CBT”

  • How to use Site Recovery Manager DR IP Customizer

    As one of the tasks given to me include protecting critical virtual machines via Site Recovery Manager (SRM) I ran into an environment that needed to be protected and have static IP’s assigned to them. The environment consists of about 15 VM’s, all of the VM’s each have 5 NIC’s with two of the VM’s having 9 NIC’s – that’s a lot of NIC’s to manually configure on both the Protected and Recovery side in SRM.

    Looking through the SRM Documentation I was able to see that VMware has graced us with a wonderful tool to greatly speed up this process, dr-ip-customizer.exe!

    How to use VMware DR-IP-Customizer

    Read More “How to use Site Recovery Manager DR IP Customizer”

  • How to manually delete NetApp SnapMirror snapshots

    The other day, one of our volumes in the lab environment filled up. This volume has a couple large VM’s on it, coupled with a couple different Veeam backup jobs running using the native Veeam backup methods as well as using NetApp snap mirror to snapshot the volume and then using Veeam to ship it out to Azure.

    At any rate the volume filled up to the point where vCenter wasn’t allowing me to migrate VM’s off the datastore. I really didn’t want to expand the volume just so I could move VM’s off of it.

    Instead, I decided to delete some of the older proof of concept snapshots from SnapMirror. Below are the quick and easy steps to clear up some un-used snapshots and free up some space on the datastore.

    Read More “How to manually delete NetApp SnapMirror snapshots”

Leave a Reply

Your email address will not be published. Required fields are marked *