How to shadow a VMware Horizon View desktop

Ever work on a View 5.x Desktop issue and needed access to the desktop it self while in use? While not a feature that is easily enabled say via the vmTools or the View Administrator console – it can however be easily enabled via Group Policy, similar to some other settings that I mention in the Windows 7 Optimization Guide.

Enable PCoIP Shadowing

  • Import the pcoip.adm GPO Template.
  • Navigate to: Computer Configuration > Administrative Templates > Classic Administrative Templates (ADM) > PCoIP Session Variables.
  • Enable “Enable access to PCoIP session from a vSphere console”.
  • Link the GPO to the OU where your View Desktops reside.
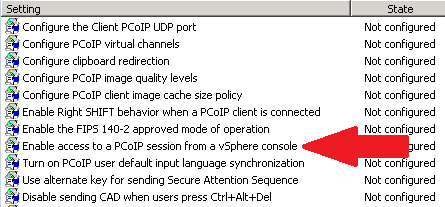
shadow pcoip policy

NOTE: The pcoip.adm template file is located on the Horizon View Connection Server: “install_directory\VMware\VMware View\Server\extras\GroupPolicyFiles”

Enable View Desktop Shadowing – vSphere 4

If you’re still running VMware vSphere 4, you’ll instead need to change a registry setting on the master image and/or the individual desktops that you wish to shadow:

HKLM\SOFTWARE\VMware, Inc.\VMware SVGA DevTap\NoBlankOnAttach: DWORD: 1

Important Note: Enabling either of these settings will allow you to open a vSphere console of said desktop and view it without any user interactions or notification. Privacy could certainly be a concern if used inappropriately.

Similar Posts

  • Become a VMware Certified Associate for FREE!

    During the San Francisco VMworld 2013, VMware announced the start of their new VMware Certified Associate certifications.

    There’s no training class requirement for the new exams although VMware offers a free self-paced e-learning course which is recommended to help you prepare for the exams. The exams normally run $120.00 but VMware is currently running a $60.00 discount for those who take the exam in 2013. NTPRO.nl has an additional coupon code (VCA13ICS) to take the remaining $60.00 off making the exam FREE!

    VCA Exam for free

    The VCA13ICS coupon code expires on October 30, 2013!

    Update:
    Global Knowledge also has a coupon code (VCA13GKN) which does not expire until January 31, 2014. Limit one free exam per individual!

  • Install ESXi 5.1 from a USB Flash Drive

    Many servers already come with a DVD/CD-ROM drive or some kind of ability to virtually mount an ISO image from a network share onto your server to then install ESXi. However, not all do or you just want to have your ESXi image readily available. Here’s a quick step by step instructions on how to use a USB flash drive to install ESXi.

    1. Download ESXi 5.1 from VMware (if you haven’t already) as well as UNettbootin.
    2. Plug in your USB Flash Drive.
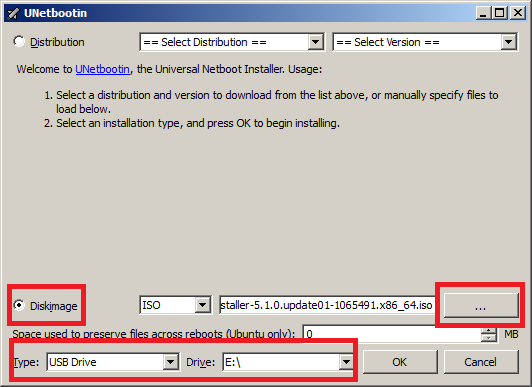
    3. Open UNetbootin and select “Diskimage”, set Type to “USB Drive”, select Drive letter of your USB flash drive, and set the path of your ESXi 5.1 ISO image. Then click on “OK”.
      unetbootin setup
    4. Read More “Install ESXi 5.1 from a USB Flash Drive”

  • VMUG EVALExperience, the new VMware VMTN

    VMUG EVALExperience

    Long ago VMware offered a program called VMware Technology Network (VMTN) which was very similar to Microsoft’s TechNet, which allowed you to download and run various VMware software within your home lab for a small yearly fee. Just like the Microsoft TechNet, the VMware VMTN program was eventually closed. From the time the VMTN program closed many people have begged and pleaded with VMware to bring the program back, there is even a long forum thread asking VMware to bring VMTN back. Though it never did… until now.

    Read More “VMUG EVALExperience, the new VMware VMTN”

  • How to install and configure vRealize Operations Manager 6.0.1

    VMware vRealize Operations Manager

    vRealize Operations Manager is the successor of vCenter Operation Manager which consists of much more then a simple name change, but several changes in the product over all. Just one of the new changes is that vRealize Operation Manager can now be deployed as a single virtual appliance, or on a Windows or Linux machine.

    This post we’ll walk through installing and configuring vRealize Operations Manager 6.0.1 step by step.

    Read More “How to install and configure vRealize Operations Manager 6.0.1”

  • VMware Recertification Policy

    VMware certified

    Starting today, March 10 2014, new VCP certifications must be re-certified within two years of it’s earned date. Anyone who currently has their VCP certification prior to March 10 2013 has until March 10, 2015 to re-certify.

    The new policy gives you three options to re-certify:

    1. Take the current exam for your existing VCP certification solution track. For example, if you are a VCP3, you could take the current VCP5-Data Center Virtualization (VCP5-DCV) exam.
    2. Earn a new VCP certification in a different solution track. For example, if you are a VCP-Cloud, you could recertify by earning VCP5-Desktop (VCP5-DT) certification.
    3. Advance to the next level by earning a VMware Certified Advanced Professional (VCAP) certification. For example, if you are a VCP5-DCV you could earn VCAP5-DCA certification.

    I can understand why they are doing this but I don’t agree with the changes. As per the announcement if you let your certification expire, “Your certification will be revoked,and you will no longer be entitled to use the certification logo or represent yourself as VMware certified“. Really? You mean everything that was done prior and after taking the exam means nothing?

    Read More “VMware Recertification Policy”

  • My VMware View Windows 7 Optimization Guide

    These are the few steps I do when creating a new "Golden" image. Luckily I don’t have to do these steps all the time as I’ll create the "Golden" image when there is a new upgrade such as when we went from View 4.6 to View 5.0.1. I like to have a new fresh machine using new virtual hardware from the start. You could certainly just upgrade the virtual hardware on the "Golden" image, I just prefer to start clean.

    At any rate, here’s my list. Hopefully someone might find it somewhat useful and maybe even others can improve upon it.

    Preparing a new virtual machine

    1. Create New Virtual Machine – FILE > NEW > VIRTUAL MACHINE (CTRL+N)
    2. Under Configuration select CUSTOM.
    3. Select a Name, Folder, Host, Cluster, and Storage.
    4. Under Guest Operating System select Windows and then Windows 7 32bit under the Version drop down.
    5. Select which Network (VLAN) and under Adapter select VMXNET 3.
    6. Configure disk size to 30GB THIN provisioned.

    Read More “My VMware View Windows 7 Optimization Guide”

Leave a Reply

Your email address will not be published. Required fields are marked *