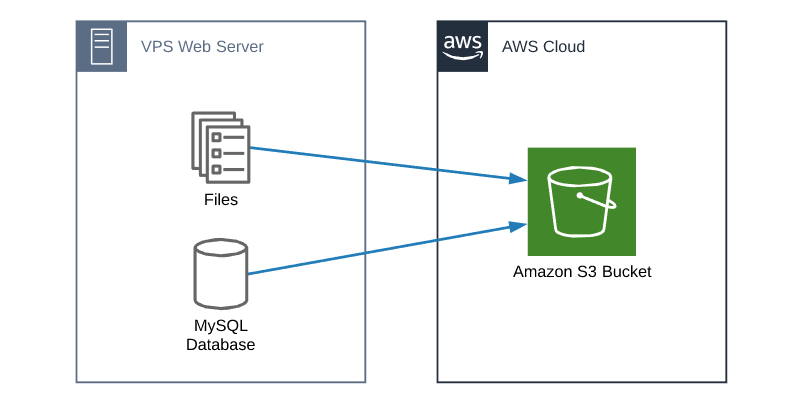
How to host a static website using AWS S3 and Cloudflare
I’ve been noticing a previous post about how to host a static site using various AWS services has been gaining in popularity.
Most recently a blog post by Thom Greene (@tbgree00) had mentioned the previous article and while all the steps in the previous post are accurate and works – I wanted to share how I now host static websites using AWS S3 and Cloudflare.
But first, why the change? It’s a simpler process.
In the previous post several AWS services (Route 53, Cloudfront, & Cert Manager) was needed to do what Cloudflare does by itself. It’s also cheaper as there is a cost that comes with Route 53 and Cloudfront, whereas Cloudflare is FREE.
It is more secure. In the previous post we created an S3 bucket and gave it public read access, using the process detailed below the bucket is no longer publicly accessible and only accessible if coming through Cloudflare. This ensures no one can try to side step all the protections that Cloudflare offers when trying to reach my static sites.
Requirements before getting started:
- An Amazon Web Services account.
- Domain name – I use and suggest either Namecheap or NameSilo to register new domains if you haven’t already. (Use coupon SAVE1OFFNAMESILO at NameSilo to save $1.00)
- Already have a static HTML page designed and ready to upload.
Host a static website using AWS S3 and Cloudflare
Amazon S3 Bucket Setup
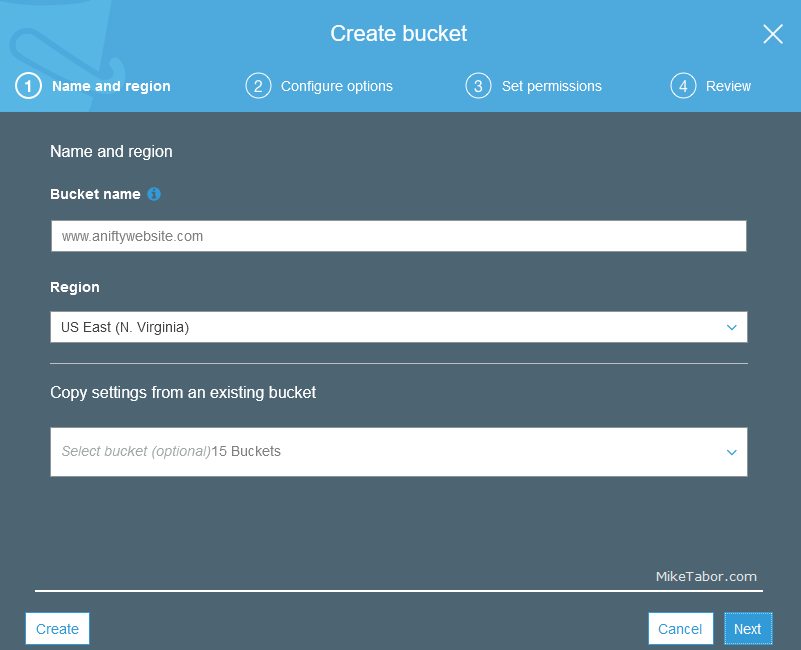
- First create an AWS S3 bucket with the same name as your domain name, be sure to include the www. and select your desired AWS region.
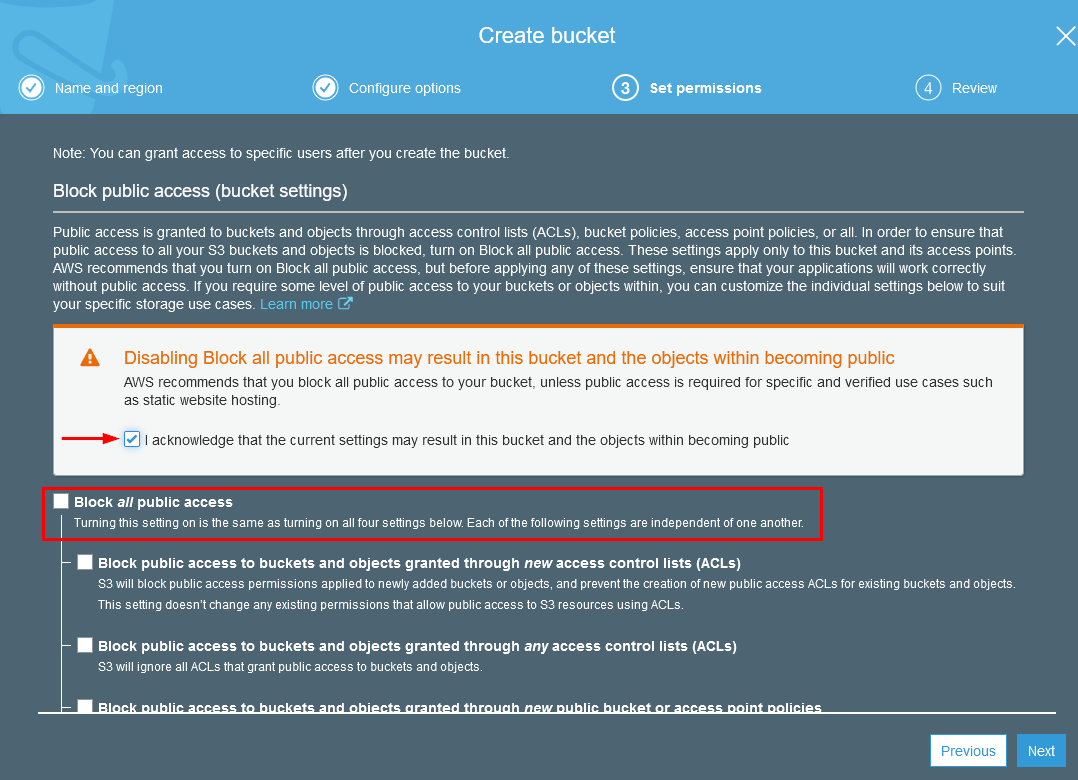
- In Step 3, Set Permissions, of creating the S3 bucket make sure to UN-check the “Block all public access” checkbox and confirm you want to remove this block!
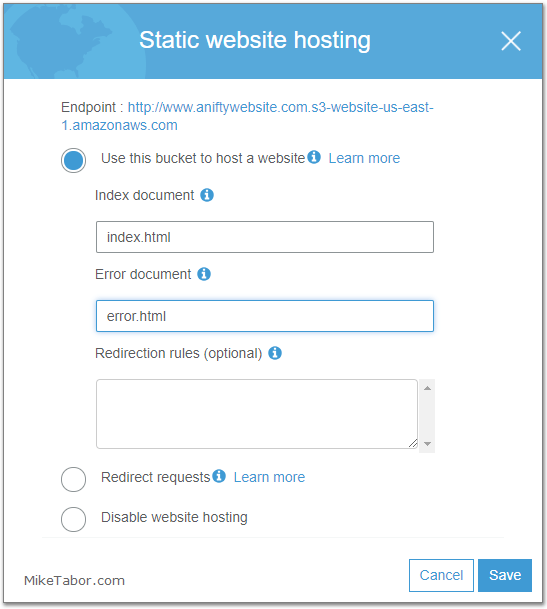
- Then enable static website hosting for the bucket under the Properties tab.

and set an index and error document file names and click SAVE. Be sure to make note of the bucket endpoint URL
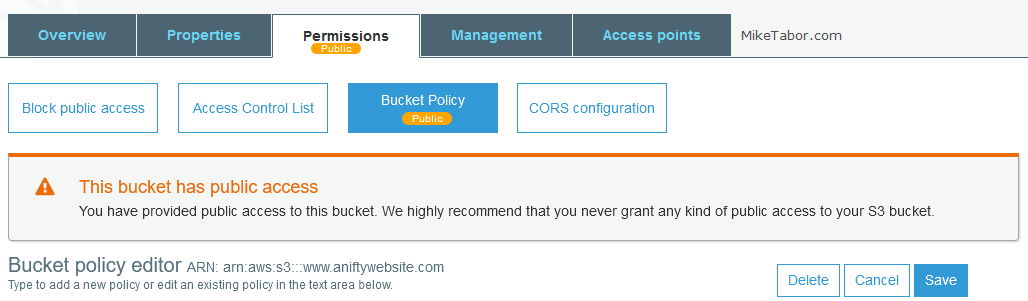
- To allow this bucket to be accessible via Cloudflare we will need to edit the bucket policy, under the permissions tab
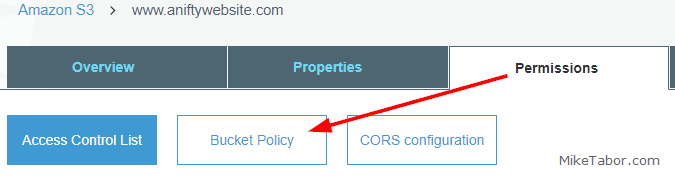 and copy/paste the following:
{
    "Version": "2012-10-17",
    "Statement": [
        {
            "Sid": "PublicReadGetObject",
            "Effect": "Allow",
            "Principal": "*",
            "Action": "s3:GetObject",
            "Resource": "arn:aws:s3:::www.MYDOMAINNAME.com/*",
            "Condition": {
                "IpAddress": {
                    "aws:SourceIp": [
				"2400:cb00::/32",
				"2405:8100::/32",
				"2405:b500::/32",
				"2606:4700::/32",
				"2803:f800::/32",
				"2a06:98c0::/29",
				"2c0f:f248::/32",
				"103.21.244.0/22",
				"103.22.200.0/22",
				"103.31.4.0/22",
				"104.16.0.0/13",
				"104.24.0.0/14",
				"108.162.192.0/18",
				"131.0.72.0/22",
				"141.101.64.0/18",
				"162.158.0.0/15",
				"172.64.0.0/13",
				"173.245.48.0/20",
				"188.114.96.0/20",
				"190.93.240.0/20",
				"197.234.240.0/22",
				"198.41.128.0/17"
                    ]
                }
            }
        }
    ]
}
Note: Be sure to replace MYDOMAINNAME in the policy with your own domain name.
- Once you’ve saved the above policy, you will get a message from AWS stating the bucket has public access. This is OKAY. In fact, while the bucket is technically public, it’s only accessible if coming through Cloudflare. Hence the extra security.
- You can now upload your static website to your S3 bucket.
Note: Your website will not be accessible yet.
AWS S3 non-www bucket setup
We need to create a second S3 bucket so that when users try to access domainname.com they will be redirected to www.domainname.com.
- Create a second S3 bucket with the same name as your domain name, this one WITHOUT the www.
- Enable static website hosting for the bucket, but this time set it to redirect to your www.domainname.com bucket.
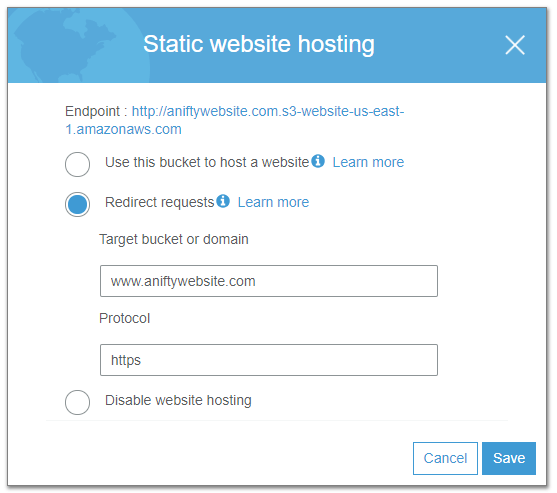
That’s it for the second bucket, now lets setup Cloudflare!
Cloudflare Setup for your static HTML site
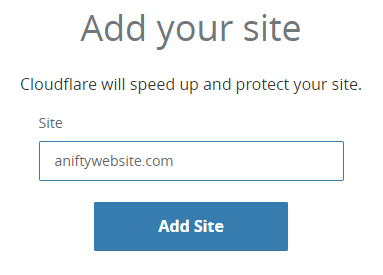
- Log into Cloudflare and click on “+Add Site“.
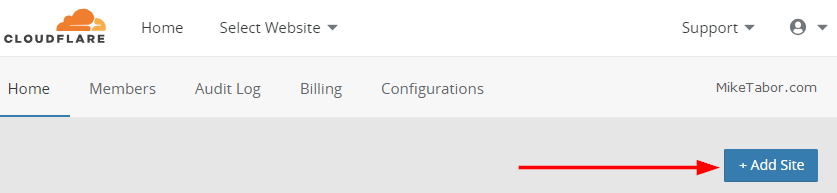
Then type in your domain name and click on “Add Site“.
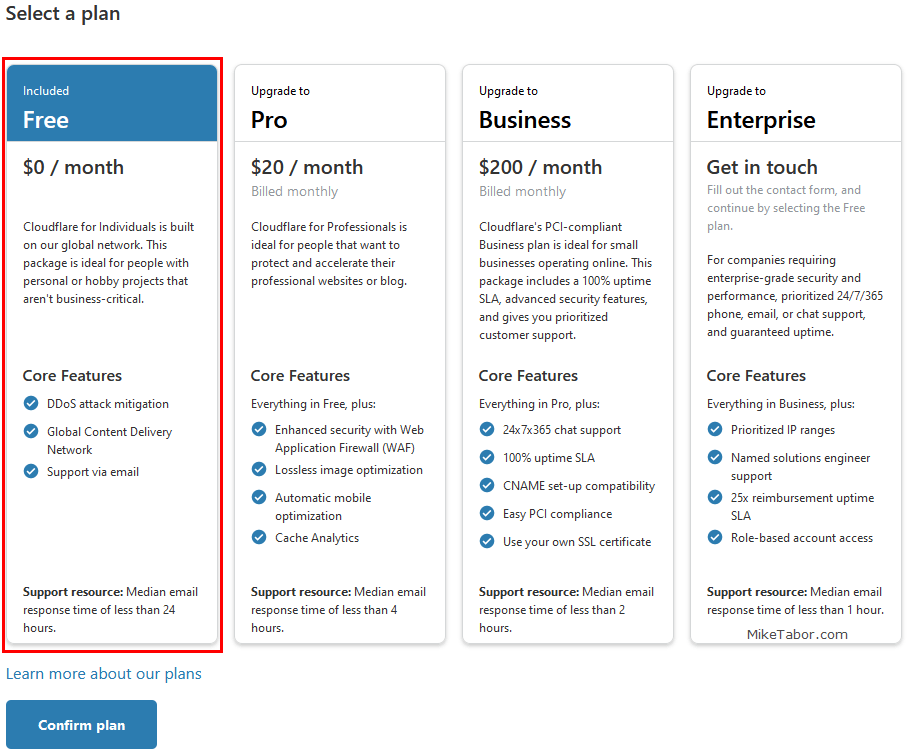
- Then select the FREE Cloudflare plan. Feel free to use another plan if you feel you need it.
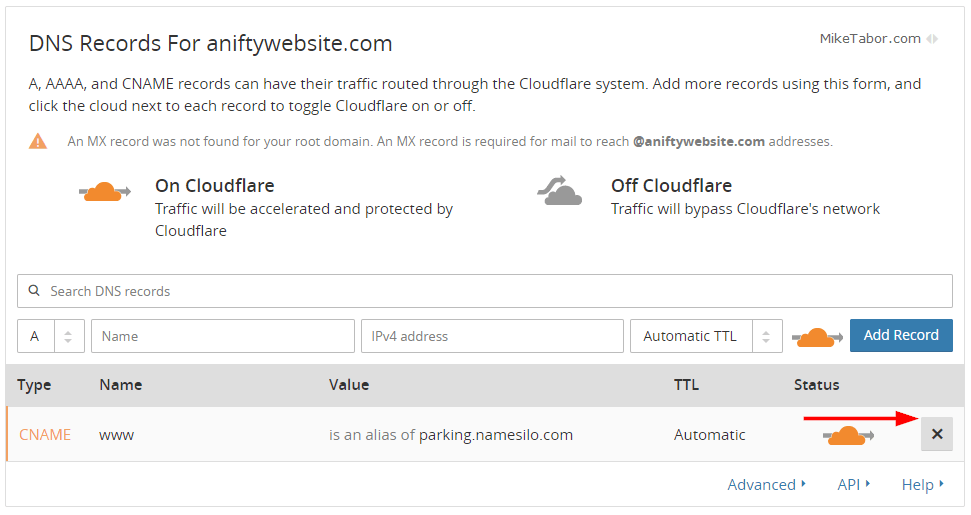
- Next you may have one or more DNS records associated with your domain, if so remove them by clicking on the X next to each one of them.
- Now lets add some DNS records for our two AWS S3 buckets. We need to add a record for each S3 bucket.
- Create a CNAME record with the name www and for the server field enter the www.yourdomain.com bucket endpoint URL without the https://
- Create a second CNAME record with the name of your domain (without the www.) and for it’s server field enter the yourdomain.com bucket endpoint URL, also without the https://
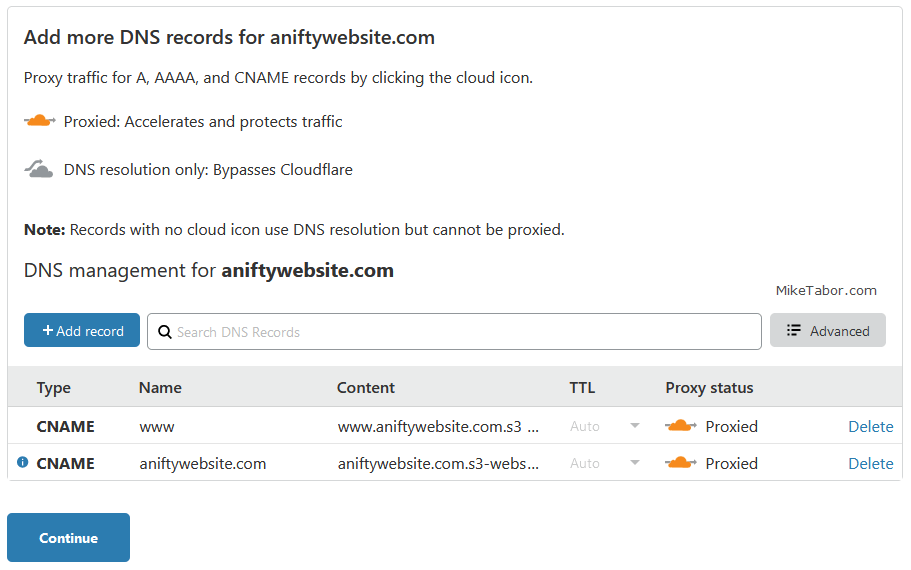
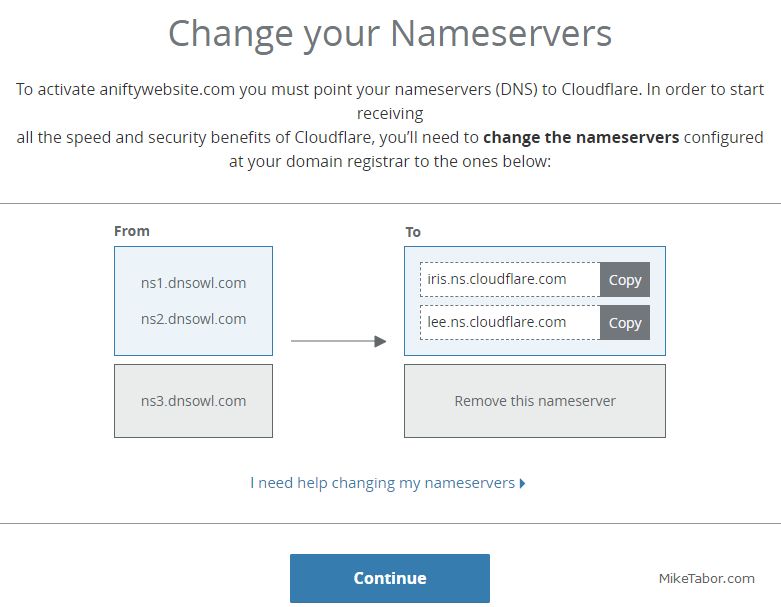
Then click on Continue. - Cloudflare will then give you two nameservers to point your domain name to. So now log into your domain name registar and update the name servers to the nameservers Cloudflare gives you.
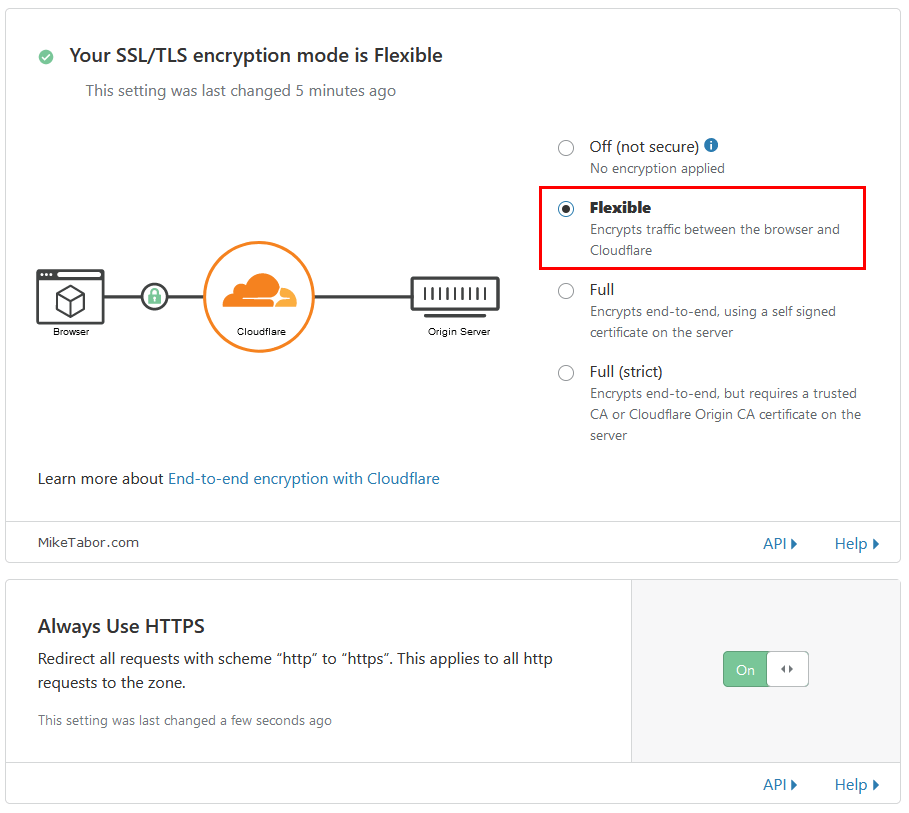
- Finally, change the default Cloudflare SSL/TLS encryption option from “Full” to “Flexible“. I also prefer to enable “Always use HTTPS” as well.
At this point you’ll just need to wait for DNS to update. This could potentially take 24-48 hours, but in most cases this is much faster.
There you have it, you now have a static website being hosted on S3 and the protections and speed improvements from Cloudflare.


Thanks for the guide.
If you also use the domain for mail (e.g. via G Suite), does not having an A record affect mail delivery (e.g. recipients flagging your email as spam)?
I keep getting “Invalid hostname: Use ‘@’ to represent the root domain.” at step 8 and can’t create any of the 2 CNAME records recommended there. Are you sure a step was not skipped? Maybe there should be a record there already before we can create those records in step 8. Any ideas?
Make sure you’re creating a CNAME record and not another type of record. Also make sure you are NOT including the http:// in the CNAME value field.
I had the same problem. Took me a while to work out that the bucket endpoint URL you get when you create it is different from the path of the data uploaded.
When you get the location of index.html, for example, it shows up as
s3-website-ap-southeast-2.amazonaws.com/www.domain.com.
This won’t work in Cloudflare, though. There, it has to be formatted as
http://www.domain.com.s3-website-ap-southeast-2.amazonaws.com, as this is the endpoint you get when the bucket is created.
I had to delete the bucket and start again to get it to work.
I guess that works, though it does waste a bucket for every variation of domain name you want to point at that bucket. Even though the 100 bucket limit is a soft limit, it’s still sort of annoying. Thanks for the article.
I too wish AWS would offer a better way of handling this, even the ability to hide the extra bucket would be nice.
Hi Mike,
Thanks for a great article, I’ll definitely be implementing this into my next website. Will this work for user generated content? I have an s3 bucket which I want to use that will allow users to upload images. These images will be deleted after 1 calendar month, however I want to make sure that I’m taking as many precautionary measures as I can in the event that my website was targeted.
Dear Mike,
I completed all the points.
Result:
1) http://www.mydomain.com – is working
2) mydomain.com – is not working
Please look at this notice:
https://imgur.com/hxyCthb
Maybe my site is not working because this is wrong?
Kim,
When you try to go to “mydomain.com” are you getting any kind of error message?
I am facing the same error and I gave a try to curl:
➜ ~ curl -X GET http://www.instadetox.org -vvv
Note: Unnecessary use of -X or –request, GET is already inferred.
* Trying 104.24.125.191…
* TCP_NODELAY set
* Connected to http://www.instadetox.org (104.24.125.191) port 80 (#0)
> GET / HTTP/1.1
> Host: http://www.instadetox.org
> User-Agent: curl/7.63.0
> Accept: */*
>
< HTTP/1.1 200 OK
< Date: Tue, 03 Sep 2019 23:48:36 GMT
< Content-Type: text/html
< Transfer-Encoding: chunked
< Connection: keep-alive
< Set-Cookie: __cfduid=daa3722d4756ddd3cef578c8c557ccbaa1567554516; expires=Wed, 02-Sep-20 23:48:36 GMT; path=/; domain=.instadetox.org; HttpOnly
< x-amz-id-2: y6keCOxN4RWpdwssQzO3MthhiW5g2TjCOUQuono0O9pCMzmHArzaIt8DU7oNk4isxsaAIuiV36E=
< x-amz-request-id: 28DBFA40D8651F13
< Last-Modified: Tue, 03 Sep 2019 17:23:05 GMT
< Server: cloudflare
< CF-RAY: 510b9d916bfeb839-WAW
<
* Connection #0 to host http://www.instadetox.org left intact
elo s3 by andilabs%
➜ ~ curl -X GET http://instadetox.org -vvv
Note: Unnecessary use of -X or –request, GET is already inferred.
* Could not resolve host: instadetox.org
* Closing connection 0
curl: (6) Could not resolve host: instadetox.org
Andi,
So long as you’ve followed the above instructions as listed you should be good. Curious, have you made any changes to any of the Cloudflare settings?
In CLOUDFLARE on the SSL/TLS tab what is your SSL set to (Off, Flexible, Full, or Full Strict)?
I tried with ssl flexible. Same otuptu of curl.
That’s what it should be set to, the default value of “Flexible”.
Hello Mike,
Recently, I made the decision to migrate my site from 1and1 (host and domain registrant) to Cloudflare and AWS. After doing so, I started scouring the net for tutorials on how to set these services up to talk to each other and get my content back online. I read a lot of confusing things and did a lot of even more confusing things in the process.
This article cleared up some of that confusion and I appreciate you creating it.
But with that, I do have a few questions.
1. Since Cloudflare is my new domain registrant, I assume I won’t be doing anything with list #9, Change Your Nameservers.
2. If I understand correctly… the CNAME in the DNS on Cloudflare are setup to target the S3 End Points. This creates the handshake from Cloudflare to S3. And the bucket policy applied to the http://www.mysite.com means that all calls for information will be routed through Cloudflare’s IPs and anything not from those IPs will be prevented access. So the Access should say “Objects can be public” correct? Do I need to add the policy to both buckets or just the one acting as the host bucket?
3. After following these steps; I’m am getting an error. Error 522, Connection timed out. It’s showing that it’s going through Cloudflare, but that I’m not connected to the host. I only have one index.html file on the server for the time being. For testing reasons, it’s a redirect that will connect to Google when the connection is made.
Thanks again for the great article. I appreciate the effort it took to get it put together and shared with noobs like myself.
So if I follow what you are saying here I do not need to set the bucket public as it is all handled through the bucket policy that allows access only to the cloudflare IPs
Yes sir that is correct.
Hi Mike
When connects cloudflare to S3
I am having problem with HTTPS (OK with HTTP)
http://tests3.sitcdn.com.s3.ap-south-1.amazonaws.com/25_mr.jpg – working
https://tests3.sitcdn.com.s3.ap-south-1.amazonaws.com/25_mr.jpg – not working
Have I missed something obvious?
Sunil
Sunil,
Doesn’t look like you’ve followed the steps above as being able to access the file directly via the S3 URL would not be permitted if you used the Bucket Policy I included above. That bucket policy restricts access only via CloudFlare, which in this case would also be providing the HTTPS cert.
-Michael
Hi Mike, appreciate the guide but how about if I dont want the www like your https://miketabor?
I followed your guide but reversed the part about creating the www first and redirect the non-www and couldn’t get it to work. Googled dozens of pages and everyone is doing it with the www or using Route 53 which is what I wanna avoid. :D
I’m sure if you list both steps it’ll be more helpful to more noobs like me out there.
Thanks.
For steps 1-4 you would do for the NON-www folder instead. Making sure to edit the bucket policy in step 3 to not include the www. in the bucket name.
For the steps under “AWS S3 non-www bucket setup” you would create a new bucket named ‘www.yourdomain.com’ and have it redirect to the bucket without the WWW.
Hope this helps!
-Michael
Those IP address on the bucket policy are from?
Erick,
Great question! Per step 3, under “Amazon S3 Bucket Setup” that policy restricts access to the buckets via Cloudflare only. Those IP addresses are Cloudflare IPs.
You can verify this by visiting – https://www.cloudflare.com/ips/
Thanks,
-Michael
I’ve tried this multiple times, and updated using the IP’s from cloudflares IP list. When I use this setting, I get blocked error messages from all pages, when I revert to open/public everything loads as expected.
Also If I set the SSL to Full, I get too many redirects, set to Flexible it works.
Any thoughts or suggestions for how to set it?
HakAtIt,
Sounds like you might not have changed the Resource in the bucket policy as mentioned in Step 4.
-Michael
Is it okay if I set bucket domain.com instead of http://www.domain.com to host web hosting and redirect the www bucket to domain.com?
You can. It’s essentially the same steps as above just in reverse.
-Michael
Cool. Thank you Mike.
One thing though, I’m getting the following errors in DNS Section of Cloudflare:
An A, AAAA or CNAME record was not found pointing to the root domain. The waleedshaukat.com domain will not resolve.
An MX record was not found for your root domain. An MX record is required for mail to reach @waleedshaukat.com addresses.
Even when I’ve two DNS CNAME records with names www and waleedshaukat respectively pointing to their corresponding s3 urls.
Is it due to https protocol set in redirecting s3 url above I roughly guess ?
FYI, my Cloudflare Crypto settings are:
– SSL (Active) : Full
– Always use HTTPS : On
– Automative HTTPS Writes : On
– TLS 1.3 : Enabled
– Onion Routing: On
– Opportunistic Encryption: On
– HSTS : disable
I’m basically building my personal site http://www.waleedshaukat.com. Can you point to the issue here?
Waleed,
Change your Cloudflare SSL settings from FULL to FLEXIBLE.
-Michael
Adding:
When loading site, it says server I{ address could not be found
Hi Mike,
Thank you for the guide.
From what I understand from the guide it is not possible to use Cloudflare to serve multiple domain names for the same s3 bucket?
Meaning:
http://www.aaa.com
http://www.bbb.com
Should go to the same s3 bucket.
Priel,
I’ve never tried nor know why you would want to do so. Just from a search engine optimization (SEO) stand point this would be a big negative as Google and other search engines would see this as duplicate content.
-Michael
Thanks, Mike!
Just what I needed–clear and concise instructions, and worked great!
Hi Mike,
Thank you for your post. After following all the steps and trying to access my website. I get the message “domain.dev redirected you too many times. ERR_TOO_MANY_REDIRECTS” and I also cannot see my endpoint when I try to access it in this way ” http://www.domain.dev.s3-website-us-east-1.amazonaws.com“. When I try to access that endpoint I get “403 Forbidden
Code: AccessDenied
Message: Access Denied”
Bill,
Make sure that your SSL settings in Cloudflare are set to “Flexible”.
-Michael
Is this procedure still working? I tried it but I am facing issues with accessing my website over https, I am getting this error ERR_SSL_VERSION_OR_CIPHER_MISMATCH.
I noticed that someone also faced similar issue and just like him I am able to access my files with s3 URL, though I am sure that I copied the policy properly.
Yes. In fact I have a couple static sites still running using this method. Make sure your Cloudflare SSL settings are set to Flexible.
-Michael
Thank you for the guide. I got my site up and running because of it.
Hi Mike,
I followed the instructions for a website and it worked perfectly some time ago
Now I am trying to do the same for another one but keeps throwing me 403 errors for root and www subdomain, even checking that I am using Flexible SSL/TLS certification
Is it possible that it could be related to bucket/file permissions? It could be great to realize what can be generating it not being a SSL/TLS issue
My domain is matiashaeussler.cl
Greeting,
Matías
Matías,
There has been some AWS interface changes since I’ve first posted this how-to. I just updated it today, give it another try and let me know how it works for you. I have a site http://www.aniftywebsite.com that I just setup on AWS S3 and Cloudflare using these exact same steps and it’s working fine for me!
-Michael
Anyone having issues with https and flexible. For some reason firefox kept redirecting me to http. Used Edge and https was fine.
Hello Chris,
I’ve just updated the article with a couple news steps, in your case the enabling of “Always use HTTPS” option in Cloudflare. Hope this helps!
-Michael
Amazon Policy Bucket said: Policy has invalid resource
Jordi,
Sounds like you haven’t changed the resource to your bucket name.
-Michael
Hi Mike,
Thanks for the guide. It’s the most clearly written I’ve found.
However, as of October 2020, I cannot get this to work. I originally got it working but only for “mysite.com”, not for the subdomain (“www.mysite.com”). I found your guide and was hoping for a solution.
I followed it exactly and the requests just time out. One issue I find is the redirect from the root domain bucket (“mysite.com”) to the subdomain bucket – the box asks for a domain or a bucket name, but in our case the bucket name IS a domain and when I go to the bucket URL it redirects me to the domain (“www.mysite.com”) rather than the public URL of the bucket (“http://www.mysite.com.s3.us….”).
I just changed my nameservers tonight so maybe I need them to update but I doubt that’s the issue as it worked when I only had one bucket called “mysite.com” with a CNAME pointing to it. Even Cloudflare’s own guide for this isn’t working as far as I can tell (https://support.cloudflare.com/hc/en-us/articles/360037983412-Configuring-an-Amazon-Web-Services-static-site-to-use-Cloudflare).
Other people must be experiencing this? It’s a shame as this is the best static site solution available but if I can only have “https://mysite.com” and not “https://www.mysite.com” I just don’t want to use it.
Mark,
Thanks for the comment.
In order to make mysite.com your primary path and not http://www.mysite.com then you’d want to reverse my steps I’ve laid out above. For “Amazon S3 Bucket Setup” instead of using http://www.mysite.com you’d use mysite.com and for the steps under “AWS S3 non-www bucket setup” you WOULD use www.
Give that a shot and let me know. I’m happy to help further if needed.
-Michael
Hi Mike,
Thanks for you response. Last night I tried to delete and re-create my buckets to start from scratch but got an error (that I forget) which basically said I couldn’t create buckets with the same name whilst others were being deleted. I left it and tried again today and was able to.
I got everything working now but I am convinced my settings now (that work) are the same as they were last night (that didn’t). When I followed your guide I wasn’t using a bucket that I created when following another guide.. that and the inability to re-create a bucket of the same name makes me think there was something lagging with AWS that wasn’t applying the settings correctly.
Anyway, it’s all working now so thanks for the guide and support through comments.
That’s great news. Glad you got it working now!
-Michael
Oh, one more thing. In Cloudflare there is the option to “enable development mode”. It’s in the main “Overview” tab. I think it’s worth enabling this whilst doing this as the caching isn’t useful at this stage; maybe that’s what was going wrong last night. Just a thought!
Great article however not something I would implement at a company simply because this is not an end-to-end encrypted solution.
Jamie,
I guess I’m not understanding how this would be good, for I’m assuming – a personal site but not for a company site?
-Michael
How does the bucket policy stop someone else with a cloudflare account accessing my S3 bucket? I could create a proxying worker in cloudflare and rewrite requests to your S3 bucket because we both are connecting to the S3 bucket from the public cloudflare ip addresses.
Shane,
Re-read the policy. I don’t think it does what you think it does. ;-)
-Michael
thank you for share
Most welcome. Glad to help!
-Michael
Just a heads up, the “Always Use HTTPS” was no showing on that page when I am following this 2023-10-24. Instead it could be found on Cloudflare Dashboard > SSL/TLS > Edge Certificates > “Always Use HTTPS”