How to use Site Recovery Manager DR IP Customizer

As one of the tasks given to me include protecting critical virtual machines via Site Recovery Manager (SRM) I ran into an environment that needed to be protected and have static IP’s assigned to them. The environment consists of about 15 VM’s, all of the VM’s each have 5 NIC’s with two of the VM’s having 9 NIC’s – that’s a lot of NIC’s to manually configure on both the Protected and Recovery side in SRM.

Looking through the SRM Documentation I was able to see that VMware has graced us with a wonderful tool to greatly speed up this process, dr-ip-customizer.exe!

How to use VMware DR-IP-Customizer

  1. Log into the server you installed SRM onto and open a command prompt and navigate to:
    C:\Program Files\VMware\VMware vCenter Site Recovery Manager\bin

    Note: drive letter and/or path may differ from your install.

  2. Then type the command:
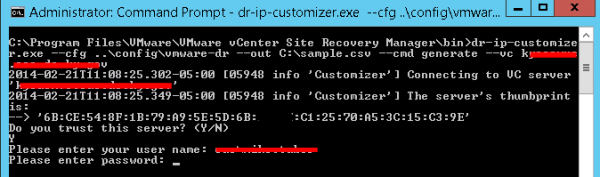
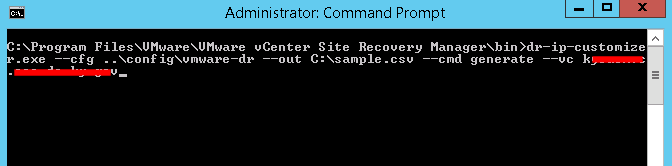
    dr-ip-customizer.exe --cfg ..\config\vmware-dr --out C:\sample.csv --cmd generate --vc FQDN_OF_VCENTER

    generate csv file

  3. You will then be asked if you trust the server, type Y and press enter then you are prompted to enter your username and password. Enter your credentials and press enter. Note: This will create a .CSV file listing every virtual machine in all Recovery Plans within SRM.
    dr-ip-customizer credentials
  4. You can now open the “sample.csv” file within Notepad, but using Microsoft Excel will make edits much easier, here is what the output will look like within Excel (I’ve already expanded the columns so they are easier to read)
    cvs file dr-ip-customizer

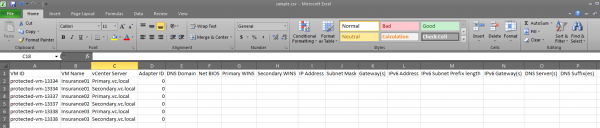
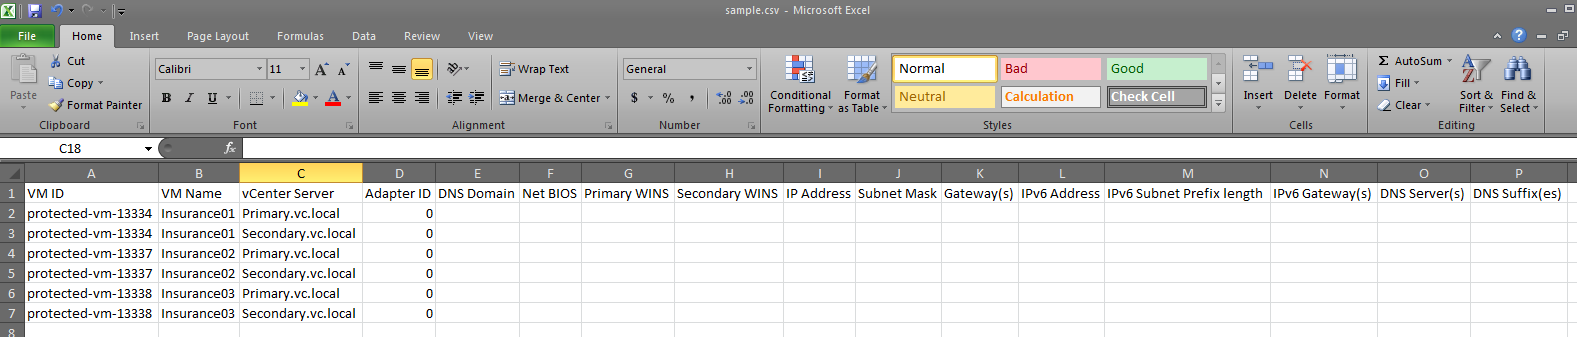
The dr ip customizer will create two entries for each VM that’s in a Recovery Plan in SRM. One entry for the Protected site and another for the Recovery site. Each will have an Adapter ID of 0. The only only thing you can configure for Adapter ID 0 is a DNS Server and suffix.

That said you will have to create two new lines for each NIC a virtual machine will have and give them an ID higher than 0, you’ll see the example below. From there you’ll be able to set things like IP address, subnet mask, gateway, additional DNS, WINS, etc. In my case the IP for each NIC needed to remain the same on the Recovery site as it is in the Protected site thus why the settings look the same. You can also set the VM to DHCP by typing “dhcp” in the IP address field if needed.

dr-ip-customizer csv file completed

  1. Save the CSV file. Now it’s time to apply the settings from the CSV to SRM.
  2. Go back to the command prompt and now type this command:
    dr-ip-customizer.exe --cfg ..\config\vmware-dr.xml --cmd apply --csv C:\sample.csv --vc FQDN_OF_VCENTER

    Again you’ll be asked if you trust the server. Confirm and then enter your credentials.
    import csv dr ip customizer

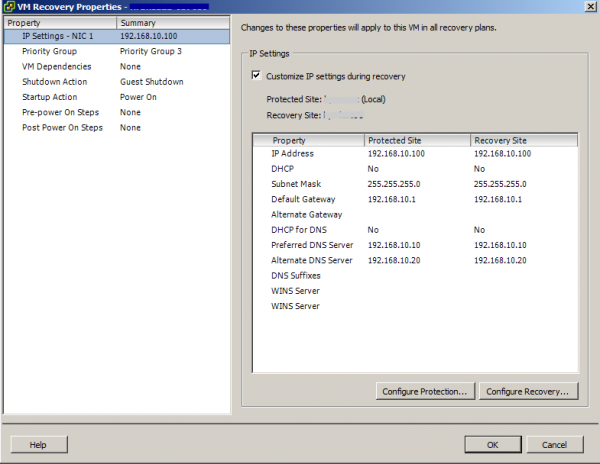
  3. Done! Now open up SRM in vSphere and confirm your changes have indeed applied.
    srm dr-ip-customizer applied

There is still a bit of a process typing all the IP’s, etc in the CSV file it certainly is much faster than doing so directly in SRM, NIC by NIC, tab by tab, protected site and recovery site when you have to make bulk IP changes for VM’s in SRM.

Also thanks to Stuart Yerdon for his assistance gathering IP’s and testing.

Similar Posts

  • Installing VMware vCenter Server Appliance 6.5

    VMware has announced that VMware vSphere 6.5 has gone general available this week. Now installing VMware vCenter Server Appliance 6.5 (VCSA) is even easier as the requirement for the client integration plugin has been removed and now the VCSA appliance is delivered via an ISO image with an installation wizard that’s been broken up into two stages.

    The VCSA 6.5 ISO offers two types of installation methods, CLI and GUI install – both availalbe for Windows, Mac and Linux machines. In this guide I’ll walk through the steps of installing VCSA 6.5 using the Windows GUI install.

    Read More “Installing VMware vCenter Server Appliance 6.5”

  • Thank you VMware Community!

    VMware vExpert 2014

    So far, 2014 has been a very rewarding year for a number of reasons, two of which has happened in just a week or two span. First, Eric Siebert (@ericsiebert) announced on March 27th, this years results of the 2014 Top VMware & Virtualization Blog voting. My first year entered into voting and made it to 71st place! A huge thanks goes out to not only Eric but just as much so to everyone who voted for me!

    To top it off, yesterday VMware announced 2014’s first quarter VMware vExpert list. While vExpert isn’t a technical certification or even a general measure of VMware expertise. The VMware judges selected people who were engaged with their community and who had developed a substantial personal platform of influence in those communities. There were a lot of very smart, very accomplished people, even VCDXs, that weren’t named as vExpert this year. VMware awarded this title to 754 people this year and on that list of many impressive names you’ll find yours truly, Michael Tabor!

    I’m both honored and humbled by both lists. It’s a great feeling to be recognized by not only my peers through the voting in the Top vBlog but also by VMware themselves through the vExpert title.

    So again THANK YOU very much to the entire VMware community, a spectacular community indeed, and congratulations to everyone else that made the Top vBlog and vExpert lists!

  • Set default printer for View floating desktop and Persona Management

    Sometime ago I asked a question over at the VMware forum about how to set default network printers on a VMware View 5.0 floating pool that used Persona Management as Persona Management wasn’t keeping this user setting on it’s own. The printers would be added to the VM just not remember the default printer setting. I’ll admit I forgot to update the thread, but a work around was devised which I’ll share below.

    Read More “Set default printer for View floating desktop and Persona Management”

  • My VMware View Windows 7 Optimization Guide

    These are the few steps I do when creating a new "Golden" image. Luckily I don’t have to do these steps all the time as I’ll create the "Golden" image when there is a new upgrade such as when we went from View 4.6 to View 5.0.1. I like to have a new fresh machine using new virtual hardware from the start. You could certainly just upgrade the virtual hardware on the "Golden" image, I just prefer to start clean.

    At any rate, here’s my list. Hopefully someone might find it somewhat useful and maybe even others can improve upon it.

    Preparing a new virtual machine

    1. Create New Virtual Machine – FILE > NEW > VIRTUAL MACHINE (CTRL+N)
    2. Under Configuration select CUSTOM.
    3. Select a Name, Folder, Host, Cluster, and Storage.
    4. Under Guest Operating System select Windows and then Windows 7 32bit under the Version drop down.
    5. Select which Network (VLAN) and under Adapter select VMXNET 3.
    6. Configure disk size to 30GB THIN provisioned.

    Read More “My VMware View Windows 7 Optimization Guide”

  • VMware vSphere 5.5 Update 2 released

    vsphere 5.5 update2 released

    VMware vCenter Server and ESXi 5.5 Update 2 has just been released today with a number of fixes and additional features such as vCenter Server database support for Oracle 12c, Microsoft SQL Server 2012 Service Pack 1, and Microsoft SQL Server 2014 in vCenter Server and support for ESXi hosts with 6TB of RAM in the ESXi 5.5 update 2 release!

    Read More “VMware vSphere 5.5 Update 2 released”

  • VMware Workstation 11 released

    VMware Workstation 11 Unmatched OS Support

    At the start of October VMware announced Workstation 11, along with VMware Player 7 Pro and said both products would be available sometime in December. Well today is the day, VMware has now officially released VMware Workstation 11!

    Workstation 11 adds support for the latest version of Windows and Linux, as well as the latest processors and hardware, and also adds the ability to connect to VMware vCloud Air.

    Read More “VMware Workstation 11 released”

Leave a Reply to Michael Chanslor Cancel reply

Your email address will not be published. Required fields are marked *

One Comment

  1. Mike – Great article! Do you know the exact process SRM goes through to change the ip and hostname on a Linux host? I’m assuming it is uses the vmware tools installed on the Linux host?