How to use Site Recovery Manager DR IP Customizer

As one of the tasks given to me include protecting critical virtual machines via Site Recovery Manager (SRM) I ran into an environment that needed to be protected and have static IP’s assigned to them. The environment consists of about 15 VM’s, all of the VM’s each have 5 NIC’s with two of the VM’s having 9 NIC’s – that’s a lot of NIC’s to manually configure on both the Protected and Recovery side in SRM.

Looking through the SRM Documentation I was able to see that VMware has graced us with a wonderful tool to greatly speed up this process, dr-ip-customizer.exe!

How to use VMware DR-IP-Customizer

  1. Log into the server you installed SRM onto and open a command prompt and navigate to:
    C:\Program Files\VMware\VMware vCenter Site Recovery Manager\bin

    Note: drive letter and/or path may differ from your install.

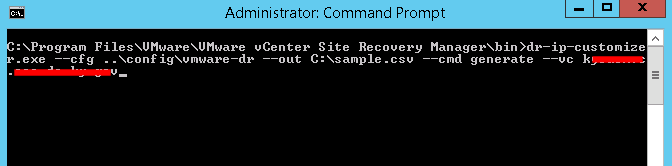
  2. Then type the command:
    dr-ip-customizer.exe --cfg ..\config\vmware-dr --out C:\sample.csv --cmd generate --vc FQDN_OF_VCENTER
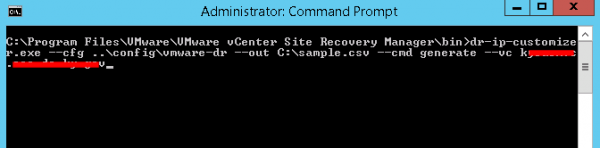
    generate csv file

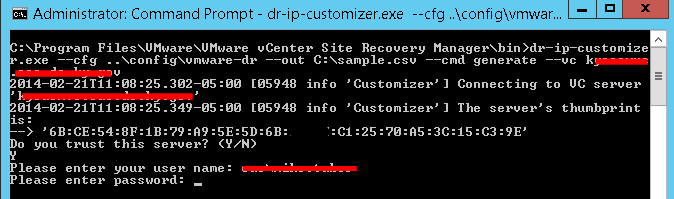
  3. You will then be asked if you trust the server, type Y and press enter then you are prompted to enter your username and password. Enter your credentials and press enter. Note: This will create a .CSV file listing every virtual machine in all Recovery Plans within SRM.
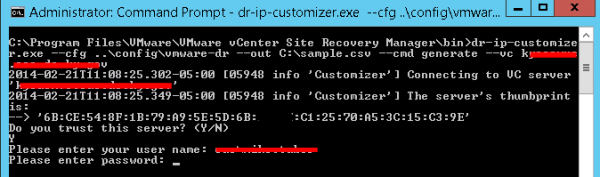
    dr-ip-customizer credentials
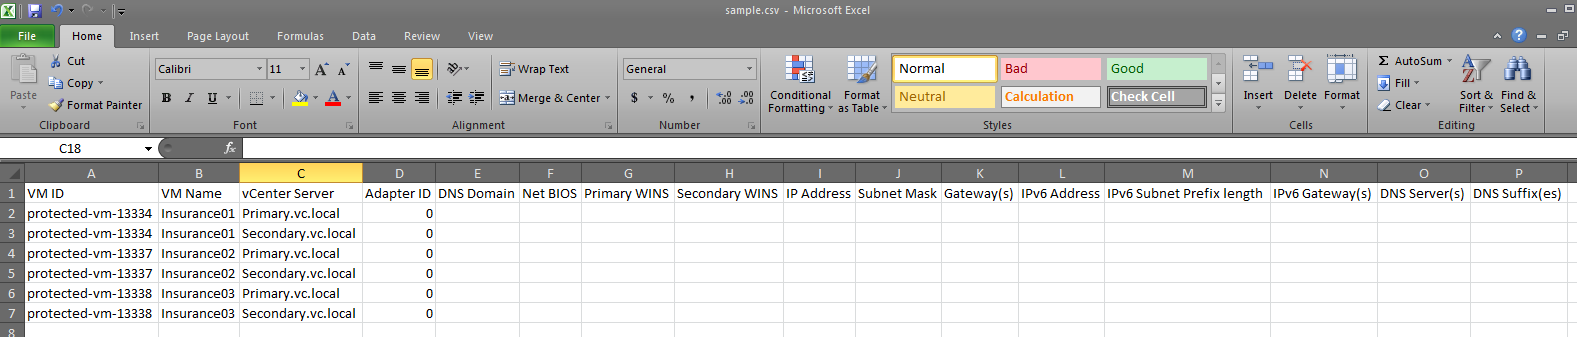
  4. You can now open the “sample.csv” file within Notepad, but using Microsoft Excel will make edits much easier, here is what the output will look like within Excel (I’ve already expanded the columns so they are easier to read)
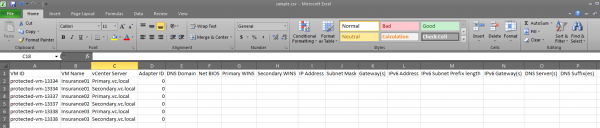
    cvs file dr-ip-customizer

The dr ip customizer will create two entries for each VM that’s in a Recovery Plan in SRM. One entry for the Protected site and another for the Recovery site. Each will have an Adapter ID of 0. The only only thing you can configure for Adapter ID 0 is a DNS Server and suffix.

That said you will have to create two new lines for each NIC a virtual machine will have and give them an ID higher than 0, you’ll see the example below. From there you’ll be able to set things like IP address, subnet mask, gateway, additional DNS, WINS, etc. In my case the IP for each NIC needed to remain the same on the Recovery site as it is in the Protected site thus why the settings look the same. You can also set the VM to DHCP by typing “dhcp” in the IP address field if needed.

dr-ip-customizer csv file completed

  1. Save the CSV file. Now it’s time to apply the settings from the CSV to SRM.
  2. Go back to the command prompt and now type this command:
    dr-ip-customizer.exe --cfg ..\config\vmware-dr.xml --cmd apply --csv C:\sample.csv --vc FQDN_OF_VCENTER

    Again you’ll be asked if you trust the server. Confirm and then enter your credentials.

    import csv dr ip customizer

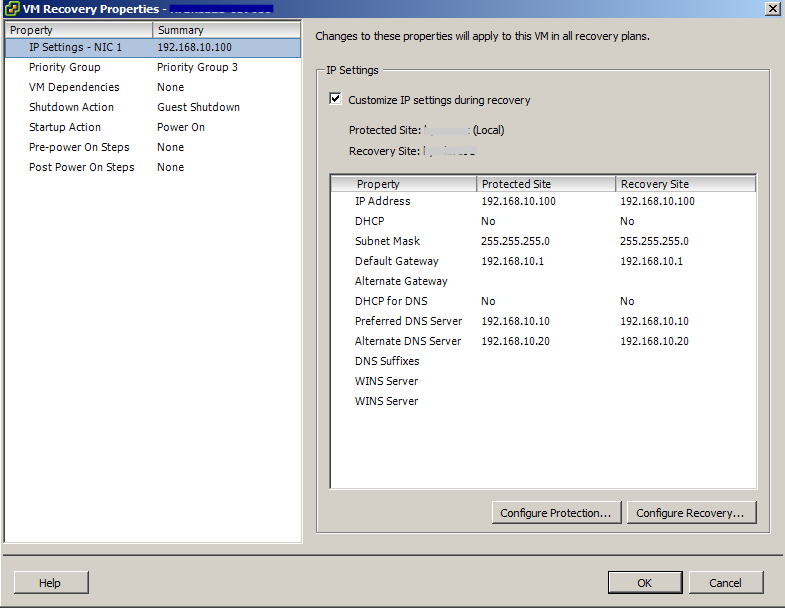
  3. Done! Now open up SRM in vSphere and confirm your changes have indeed applied.
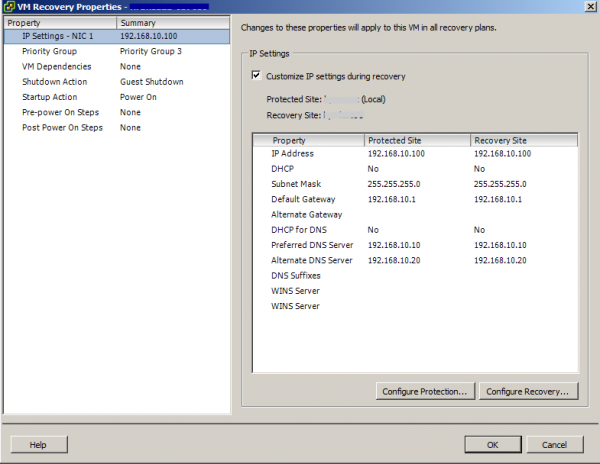
    srm dr-ip-customizer applied

There is still a bit of a process typing all the IP’s, etc in the CSV file it certainly is much faster than doing so directly in SRM, NIC by NIC, tab by tab, protected site and recovery site when you have to make bulk IP changes for VM’s in SRM.

Also thanks to Stuart Yerdon for his assistance gathering IP’s and testing.
Similar Posts

  • How to upgrade ESXi 6.5 to ESXi 6.7

    VMware released ESXi 6.7 a little while ago, but it’s only been here recently have I started deploying it in my home and work lab environments. Below are two ways to easily upgrade your ESXi 6.5 hosts to ESXi 6.7 using the command line or by using the VMware ESXi offline bundle.

    Read More “How to upgrade ESXi 6.5 to ESXi 6.7”

  • How to update VMware ESXi 6.5 to 6.5 Update 1

    With the release of VMware vCenter 6.5 Update 1 also comes VMware ESXi 6.5 Update 1 and just like vCenter there are a number of changes, updates, and fixes for ESXi as well in 6.5 Update 1 – you can see the release notes here.

    Yesterday I made a post on how to upgrade VMware VCSA 6.5 to 6.5 Update 1. Below I’ll show you three ways to upgrade your ESXi hosts to 6.5 Update 1.

    Read More “How to update VMware ESXi 6.5 to 6.5 Update 1”

  • How to manually delete NetApp SnapMirror snapshots

    The other day, one of our volumes in the lab environment filled up. This volume has a couple large VM’s on it, coupled with a couple different Veeam backup jobs running using the native Veeam backup methods as well as using NetApp snap mirror to snapshot the volume and then using Veeam to ship it out to Azure.

    At any rate the volume filled up to the point where vCenter wasn’t allowing me to migrate VM’s off the datastore. I really didn’t want to expand the volume just so I could move VM’s off of it.

    Instead, I decided to delete some of the older proof of concept snapshots from SnapMirror. Below are the quick and easy steps to clear up some un-used snapshots and free up some space on the datastore.

    Read More “How to manually delete NetApp SnapMirror snapshots”

  • VMware View client now availabe for Android!

    VMware has announced that they have released a View Client for Android tablets available on the Android Market now. Here are just a few of the features found on the new client.

    • A new look and feel – The View Client for Android features the NEW blue look and feel of the VMware View clients!
    • Multiple broker support – If you have more than one VMware View broker in your organization, you can can easily access your desktop from all of them via the Android client
    • Desktop Shortcuts – Quickly connect with as many as four recent desktop via shortcuts
    • Virtual trackpad – Control your desktop on a granular level just like you would control the mouse on a laptop
    • Custom keyboard toolbar – Super easy access to all of the special keys not found on the Android default keynboard
    • Honeycomb 3.x support – Made from the ground up for the new generation of Android tablets
    • Custom gestures – Invoke keyboard, scrolling, etc are as easy as ever and simple to use
    • VMware View Security Server support (best experience) – No need to have VPN when you use VMware View Security Server
    • Background tasking – Switch between apps on your tablet and come right back
  • Easy ESXi 5.5 upgrade via command line

    ESXi 5.5 was just released general availability (GA) on Sunday (9/22) and I’m itching to upgrade the home lab to run the latest version with all it’s goodies. I wanted to try upgrading my hosts without having to go through the same process that I followed setting up ESXi on the NUC in the first place, injecting custom NIC drivers, etc.

    Enter the command line…

    1. Move all VM’s from the host and then put the host into Maintenance Mode.
    2. Go to the Configuration tab > Security Profile and Enable SSH under Services.
      ssh enabled
    3. Under Firewall, enable httpClient (outbound http).
      httpClient enable
    4. Open PuTTY (or other SSH client) and SSH into your host.
    5. Read More “Easy ESXi 5.5 upgrade via command line”

  • How to update VMware ESXi 6.7 to 6.7 Update 1

    To go along with the newly released VMware vCenter 6.7 Update 1 release, comes VMware ESXi 6.7 Update 1 as well.

    As you might expect with an Update 1 release there are a number of patches, fixes and new additions with ESXi 6.7 U1. If you haven’t already seen, check out the release notes here.

    Below are two ways to easily upgrade your ESXi 6.0-6.7 hosts to ESXi 6.7 U1 using the command line or by using VMware Update Manager.
    Read More “How to update VMware ESXi 6.7 to 6.7 Update 1”

Leave a Reply

Your email address will not be published. Required fields are marked *

One Comment

  1. Mike – Great article! Do you know the exact process SRM goes through to change the ip and hostname on a Linux host? I’m assuming it is uses the vmware tools installed on the Linux host?