Setup Synology Syslog server for VMware ESXi

After performing my home lab upgrade, ESXi now runs from a USB stick and because of that vSphere would complain that the system logs where on non-persistent storage:
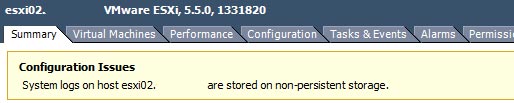
ESXi syslog error

If I wanted I could have ran the vCenter Server Appliance (vCSA) as it comes with it’s own syslog server, or I could have used something like KIWI or Splunk to be my syslog server. I instead went the route of my Synology NAS as it too has the ability to act as a syslog server and these are the steps I performed to setting it up.

  1. Log into your admin panel for the Synology and open the Package Center and click on Utilities and then INSTALL under “Syslog Server”.
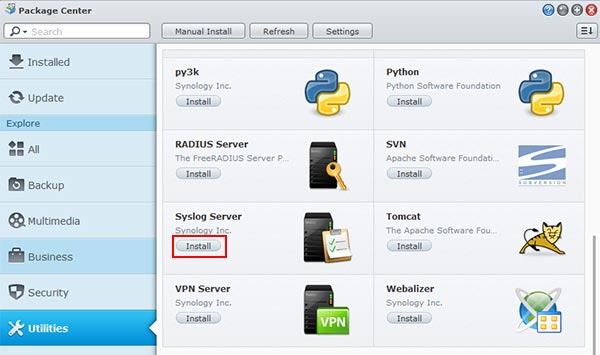
    synology syslog install
  2. Next I created a folder called “syslogs” on the Synology for all the log files to live by opening Control Panel > Shared Folder and then clicking on “Create”
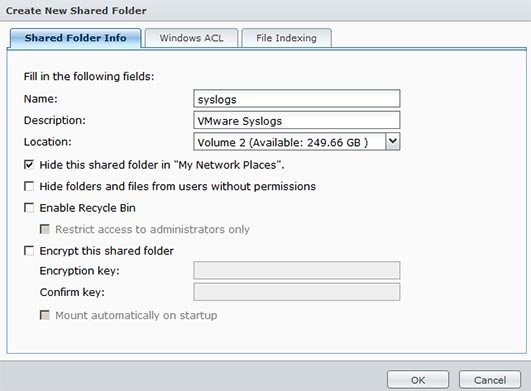
    new syslog folder
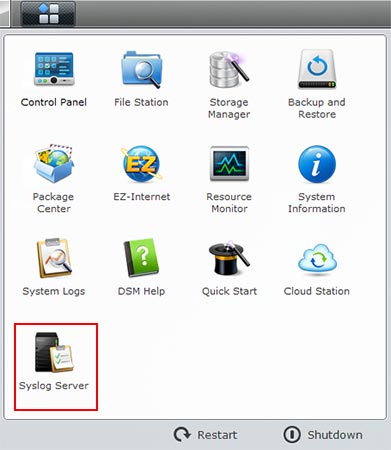
  3. Now open the Synology Syslog Server.
    start syslog server
  4. Click on Server Settings and then check Enable Syslog Server and change the location to your newly created folder, in my case “syslogs”.
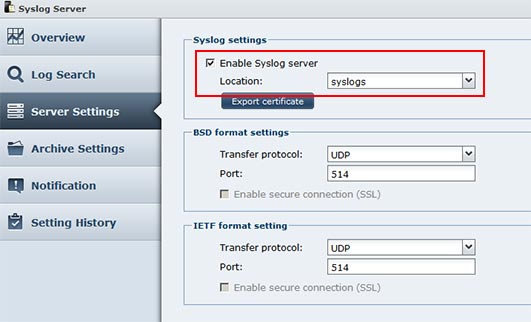
    enable sylog server
  5. Now we need to head over to vSphere and for each host go to the Configuration tab, then Security Profile.
  6. Next to Firewall, click Properties and check “syslog” which will open ports 514 and 1514 and click on OK, this will allow our host to communicate with the new syslog server on the Synology.
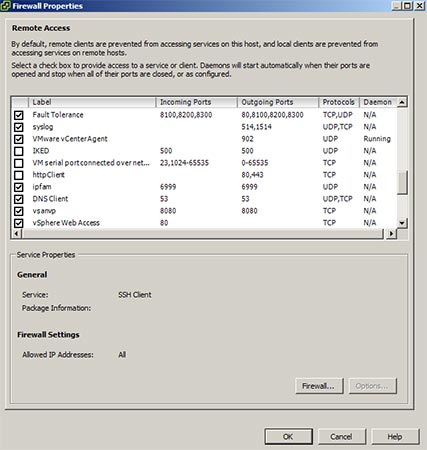
    enable esxi syslog firewall
  7. Still in the Configuration tab, click Advanced Settings and expand Syslog and click on Global.
  8. Type in the IP address of your Synology in the Syslog.global.logHost field and click OK.
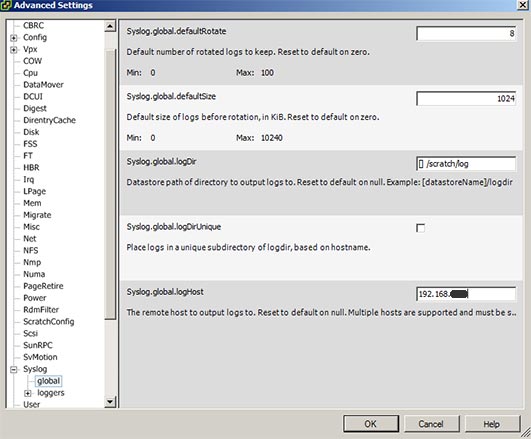
    esxi configure syslog
  9. That’s is, just be sure to repeat steps 6 thur 8 for each host you have in your environment!
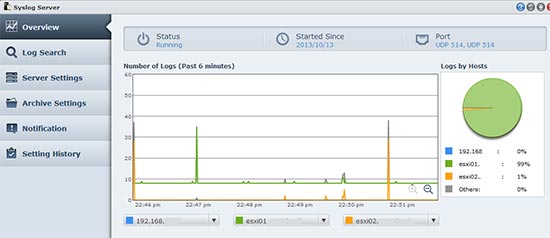
    Logs

Note: The above steps where performed using a Synology DS412+, running DSM 4.3-3776. Your steps may vary if running a different model and/or version of DSM.

Similar Posts

  • How to Upgrade PowerShell 7 to latest version

    Have you opened a Windows Terminal and seen a highlighted message stating “A new PowerShell stable release is available …“?

    powershell 7 upgrade prompt

    Well you could go to the link provided in the prompt, download the upgrade and then run it on your machine, or you can quickly and easily upgrade PowerShell 7 directly from the terminal by typing the following command.

    Invoke-Expression "& { $(Invoke-Restmethod https://aka.ms/Install-PowerShell.ps1) } -UseMSI"
    

    This will automatically download and run the latest version of PowerShell 7 and run the installer for you. See quick and easy!

  • Easy ESXi 5.5 upgrade via command line

    ESXi 5.5 was just released general availability (GA) on Sunday (9/22) and I’m itching to upgrade the home lab to run the latest version with all it’s goodies. I wanted to try upgrading my hosts without having to go through the same process that I followed setting up ESXi on the NUC in the first place, injecting custom NIC drivers, etc.

    Enter the command line…

    1. Move all VM’s from the host and then put the host into Maintenance Mode.
    2. Go to the Configuration tab > Security Profile and Enable SSH under Services.
      ssh enabled
    3. Under Firewall, enable httpClient (outbound http).
      httpClient enable
    4. Open PuTTY (or other SSH client) and SSH into your host.
    5. Read More “Easy ESXi 5.5 upgrade via command line”

  • How to easily add an ESXi SSH login message banner

    ESXi issues message

    Preparing for some upcoming audits, I noticed one of the checkpoints was to ensure each ESXi host was configured with a warning banner stating the machine is being monitored and audited when someone logs into the ESXi host via SSH. This type of message is something you see on most any company or government computer before you login.

    There are two message types that can be used to achieve this, the first being login banner (/etc/issue) and MOTD (/etc/motd). The difference between the two are where they are shown. The login banner is shown between the username and password inputs during login, while the MOTD is displayed after a user has successfully logged into SSH.

    Read More “How to easily add an ESXi SSH login message banner”

  • Secure your Synology NAS, install a SSL certificate

    I’ve been using the default setup on my Synology DS412+ with HTTPS enabled for a while now but knew it really wasn’t all that secure without a proper SSL certificate and creating a self-signed certificated isn’t all the much better and can be easily forged. I decided it was about time I used a “real” certificate to better secure the NAS.

    Prerequisites before starting

    • You need to own a domain name, for example MikeTabor.com and be able to receive email from the domain name.
      If you don’t already have a webhost for the domain, I’d suggest BlueHost.

    • You also need a DDNS service setup. In this case and for my use, I simply use the Synology DDNS service they offer for free.
    • With those two setup, you will also want to add a CNAME DNS forward from your domain (or subdomain if you wish to go that route) to your DDNS service.
    • Finally you’ll want to make sure Port Forwarding has been configured on your router.

    Read More “Secure your Synology NAS, install a SSL certificate”

  • Crucial 16GB memory, perfect for Intel NUC

    crucial 16gb 204pin memory

    I’m a huge fan the of Intel NUC‘s for a VMware home lab. In fact I just recently picked up my third Intel NUC to give me more head room for a small VMware Horizon (View) environment at home.

    I typically use G.Skill memory in my NUC’s as I’ve had great luck with the brand in my desktop and laptop for years. However G.Skill has been increasing in price which made me look around for alternatives and came across Crucial DDR3 204-pin memory for less money, but days after I purchased it they too went up in price. However they are now back on sale and cost about $50 less then the G.Skill memory I have been using in my first two NUC’s.

    I’ve been using the Crucial memory now for the last several months without any problems and even though they are rated at a lower voltage I can’t say I really see any difference in power savings or consumption compared to the G.Skill 1.5V. If you’re looking to upgrade now might be a good time to take advantage of the sale price.

  • Secure Public WiFi using Synology VPN Server

    Public WiFi is something many of use enjoy while we’re at the coffee shop, hotels, airports, libraries and so on, but one thing everyone should or needs to know is that public WiFi is NOT secure. In fact it’s so easy for people to eavesdrop and hack a public WiFi that even a 7 year old girl can do it, in under 11 minutes!

    The solution would be to use a VPN which will encrypt your traffic between you and the VPN server. So even if someone is attempting to hack the public WiFi, your traffic becomes useless to them and thus your emails, chats, web browsing and file transfers are now secure and out of other peoples sight.

    There are plenty of VPN services available such as NordVPN (which I also use), but you can also setup your own VPN server on your Synology NAS.

    Read More “Secure Public WiFi using Synology VPN Server”

Leave a Reply

Your email address will not be published. Required fields are marked *

One Comment