Upgrade VMware ESXi 5.5 U1 using command line
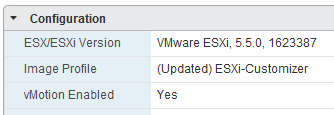
esxi 5.5 update1

In case you missed it somehow, VMware released ESXi 5.5 Update 1 this week. In the last update I also used the command line to upgrade my Intel NUC hosts, which worked flawlessly. This time I’ve updated via command line as well and this is how.

  1. vMotion any machines currently on the host, then place the host into Maintenance Mode.
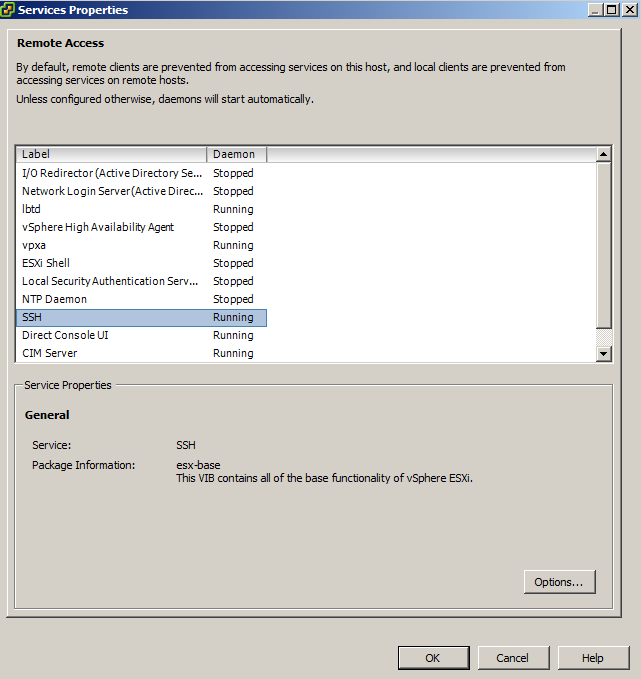
  2. On the host you’re about to upgrade, go to the Configuration tab > Security Profile and Enable SSH under Services.
    ssh enabled
  3. Open PuTTY (or other SSH client) and SSH into your host.
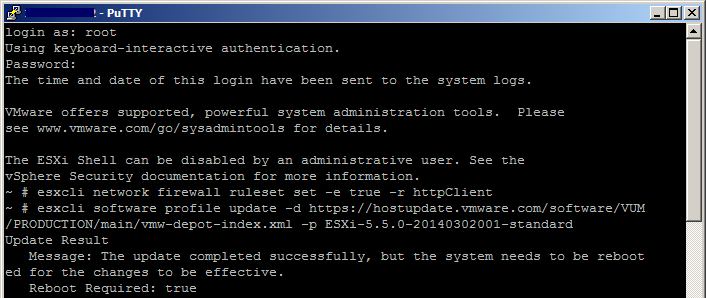
  4. Type the following command to open the firewall for outgoing HTTP requests.
    esxcli network firewall ruleset set -e true -r httpClient
  5. Now type the following command to download and upgrade to ESXi 5.5U1
    esxcli software profile update -d https://hostupdate.vmware.com/software/VUM/PRODUCTION/main/vmw-depot-index.xml -p ESXi-5.5.0-20140302001-standard
  6. Once that completes reboot your host by typing:
    reboot
  7. esxi 5.5 u1 command line

  8. After it’s rebooted PuTTy back into the host and disable the HTTP firewall rule by typing:
    esxcli network firewall ruleset set -e false -r httpClient
  9. Also, don’t forget to disable SSH when you’re done for security purposes!
This is essentially the same steps taken in the last upgrade, except this time the firewall changes was done via command line too. Personally I would make the firewall change in the GUI as well as it’s just as easy to enable the firewall rule while I’m already there enabling SSH.

Similar Posts

  • Setup Synology Syslog server for VMware ESXi

    After performing my home lab upgrade, ESXi now runs from a USB stick and because of that vSphere would complain that the system logs where on non-persistent storage:

    ESXi syslog error

    If I wanted I could have ran the vCenter Server Appliance (vCSA) as it comes with it’s own syslog server, or I could have used something like KIWI or Splunk to be my syslog server. I instead went the route of my Synology NAS as it too has the ability to act as a syslog server and these are the steps I performed to setting it up.

    Read More “Setup Synology Syslog server for VMware ESXi”

  • Installing VMware vCenter Server Appliance 6.5

    VMware has announced that VMware vSphere 6.5 has gone general available this week. Now installing VMware vCenter Server Appliance 6.5 (VCSA) is even easier as the requirement for the client integration plugin has been removed and now the VCSA appliance is delivered via an ISO image with an installation wizard that’s been broken up into two stages.

    The VCSA 6.5 ISO offers two types of installation methods, CLI and GUI install – both availalbe for Windows, Mac and Linux machines. In this guide I’ll walk through the steps of installing VCSA 6.5 using the Windows GUI install.

    Read More “Installing VMware vCenter Server Appliance 6.5”

  • vSphere 5.1 Release Date leaked, maybe?

    Looks like Sammy Bogaert over at Boerlowie’s Blog has possibly found the release date of vSphere 5.1… maybe?

    I was about to download vSphere Update Manager PowerCLI 5.0.

    I followed the main site and wanted to check the documentation first. So I clicked the Documentation button.

    vmware update manager

    This lead me to the Docs of Update Manager PowerCLI 5.1! That’s right, 5.1! With a release date of 10 September 2012.

    vsphere5.1 release date

    None of the links for 5.1 work, so no news on any new features…

    Guess somebody at VMware was a bit too fast to update the website

    Nice find Sammy, guess time will tell if the Sept. 10th date is the actual release date or not.

  • How to manually delete NetApp SnapMirror snapshots

    The other day, one of our volumes in the lab environment filled up. This volume has a couple large VM’s on it, coupled with a couple different Veeam backup jobs running using the native Veeam backup methods as well as using NetApp snap mirror to snapshot the volume and then using Veeam to ship it out to Azure.

    At any rate the volume filled up to the point where vCenter wasn’t allowing me to migrate VM’s off the datastore. I really didn’t want to expand the volume just so I could move VM’s off of it.

    Instead, I decided to delete some of the older proof of concept snapshots from SnapMirror. Below are the quick and easy steps to clear up some un-used snapshots and free up some space on the datastore.

    Read More “How to manually delete NetApp SnapMirror snapshots”

  • My VMware View Windows 7 Optimization Guide

    These are the few steps I do when creating a new "Golden" image. Luckily I don’t have to do these steps all the time as I’ll create the "Golden" image when there is a new upgrade such as when we went from View 4.6 to View 5.0.1. I like to have a new fresh machine using new virtual hardware from the start. You could certainly just upgrade the virtual hardware on the "Golden" image, I just prefer to start clean.

    At any rate, here’s my list. Hopefully someone might find it somewhat useful and maybe even others can improve upon it.

    Preparing a new virtual machine

    1. Create New Virtual Machine – FILE > NEW > VIRTUAL MACHINE (CTRL+N)
    2. Under Configuration select CUSTOM.
    3. Select a Name, Folder, Host, Cluster, and Storage.
    4. Under Guest Operating System select Windows and then Windows 7 32bit under the Version drop down.
    5. Select which Network (VLAN) and under Adapter select VMXNET 3.
    6. Configure disk size to 30GB THIN provisioned.

    Read More “My VMware View Windows 7 Optimization Guide”

Leave a Reply

Your email address will not be published. Required fields are marked *