VMware Workstation 11 released
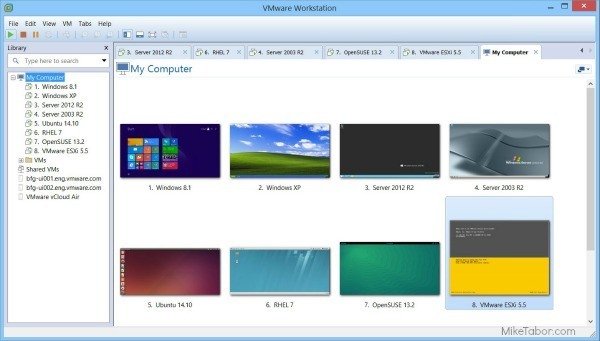
VMware Workstation 11 Unmatched OS Support

At the start of October VMware announced Workstation 11, along with VMware Player 7 Pro and said both products would be available sometime in December. Well today is the day, VMware has now officially released VMware Workstation 11!

Workstation 11 adds support for the latest version of Windows and Linux, as well as the latest processors and hardware, and also adds the ability to connect to VMware vCloud Air.

Key VMware Workstation 11 features

  • Ready for Windows 10 Technical Preview as well as Ubuntu 14.10, RHEL 7, CentOS 7, OpenSUSE 13.2
  • Supports the latest Intel 64-bit x86 processors, including Haswell. Taking advantage of key new Haswell extensions, also delivers up to 45 percent improvement in CPU intensive operations like multimedia and encryption/decryption compared to Workstation 10.
  • Create virtual machines with up to 16 vCPUs, 8 TB virtual disks, 64 GB memory, and now 2GB video memory.
  • Ability to connect to VMware vClount Air which allows you to upload, run, and view virtual machines right from the VMware Workstation interface.

VMware Workstation 11 can be purchased for $249.99 and upgrades from Workstation 9.x and 10.x to VMware Workstation 11 will cost $149.99 at VMware.com.

VMware Workstation, 30% discount!

VMware kicked off a “Cyber Monday” promotion, on Dec 1th, 2014, offering a 30% discount on VMware Workstation 11, VMware Player 7 Pro, VMware Fusion 7 and Fusion 7 Pro. This offer ends however on Dec 5, 2015 at 11:59pm PST!

This brings the price down on VMware Workstation 11 to $174.99 and $104.99 for the full and upgrade versions respectively.
Similar Posts

  • My VMware View Windows 7 Optimization Guide

    These are the few steps I do when creating a new "Golden" image. Luckily I don’t have to do these steps all the time as I’ll create the "Golden" image when there is a new upgrade such as when we went from View 4.6 to View 5.0.1. I like to have a new fresh machine using new virtual hardware from the start. You could certainly just upgrade the virtual hardware on the "Golden" image, I just prefer to start clean.

    At any rate, here’s my list. Hopefully someone might find it somewhat useful and maybe even others can improve upon it.

    Preparing a new virtual machine

    1. Create New Virtual Machine – FILE > NEW > VIRTUAL MACHINE (CTRL+N)
    2. Under Configuration select CUSTOM.
    3. Select a Name, Folder, Host, Cluster, and Storage.
    4. Under Guest Operating System select Windows and then Windows 7 32bit under the Version drop down.
    5. Select which Network (VLAN) and under Adapter select VMXNET 3.
    6. Configure disk size to 30GB THIN provisioned.

    Read More “My VMware View Windows 7 Optimization Guide”

  • Shrink a thin provisioned VMDK disk

    When maintaining a Horizon View environment I like to keep my parent images as small as possible and over time a thin provision disk can start to grow on you if you don’t watch it – be it from downloading installers, updates, or even running disk defrag. While there isn’t a simple, one click button in the View Administrator Console there is a fairly easy manual method using vmfkstools.

    Before we can use “vmkfstools” to shrink the VMDK file we must zero out any unused space on the thin provisioned disk. A simple way of doing this is by using a free utility called SDelete from Sysinternals.

    Read More “Shrink a thin provisioned VMDK disk”

  • Backup and Restore VMware VCSA 6.5

    With the release of vSphere 6.5, the VCSA has had a built-in and convenient way easily backup the configuration, inventory and even historical data right from the VAMI and directly into a TAR bundle. VMware has also made restoring the VCSA from a backup just as easy as well.

    Below are quick and dirty steps to backing up and restoring your VMware VCSA!

    Read More “Backup and Restore VMware VCSA 6.5”

  • VMware Workstation 8.0.4 released

    VMware has just released it’s forth minor update for VMware Workstation 8, bringing it up to 8.0.4. The looks to contain mostly a few bug and security fixes.

    General Issues

    • Linux guests running the Linux kernel version 2.6.34 or later could not be pinged from the host via an IPv6 address.
    • On rare occasions, Linux guests would suddenly fail to Autofit or enter Unity.
    • Unity mode would exit if the title bar of an application contained certain non UTF-8 encoded extended ASCII characters.
    • On Windows hosts, the VMware Workstation user interface sometimes became unresponsive when minimized from full-screen mode if the suggestion balloon was being displayed.
    • On Windows hosts, the user interface sometimes became unresponsive if the application was rendered on an extended display that was abruptly disconnected.

    Read More “VMware Workstation 8.0.4 released”

  • Easy ESXi 5.5 upgrade via command line

    ESXi 5.5 was just released general availability (GA) on Sunday (9/22) and I’m itching to upgrade the home lab to run the latest version with all it’s goodies. I wanted to try upgrading my hosts without having to go through the same process that I followed setting up ESXi on the NUC in the first place, injecting custom NIC drivers, etc.

    Enter the command line…

    1. Move all VM’s from the host and then put the host into Maintenance Mode.
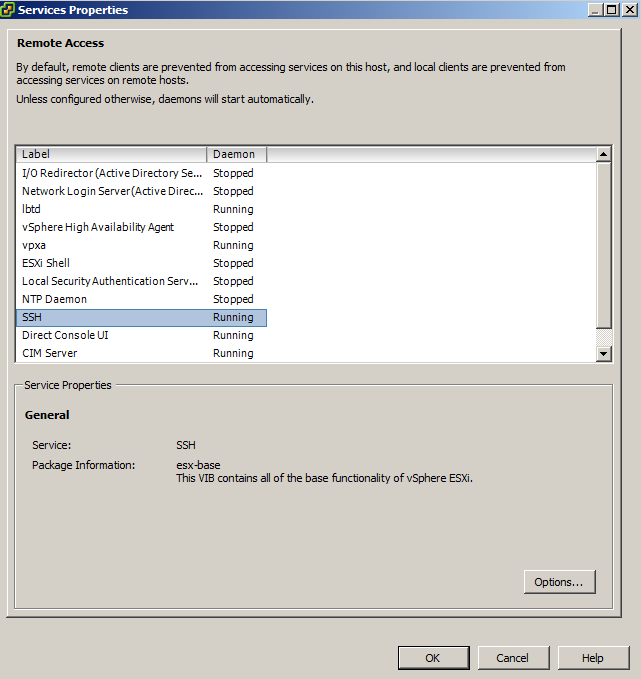
    2. Go to the Configuration tab > Security Profile and Enable SSH under Services.
      ssh enabled
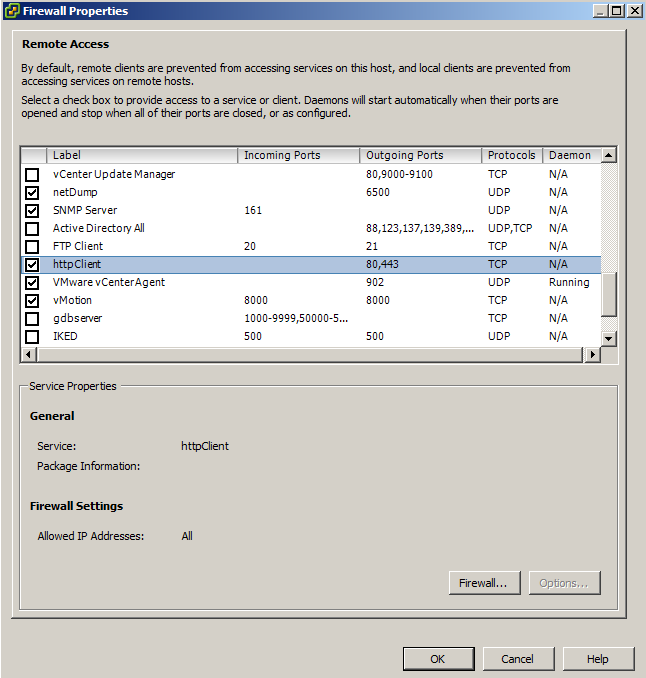
    3. Under Firewall, enable httpClient (outbound http).
      httpClient enable
    4. Open PuTTY (or other SSH client) and SSH into your host.
    5. Read More “Easy ESXi 5.5 upgrade via command line”

  • How to convert VMDK to OVF file format

    Here is a quick and easy way to convert a VMDK to OVF file format using the OVF Tool from VMware.

    1. First download and install the VMware OVF Tool for your operating system.
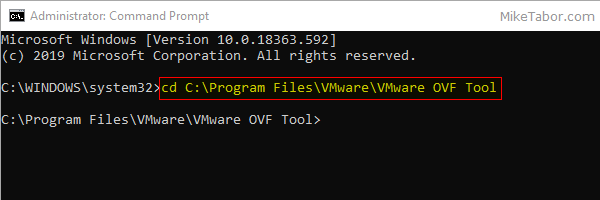
    2. Open a command prompt as Administrator and navigate to the OVF Tool install directory:
      
      cd C:\Program Files\VMware\VMware OVF Tool
      

      vmdk to ovf command prompt

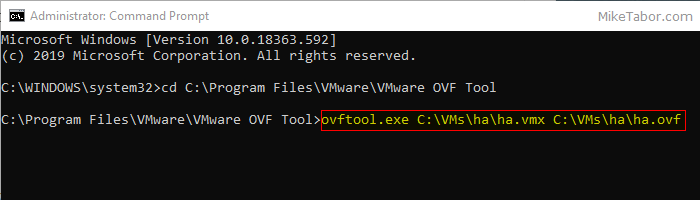
    3. Next, type in the following command to convert VMDK to OVF:
      
      ovftool.exe \virtualmachine.vmx \virtualmachine.ovf
      

      convert vmdk to ovf command

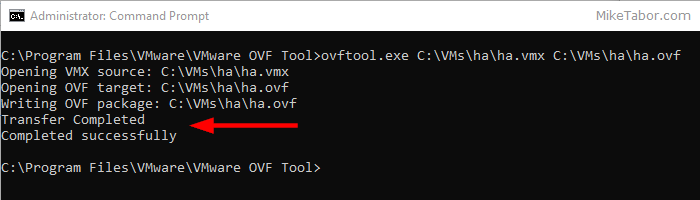
    After a few minutes time you should you should see a “Transfer Completed, Completed successfully” message and your VMDK to OVF file conversion is complete and ready for use.
    convert vmdk to ovf complete

Leave a Reply

Your email address will not be published. Required fields are marked *