Easy ESXi 5.5 upgrade via command line
ESXi 5.5 was just released general availability (GA) on Sunday (9/22) and I’m itching to upgrade the home lab to run the latest version with all it’s goodies. I wanted to try upgrading my hosts without having to go through the same process that I followed setting up ESXi on the NUC in the first place, injecting custom NIC drivers, etc.
Enter the command line…
- Move all VM’s from the host and then put the host into Maintenance Mode.
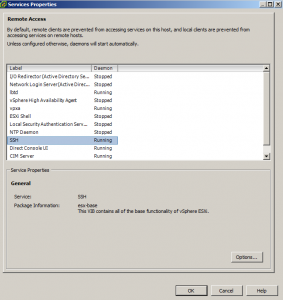
- Go to the Configuration tab > Security Profile and Enable SSH under Services.

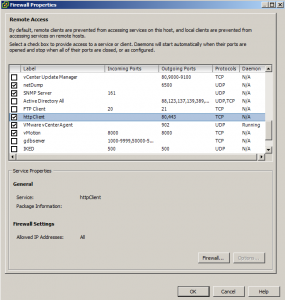
- Under Firewall, enable httpClient (outbound http).

- Open PuTTY (or other SSH client) and SSH into your host.
- Type the following command to download and install the update:
esxcli software profile update -d https://hostupdate.vmware.com/software/VUM/PRODUCTION/main/vmw-depot-index.xml -p ESXi-5.5.0-1331820-standard - Depending on your internet connection, this could take just a few minutes or longer. Once finished you should see the following:

- Reboot your host then verify ESXi 5.5 is installed:

- note: I did have to restart the virtualcenter service in order for the Web Client to show the updated version number.

That’s it, it’s as simple as that! Because I ran the UPDATE command and not the INSTALL command, my existing injected NIC drivers for the Intel NUC remained in place. So a quick and easy upgrade for hosts with no CD-ROM or ability to virtually mount a CD image.
UPDATE:
View available upgrades
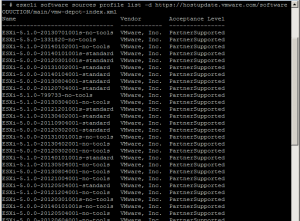
The steps above work perfectly for when you want to upgrade to ESXi 5.5, but what about when newer versions come out or you want to apply a different update? Simply run this command to view all available image profiles in the depot:
esxcli software sources profile list -d https://hostupdate.vmware.com/software/VUM/PRODUCTION/main/vmw-depot-index.xmlThen replace the file name in the command from Step 5 with the new/other image profile of your choice.


Thank You. This took care of my issue of not being able to inject NIC drivers to 5.5 and only could on 5.1, this upgraded my NUC server and all is well.
Welcome! Glad I was able to help.
Thanks for sharing! Just did this upgrade on my two NUCs, worked perfectly.
Glad to have helped!
Is it strictly necessary to move all the VMs off the host, or is shutting them down and putting it in Maintenance mode sufficient?
No it is not required that you move the VM’s off the host before upgrading them. I prefer to move all VM’s off in case something was to go wrong and so that I don’t have to power down the machines.
Powering off the VM’s and putting the host into maintenance mode will work just fine.
Okay; good. We’re SAN-less right now (have one sitting on the floor in my office waiting to be racked-and-stacked), so moving the VMs off the hosts is non-trivial. Much less work to just power them off and put the host into maintenance mode.
One more question: Is that URL still current? How did you arrive at it, for future reference?
Yes, the URL is current and is the URL that VUM uses. You can verify this info in KB: 1004543
Okay; and the argument to the -p flag (ESXi-5.5.0-1331820-standard) came from what source? I’m guessing it’ll always just be the current version + build #?
The source of the info comes from the documentation, take a look at the esxcli software section. -p tells it what profile to use, in this case we’re using the most current ESXi image. Hope this helps.
Yeah, I guess I wasn’t asking so much about what the “-p” means (I could figure that), but rather, how you arrived at the “5.5.0-1331820-standard” – in other words, when ESXi 5.6 comes out (or whatever the next version will be called) and I want to replicate this, where would I need to go to determine what exact version number/build number to use in the command? It looks like I can just go to the MyVMWare site and snag the version + build number – just wasn’t sure if that was your process as well, or if there was a better way of arriving at it.
The way I do it is by doing the same steps above (enable SSH and httpclient) and then run this command:
esxcli software sources profile list -d https://hostupdate.vmware.com/software/VUM/PRODUCTION/main/vmw-depot-index.xmlThis will then display a list of all available images at depot. So when the new version of ESXi comes out you’d type the above, find the new name and then replace that name with the name I’ve supplied in the post.
I’ve updated the post to add the “view” command. :)