How to enable SSH auto login on Ubiquiti EdgeRouter X

edgerouter ssh key auto login

SSH key authentication not only provides a more convenient way to logging into your EdgeRouter X, but is also more secure because the private key replaces the need of a password and thus is typically more difficult to brute force.

The below steps will show how to generate a SSH key, add it to the router, and then disable password authentication so that only the key-pair can be used to login.

How to setup SSH based authentication on EdgeRouter X

Better secure your Ubiquiti EdgeRouter X using SSH login certificates!

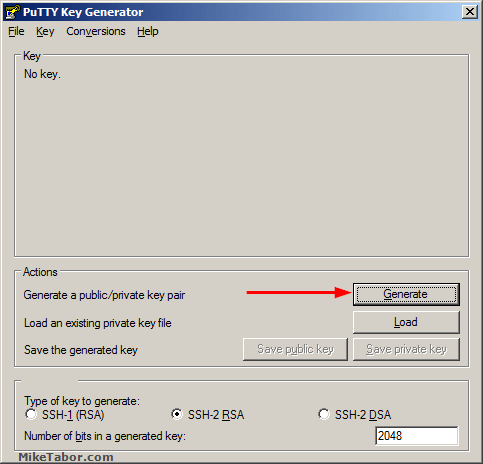
  1. Open PuTTYGen.exe and click on Generate to create the public and private key pair.
    edgerouterx ssh key generate
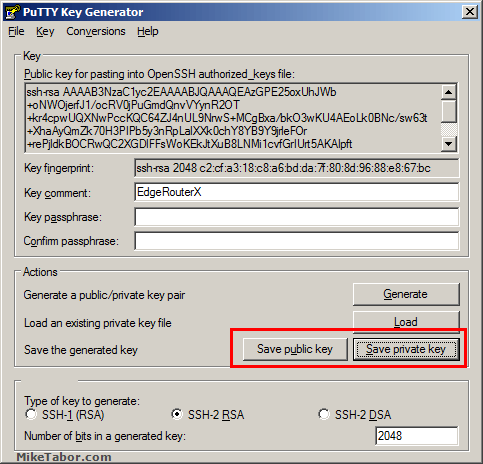
  2. Click on “Save public key” naming it edgerouter.pub then click on “Save private key” naming it edgerouter-pri.ppk
    edgerouter ssh key save keys
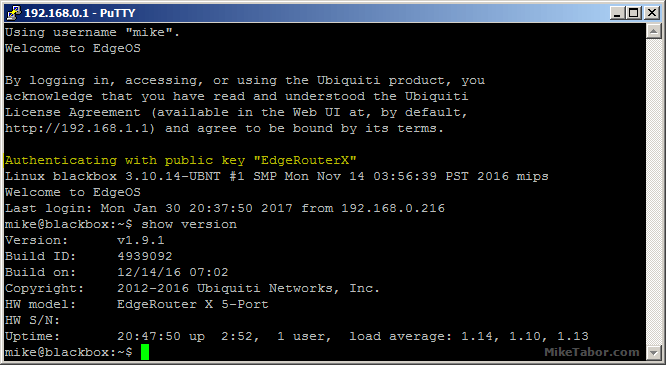
  3. Open PuTTY and log into your EdgeRouter X using your username and password and then type:
    configure

    edgerouter ssh key configure

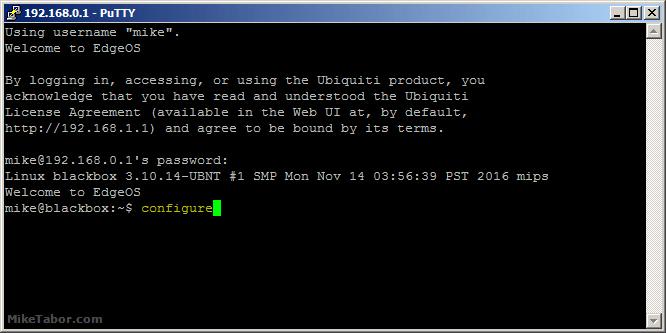
  4. Create the public key file by typing:
    vi edgerouter.pub

    edgerouter ssh key create key file

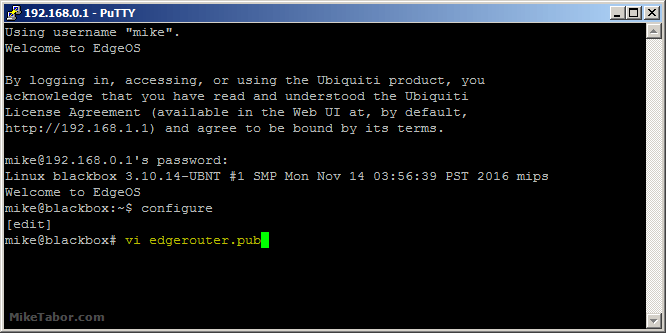
  5. Enter VI Insert mode by pressing i and paste your public key from the PuTTYGen “public key for pasting into OpenSSH authorized_keys file” field and then press ESC and ZZ to exit insert mode and save and exit VI.
  6. Load your key file into your configuration by typing the following:
    loadkey ACCOUNT_NAME edgerouter.pub

    edgerouter ssh key loadkey

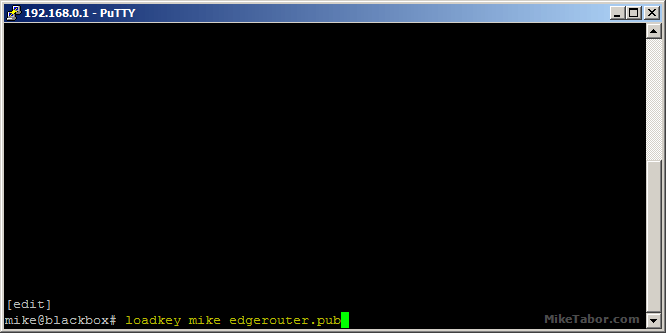
  7. Lets disable password authentication so that only the RSA-Key pair is allowed to log into the EdgeRouter by typing:
    set service ssh disable-password-authentication

    edgerouter ssh key disable password

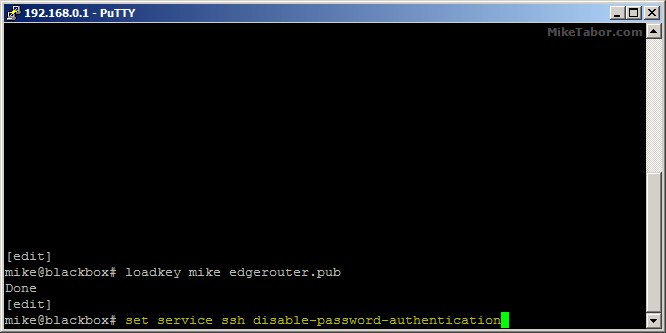
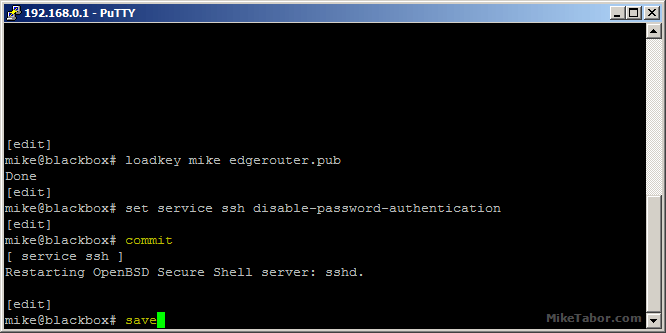
  8. Now lets commit and save our work.
    edgerouter ssh key commit save

Configure PuTTY to use the SSH certificate

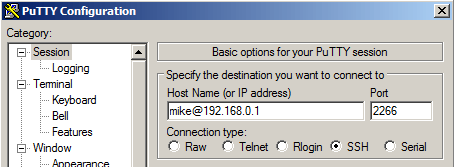
  1. Open PuTTY and enter the host IP and port number as you normally would.
    edgerouter ssh key host name
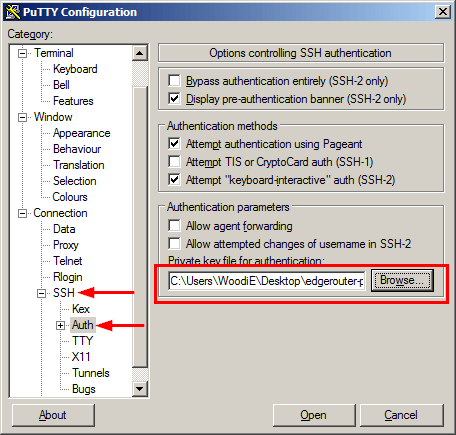
  2. Next expand SSH, then click on Auth and click the Browse button and enter the path of the edgerouter-pri.ppk file.
    edgerouter ssh key putty key
  3. When you click on “Open” your SSH session will no longer ask for your password and instead auto login using the SSH private certificate key!
    edgerouter ssh key success
Re-enable password authentication on the EdgeRouter X

If for some reason you no longer want to use the SSH certificate and go back to using passwords to login you can do so very easily by following the below.

  1. Login in SSH using PuTTY and type:
    configure
  2. Then type:
    delete service ssh disable-password-authentication

    edgerouter enable password authentication

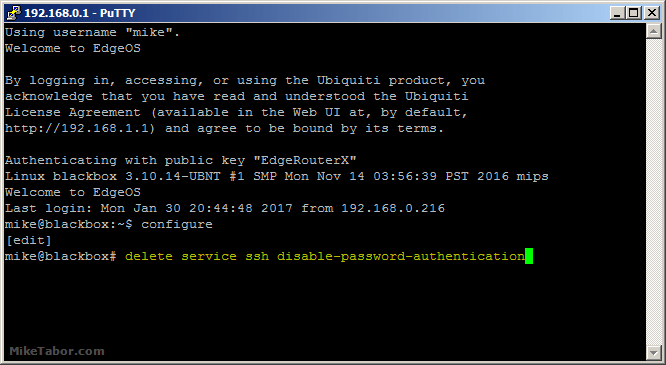
  3. Then type commit , save , then exit

Similar Posts

  • How to add Realtek R8168 to ESXi 5.5 Update 2 ISO

    Realtek

    Over the past weekend I was working on a whitebox ESXi host and wanted to upgrade it to ESXi 5.5 Update 2 from an older version of ESXi 5.1 using a realtek R8168 network card. While I could have performed an in place upgrade, such as via command line, a clean install was preferred. However, VMware has removed a number of NIC drivers from ESXi 5.x and trying to install with the base ESXi image would result in a “No Network Adapters” error during install.

    In order to do a clean install you have to re-add the Realtek R8168 NIC drivers back into the ESXi 5.5 image, otherwise a NIC will not be found and thus ESXi will not install. These are the steps to easily re-add the Realtek R8168 drivers into ESXi 5.5 ISO by making a custom ESXi 5.5 image.

    Read More “How to add Realtek R8168 to ESXi 5.5 Update 2 ISO”

  • My VMware ESXi Home Lab Upgrade

    Although the focus in my career right now is certainly more cloud focused in Amazon Web Services and Azure, I still use my home lab a lot.

    For the last 5+ years my home lab had consisted of using 3x Intel NUC’s (i5 DC53427HYE), a Synology NAS for shared storage and an HP ProCurve switch. This setup served me well for most of those years. It has allowed me to get many of the certifications I have, progress in my career and have fun as well.

    At the start of this year I decided it was time to give the home lab an overhaul. At first I looked at the newest generation of Intel NUC’s but really wasn’t looking forward to dropping over $1,300 on just partial compute (I’d still need to be RAM for each of the 3 NUC’s). I also wanted something that just worked, no more fooling around with network adapter drivers or doing this tweak or that tweak.

    I also no longer needed to be concerned about something that had a tiny footprint. I also questioned if I really needed multiple physical ESXi hosts. My home lab isn’t running anything mission critical and if I really wanted I could always build additional nested VMware ESXi hosts on one powerful machine if I needed.

    So in the end, the below is what I settled on. Replacing all of my compute, most of my networking and adding more storage!

    Read More “My VMware ESXi Home Lab Upgrade”

  • VMware ESXi 5 home lab upgrade

    In the past I’ve been using a single server to run my VMware ESXi home lab. it was slow, old, big and loud. I’ve been meaning to upgrade my home lab for a while and just never got around to it, until now! When looking for new hardware I wanted the servers to be as compact as possible, quiet, and low energy usage as possible while still having some horsepower.

    I debated on going the whitebox solution as I build all my own desktops anyway, I also looked at several other solutions such as the HP ML310e server, Shuttle XH61V barebones machine, but ultimately decided to go with two Intel NUC i5’s.

    Intel NUC i5 and 16GB ram

    Intel NUC i5 DC53427HYE Features:

    • Uses very little energy
    • Completely quiet
    • Supports up to 16GB RAM
    • A dual core CPU that scores nearly 3,600 in PassMark benchmarking
    • Includes vPro which allows me to easily run both NUC’s headless
    • Extremely small, nearly 4 1/2″ inch square footprint

    Read More “VMware ESXi 5 home lab upgrade”

  • Installing DD-WRT on an ASUS RT-AC66U router

    I recently upgraded my EnGenius ESR-750H wireless N router to an Asus RT-AC66U wireless AC router. The EnGenius router has been pretty good for me but basic and no support for other firmware. The Asus RT-AC66U not only has a number of added features and support for 802.11ac, it also doesn’t seem to be plagued with the port 32764 bug or the Linksys “TheMoon” virus that’s been going around on select Linksys models, but the Asus also has a number of firmware options that can be used with this router such as Merlin, Tomato, and DD-WRT.

    I’ve used DD-WRT in the past with other routers and had great success and decided to go that route with my new AC66U router as well.

    How to install DD-WRT on Asus RT-AC66U

    Read More “Installing DD-WRT on an ASUS RT-AC66U router”

  • How to install Ubiquiti UniFi controller on the cloud

    Recently I replaced my wireless router, an Asus RT-AC66U, with an Ubiquiti EdgeRouter X router and Ubiquiti UAP-AC-LR access point. Both of which are a HUGE step up over traditional consumer wireless routers.

    The Ubiquiti access points use software called the Ubiquiti UniFi controller to configure and control the access points which can be installed locally or in the cloud – allowing you to manage the access points no matter where they are located.

    To automate the install process, I created a simple script to deploy the Ubiquiti UniFi Controller in the cloud on a Ubuntu server, and have also tested the script on three popular VPS providers: Linode, Vultr, and DigitalOcean – all three worked perfectly!

    Read More “How to install Ubiquiti UniFi controller on the cloud”

  • Synology DSM 5.1-5021 update released

    Synology

    Synology released DSM 5.1-5021 update as well as Cloud Station 3.1-3320 today. This update includes all the updates since 5.1-5004 as well as fixes for a number of vulnerabilities in PHP, OpenVPN, and other security improvements. DSM 5.1-5004 also improves Amazon S3 backup stability along with a number of other fixes and improvements.

    Read More “Synology DSM 5.1-5021 update released”

Leave a Reply

Your email address will not be published. Required fields are marked *

5 Comments

  1. so following “exactly” as shown gets all muddied up at Step: “vi edgerouter.pub” I am logged into my ERX via Putty successfully, BUT then it goes south….. Once I do that the putty app will not “esc zz” or save. The console will not take any commands. WTF. where is the mistyped info? referring to your instructions. I am literally reproducing steps exactly. not working, noWayJose

    1. If I had a dollar for every time I heard someone couldn’t exit out of VI I would be a rich man. haha

      If you’re pressing the ESC key and then typing “zz” then you’re doing it wrong. As it’s mentioned in the above post it’s “ZZ” (take super special note of the CAPS). In VI zz and ZZ does NOT mean the same. ;-)

      -Michael

  2. Hi Mike,
    I’ve added the authentication method to my laptop and disabled username/login, now I can easily connect. However, if I wanted to access my router from another computer, it would require me to copy that secret key over to the new computer?
    Lastly, if my laptop dies, how would I regain access to the router again? Would this require a physical connection into eth0 to regain control?
    Thanks!

    1. Bruce,

      Yes you need to store your private key in a secure location and I would highly suggest backing it up. I like to keep all my SSH keys in an encrypted container that gets backed up on my NAS and to Backblaze.

      -Michael