Install Synology NFS VAAI Plug-in for VMware

Synology

In the recent DSM update (5.1), Synology added VMware VAAI support for NFS volumes using two primitives which are Full File Clone and Reserve Space. What do these VAAI primitives offer?

  • Full File Clone enables virtual disks to be cloned by the NAS albeit while the machine is powered off.
  • Reserve Space allows you can create a thick VMDK file. However Reserve Space does not off-load the work to the array. The benefit of thick VMDKs is that many use eager-zero for high I/O performance needs.

On the Synology side of things you just need to update to DSM 5.1, but in order to take advantage of VAAI you still need to install the VIB plugin on your ESXi 5.5 hosts.

Installing Synology NFS VAAI Plug-in

There are two ways to install the Synology NFS VAAI plug-in, command line and via VMware Update Manager and I’ll include steps below for both starting with command line.

Command line:

  1. Download the Synology NFS Plugin online bundle (mirror) and upload it to a datastore that’s seen by your hosts (in my case I uploaded it to my “Data” datastore).
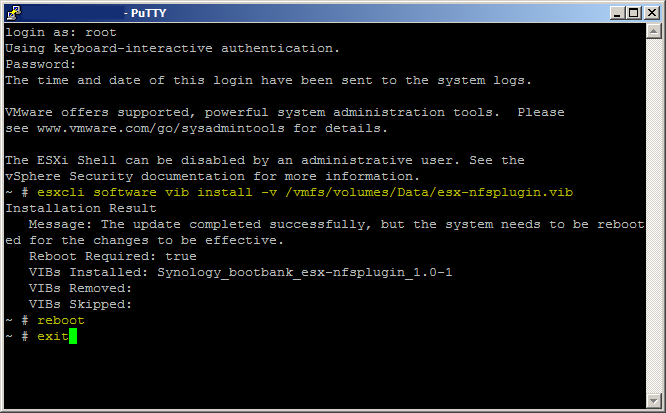
  2. Next SSH into your ESXi host and run the following command:
    esxcli software vib install –v /vmfs/volumes/Data/esx-nfsplugin.vib

    Be sure to replace the datastore name with the name of your own datastore.

  3. Finally reboot the ESXi host.

synology nfs vaai vib install

After the reboot you can verify that the Synology NFS VAAI VIB has been installed by typing the following in the command line:

esxcli software vib list | more

synology nfs vaai vib installed

VMware Update Manager:

Be sure to download the Synology NFS Plugin offline bundle (mirror), this is different from the online bundle as mentioned in the Command Line install.

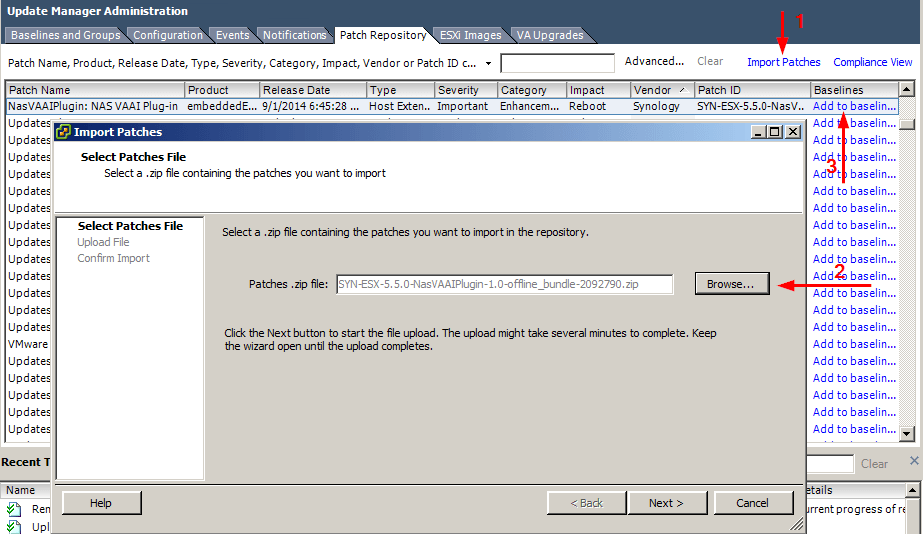
  1. Open vSphere and go to Update Manager and then the “Patch Repository” tab and click on “Import Patches
  2. Next browse to the location of the Synology VAAI offline bundle zip file and import the patch.
  3. After the patch has been imported, click on “Add to baseline…” to add the plugin to an existing baseline. Or you can create a new baseline just for this plugin under the “Baselines and Groups” tab and clicking “Create”
  4. Finally, Remediate each of your hosts connected to the Synology NAS
synology vaai vum

Synology VAAI NFS Supported

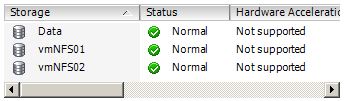
Once you’ve installed the Synology NFS VAAI plugin on your hosts, either via command line or VUM, your Synology datastores “Hardware Acceleration” should go from looking like this:
VAAI before

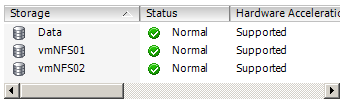
To now each Synology NFS volume “Hardware Acceleration” being listed as Supported like so:
VAAI after

Similar Posts

  • Setup Synology Syslog server for VMware ESXi

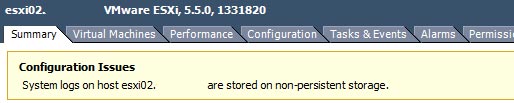
    After performing my home lab upgrade, ESXi now runs from a USB stick and because of that vSphere would complain that the system logs where on non-persistent storage:

    ESXi syslog error

    If I wanted I could have ran the vCenter Server Appliance (vCSA) as it comes with it’s own syslog server, or I could have used something like KIWI or Splunk to be my syslog server. I instead went the route of my Synology NAS as it too has the ability to act as a syslog server and these are the steps I performed to setting it up.

    Read More “Setup Synology Syslog server for VMware ESXi”

  • VMware ESXi 5 home lab upgrade

    In the past I’ve been using a single server to run my VMware ESXi home lab. it was slow, old, big and loud. I’ve been meaning to upgrade my home lab for a while and just never got around to it, until now! When looking for new hardware I wanted the servers to be as compact as possible, quiet, and low energy usage as possible while still having some horsepower.

    I debated on going the whitebox solution as I build all my own desktops anyway, I also looked at several other solutions such as the HP ML310e server, Shuttle XH61V barebones machine, but ultimately decided to go with two Intel NUC i5’s.

    Intel NUC i5 and 16GB ram

    Intel NUC i5 DC53427HYE Features:

    • Uses very little energy
    • Completely quiet
    • Supports up to 16GB RAM
    • A dual core CPU that scores nearly 3,600 in PassMark benchmarking
    • Includes vPro which allows me to easily run both NUC’s headless
    • Extremely small, nearly 4 1/2″ inch square footprint

    Read More “VMware ESXi 5 home lab upgrade”

  • How to manually delete NetApp SnapMirror snapshots

    The other day, one of our volumes in the lab environment filled up. This volume has a couple large VM’s on it, coupled with a couple different Veeam backup jobs running using the native Veeam backup methods as well as using NetApp snap mirror to snapshot the volume and then using Veeam to ship it out to Azure.

    At any rate the volume filled up to the point where vCenter wasn’t allowing me to migrate VM’s off the datastore. I really didn’t want to expand the volume just so I could move VM’s off of it.

    Instead, I decided to delete some of the older proof of concept snapshots from SnapMirror. Below are the quick and easy steps to clear up some un-used snapshots and free up some space on the datastore.

    Read More “How to manually delete NetApp SnapMirror snapshots”

  • How to add Realtek R8168 to ESXi 5.5 Update 2 ISO

    Realtek

    Over the past weekend I was working on a whitebox ESXi host and wanted to upgrade it to ESXi 5.5 Update 2 from an older version of ESXi 5.1 using a realtek R8168 network card. While I could have performed an in place upgrade, such as via command line, a clean install was preferred. However, VMware has removed a number of NIC drivers from ESXi 5.x and trying to install with the base ESXi image would result in a “No Network Adapters” error during install.

    In order to do a clean install you have to re-add the Realtek R8168 NIC drivers back into the ESXi 5.5 image, otherwise a NIC will not be found and thus ESXi will not install. These are the steps to easily re-add the Realtek R8168 drivers into ESXi 5.5 ISO by making a custom ESXi 5.5 image.

    Read More “How to add Realtek R8168 to ESXi 5.5 Update 2 ISO”

  • Crucial 16GB memory, perfect for Intel NUC

    crucial 16gb 204pin memory

    I’m a huge fan the of Intel NUC‘s for a VMware home lab. In fact I just recently picked up my third Intel NUC to give me more head room for a small VMware Horizon (View) environment at home.

    I typically use G.Skill memory in my NUC’s as I’ve had great luck with the brand in my desktop and laptop for years. However G.Skill has been increasing in price which made me look around for alternatives and came across Crucial DDR3 204-pin memory for less money, but days after I purchased it they too went up in price. However they are now back on sale and cost about $50 less then the G.Skill memory I have been using in my first two NUC’s.

    I’ve been using the Crucial memory now for the last several months without any problems and even though they are rated at a lower voltage I can’t say I really see any difference in power savings or consumption compared to the G.Skill 1.5V. If you’re looking to upgrade now might be a good time to take advantage of the sale price.

  • Synology 10GbE Upgrade for the Home Lab

    One big feature I was looking forward to taking advantage of when I replaced my old Synology DS1815+ with a new Synology DS1621+, was the PCIe expansion slot and support for 10GbE cards. I could now setup a 10GbE network between the NAS, the home lab Dell R720, and my main PC.

    My goal was to create a small 10GbE network without spending a ton of money.

    In order to achieve this goal I purchased the following items:

    Read More “Synology 10GbE Upgrade for the Home Lab”

Leave a Reply

Your email address will not be published. Required fields are marked *

4 Comments

  1. Hey MIke. Does this still work? I tried to find the download but it doesn’t seem to exist anymore. Do you know where I can get the offline bundle file?

    1. Nm I think I found it. Thanks! If this works, I have found the perfect machine for VMware Lab and some pretty good midrange gaming!