How to install Backblaze on Synology NAS
In case you’ve missed it, Crashplan announced yesterday that they are no longer offering a family backup plan but instead focusing on business plans. Immediately people started asking me on twitter for alternatives.
Well one option would be to upgrade to the more expensive Crashplan business plan or another option would be to check out Backblaze!
In this post I’ll be showing you just how easy it is to use Backblaze on your Synology Diskstation NAS – all with native Synology apps. No need to worry about upgrades breaking your backups or 3rd party solutions!
Install Backblaze on Synology NAS
- First you obviously need a Backblaze account, if you haven’t already signed up do so now.
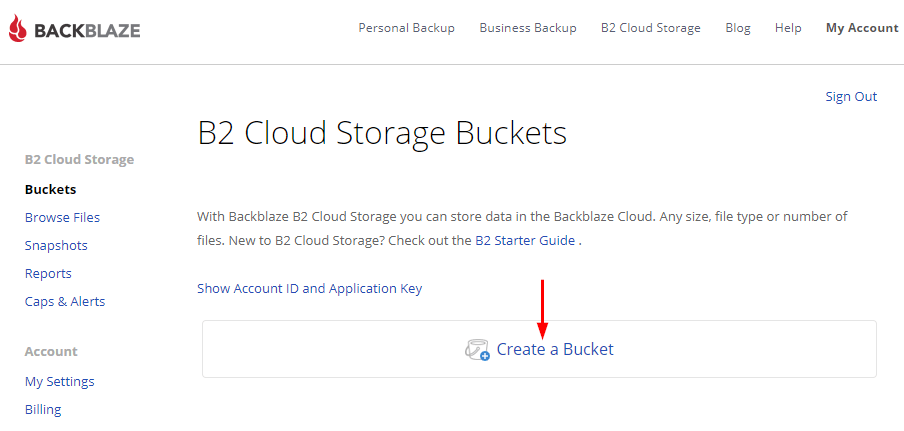
- After the account has been created we need to create a “bucket” where all the files will be stored, so click on Create a Bucket.
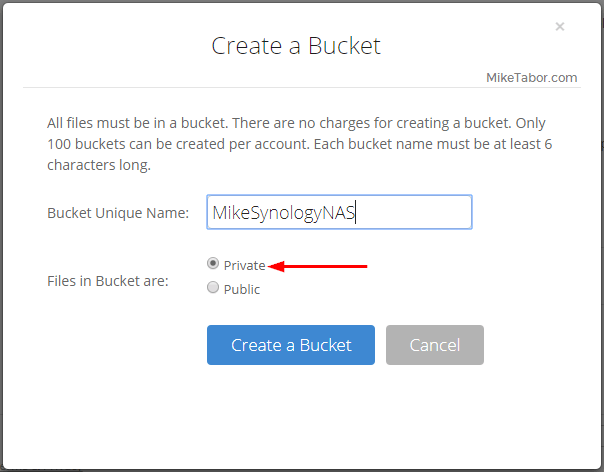
- Now give your bucket a name and more importantly make sure you set your bucket to “Private” – unless you want everyone to see your files.
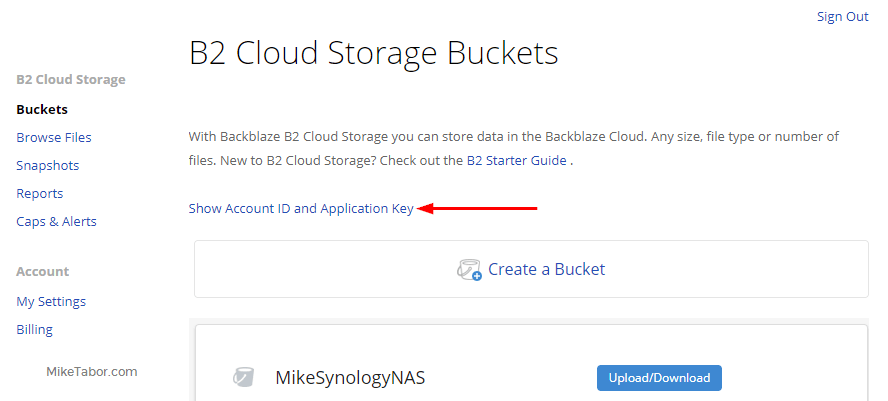
- After you’ve create a bucket, now click on the Show Account ID and Application Key link.
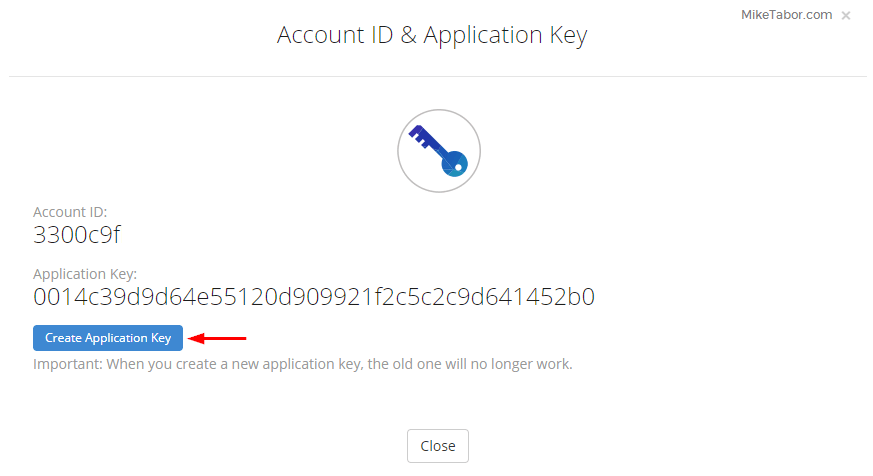
- Next click on the Create Application Key button and then make note of both your Account ID and Application Key.
- Now log into your Synology admin interface.
- Install Cloud Sync package. Go to your Package Manager > Backup > and click on Install under Cloud Sync.

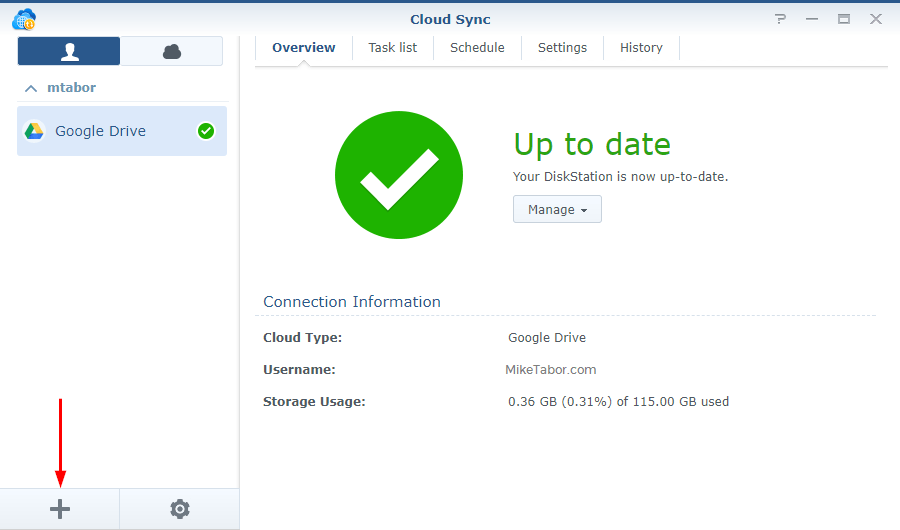
- Next open Cloud Sync and click on the plus (+) button in the bottom left corner.
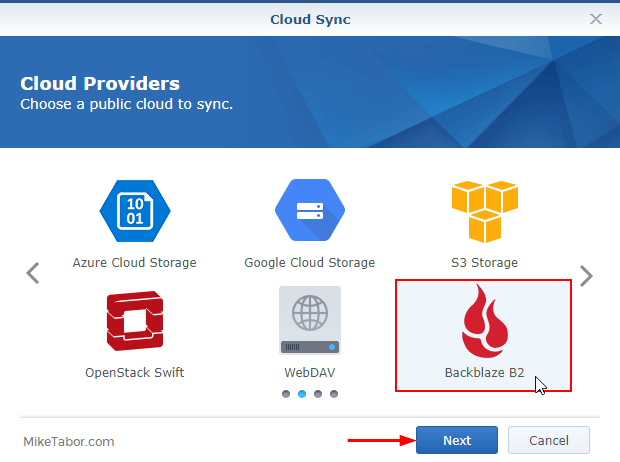
- Then select Backblaze B2 from the list of providers and click on Next.
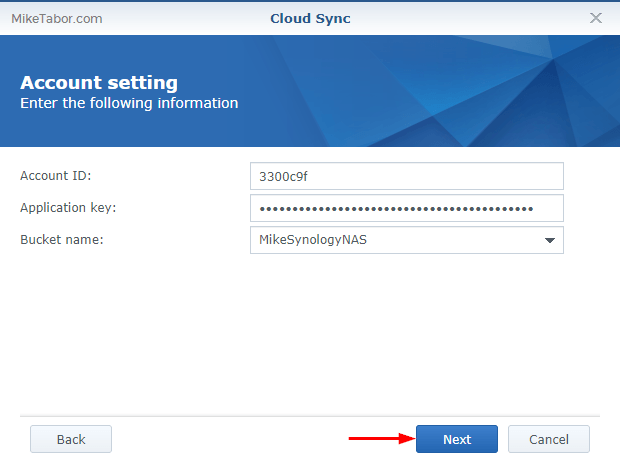
- Now enter your Account ID and Application Key from Step 5 above and select your bucket from the drop down menu, then click on Next.
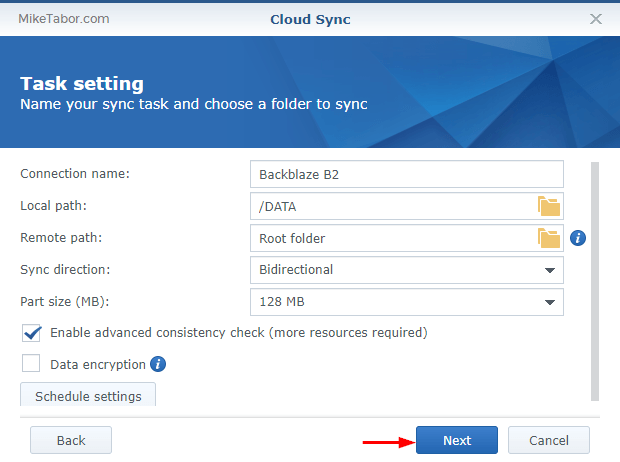
- Now you’ll want to select a Local Path (a folder on the NAS) you want backed up, then adjust the other settings to your liking and click Next.
- Finally, confirm the settings and click on Apply.
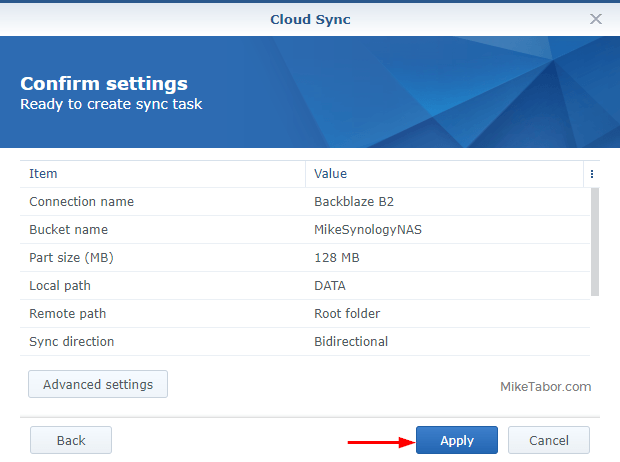
At this point your files will start being backed up to Backblaze using the Synology Cloud Sync app and you’ll have little worry about a Backblaze and/or Synology update breaking your backups!
Let me know what you think about Backblaze in the comments below.
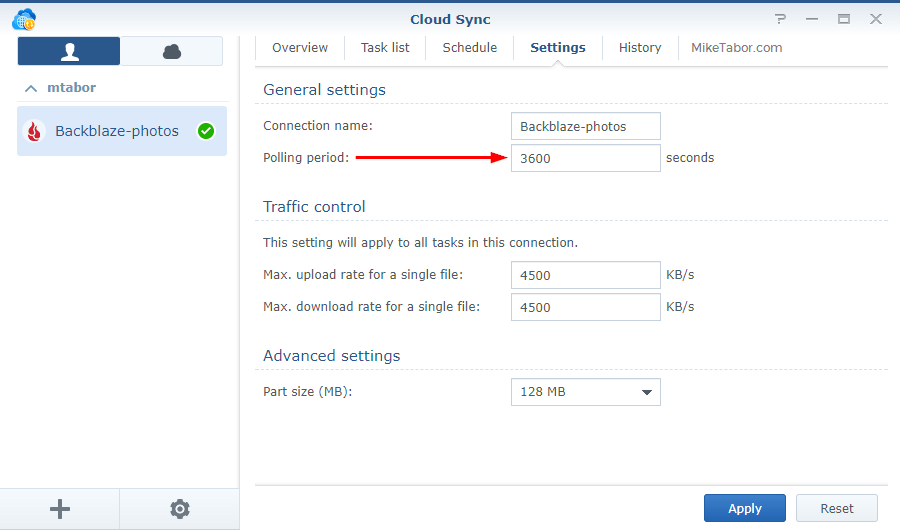
Avoid Class C Transaction Cap
I’ve had a couple people state they’ve had issues with getting messages from Backblaze regarding reaching the Class C Transaction Cap, which is 2,500 daily. To fix this issue you just need to change the polling period in Cloud Sync from the default 60 seconds to something more manageable, I’ve set mine currently to 3,600 without any issues:
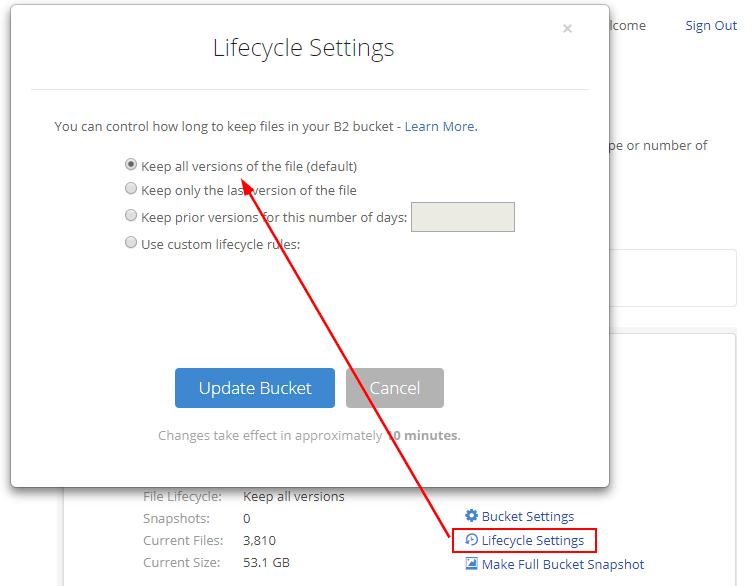
But Mike is this backup?
I have also received a few comments stating this couldn’t possibly be backup because it’s sync and doesn’t support versioning. The only thing I can say to that is those individuals simply have not even bothered trying this method. Because by default, Backblaze sets all bucket lifecycle policies to “Keep all versions of the file (default)” as shown below:
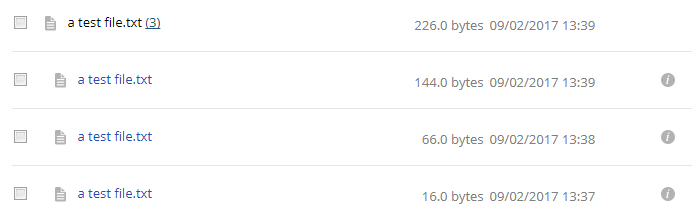
Further, here is a test file I’ve uploaded, made a few changes a couple times and you can see the different versions, time stamps and file sizes:
Simply put, give Backblaze a try. THEN come back and let us know your thoughts. ;)
Just an FYI that, currently, there is a bug in Cloud Sync if you enable encryption it will fail. I’m currently working with Synology to see if they can figure out the problem.
Thanks for the heads up, please keep us posted on this issue!
-Michael
Good news, the Synology support team got it Cloud Sync working with encryption with Backblaze. They had to remote into my NAS in order to manually apply an update so that my databases wouldn’t get damaged. They mentioned that an update for Cloud Sync is coming soon, but no date has been set yet. Just be aware if you try to use encryption right now you’ll probably run into the same problem I did.
Well that was quick! Any chance this is a fix we can apply ourselves while we wait for the “official” fix?
-Michael
Not that I’m aware of, they didn’t share the details of the changes they made. I think we’ll have to wait until the update is officially released (unless you want to work with support to get it manually applied to your system).
Cloud Sync is not backup – it is only sync. The difference to real backup is that you cannot go back to different points in time. You can just go to the last sync. If something bad happened before the last sync – game over.
Your definition of sync is correct @Mark, however you are wrong regarding this configuration. The default lifecycle setting for the backblaze bucket is to “Keep all versions of the file”. I can restore or any point of time.
But what happens if you delete the source file? Is the deleted file retained in the cloud version? Because if it isn’t, then it most certainly isn’t a “backup”.
What do you want to happen @knightnet:disqus ? Do you want the file to be removed then don’t check the “Don’t remove files in the destination folder when they are removed in the source folder.” option.
If you want the file to be retained then leave the “Don’t remove files in the destination folder when they are removed in the source folder.” checked. The option is yours.
-Michael
A “backup” would retain the file, at least with a previous version. A backup will keep deleted and changed files for a significant period of time, typically a year or more.
I’ve just been experimenting with that “Don’t remove” option as I just realised (slow on the update I realise) that my Amazon Prime subscription allows me to create a sync job to Amazon Drive for all the photos on my NAS! That’s 117.24 GB (31,681 files)! Still only a fraction of the 1.6TB of data though that I have backed up with CrashPlan. Still, using NAS->Amazon sync (not bi-directional) and retain deleted files isn’t too bad an option.
At the moment, my options for cloud backup are:
– Backblaze B2 – 2TB $123 but extra charges for restores 2TB restore = $40 – Sync only
– Amazon Drive (£55pa for unlimited storage) – Sync only, no versioning.
– IDrive (5TB $7 for the first year – 2TB $70pa normally) – I can use this for Synology Hyper Backup
I’m thinking that IDrive is pretty low risk for 12m for a backup though only 10 versions of each file are available online as I understand, this may not matter when using Hyper Backup. Amazon Drive is great for an extra copy of our photos which are the most precious files we have but has no versioning so useless for protecting against malware.
CrashPlan has been pretty useless this year anyway as it keeps failing.
Backblaze isn’t looking that good a deal. Especially given the performance issues some people seem to be having plus the additional costs for restores.
Well than Backblaze will work just fine for you it seems as it already keeps unlimited amount of versions by default as gives you the option to retain deleted files from the backup or not.
I’ve not heard of any performance issues nor have I experienced any myself. Cost-wise, it’s going to vary from person to person. At the moment I’m paying less now with Backblaze than I was with Crashplan so that’s just another plus for me.
If you find another great alternative for the backups on your Synology please do share. I’ll be sure to do the same as well as I’m always looking for new options and up for trying new things!
-MIchael
OK, good to know thanks. I’m basing my views on a 2TB backup size.
Backblaze would be $123pa but to recover that would cost an additional $40 (a LOT cheaper than Amazon Glacier recovery though it’s per Gb costs are actually lower than B2 right now – $0.004 vs $0.005. Also much simpler to cost than any of the Azure/S3/etc services.
I’m also looking at:
Amazon Drive – £55 (~$75) for unlimited storage (UK prices incl. VAT). Supported by both Backup & Sync. I have a trial sync task for my photos that I started yesterday: 120GB, currently uploading at about 2.5-3Mbps. Certainly a good price.
hubiC – supported by both CloudBackup and CloudSync – 10TB for 50€ pa (incl. VAT, ~$60). Been using their free 20GB offer for a while with smaller backup tasks and it seems to work fine though some people have had issues with their minimal support. Certainly a tempting price if it works.
TransIP Stack – 1TB is free, 2TB 120€ pa (~$143) – uses WebDAV so supported by both Backup & Sync. I’ve requested a sign-up for the 1TB offer to see how it performs.
IDrive – 2TB $70pa ($104 for 2yrs). Currently has 1yr offers for 1TB=$14, 5TB=$7 (for ex. CrashPlan users). Needs a 3rd party app on Synology but it is officially supported by IDrive and provided by Synology. Seems a reasonable price but their support appears to be appalling and their charging model is also suspect.
Google G Suite Business – 1TB if <5 users, unlimited otherwise (though some people say they don't really check so you may get unlimited anyway) £79pa (~$107). You get other things with that too of course though I don't need them. Supported by both Backup & Sync. I don't really want to rely on Google not checking limits so I'm not interested in this right now.
Worth remembering that ALL of these are **cloud storage providers** not **cloud backup providers**. This means that, if you use CloudSync, you don't generally get multi-versioned backups (an absolute requirement to protect against ransomware, B2 and G Suite are the exception). Also your files are NOT ENCRYPTED in the cloud, you should pre-encrypt anything sensitive (if you do this with CloudSync, I think you have to use the NAS to get the data back which negates one of the advantages of using sync). Using CloudBackup gets round these issues but leaves you with the issue that you need to have a working Synology NAS in order to recover data (though you may be able to use the Windows application instead).
If you want true point in time backups with Amazon Drive then use Hyper Backup with it. Also note that IDrive has a max file size of 10GB.
Thanks, I’d hoped I’d got that message across. I’ve tested backups now with hubiC and Amazon Drive and both work fine. Thanks for the note about max file size on IDrive – on balance IDrive just seems too big a risk.
I think that I will stick with Amazon Drive now. It is not only cheaper than hubiC but you can actually see the backup folder and files on Amazon so you should be able to use the Windows backup viewer without having a Synology NAS active if that becomes necessary.
Thanks for this Michael. I echo mark’s comments that this isn’t backup, it’s a sync (second copy). If some files go corrupt and sync it’s a BIG issue. Crashplan was/is backup.
Also for me, i’m running a DS1010+ on DSM5.2 so cloud sync doesn’t support backblaze. I’m hoping to find a way to setup a docker with backblaze and backup software that offers versioning.
@SimonB83:disqus I’ll echo my reply to Mark to you as well. Both of you are mistaken regarding the configuration I’ve laid out above. By default the backblaze bucket life cycle settings is to “Keep all versions of the file”
I welcome both of you to actually try this and then let me know your thoughts. ;-)
In the case of major data corruption, (e.g. ransomware) is there a way to batch restore *all* files for a given point in time, or would you need to individually select each file and restore a previous version? Thanks.
Thanks for the great post, Mike. I’d like to sync every shared folder on my DS916+ without having to define each one in Cloud Sync. If I leave the local folder empty, the wizard won’t let me proceed. I don’t want to create a separate sync task for every local folder. Furthermore, I would have to remember to do this for any new folders I create. I know I could put everything into one big folder and point that at Backblaze, but that defeats the purpose of having multiple shares for security purposes. Any advice?
@George, I agree it would be nice to have the option to just check the root of the Synology NAS so everything is backed up no matter what.
On the flip side I have several folders on the root that I really don’t care or want backed up so it works just as well for me having to do it for each folder under root.
I think we should submit a request to Synology and Backblaze to see if we can get this option added.
-Michael
It seems like Backblaze’s “cloud” backup feature (B2) is a different product than their normal “desktop” backup product. Is this true? If I am paying for unlimited personal backup, why can’t I just use the cloud feature too? Is there any way to have an account for both?
When I visit the list of providers in Cloud Sync, Backblaze B2 isn’t one of the options. What version of Cloud Sync are folks using that shows Backblaze? My version is 1.0-0484. I clicked the “Refresh” button but there doesn’t seem to be a newer version available. I have a Synology DS1513+ running “DSM 5.0-4528 Update 2”.
@brandonjewetthall:disqus you need to be running Cloud Sync version 2.1.0 or better. Probably wouldn’t hurt to upgrade your DSM version to the latest 6 build as well.
-Michael
Synology advised me that Cloud Sync ver 2.1.0 or better will only run on DSM 6 with the latest build. When you’ve updated both of those, you will see B2 as an option.
Can this work with Backblaze personal? It looks like it would cost the same for me to use backblaze as crashplan for business. I have 2 TB to backup.
Using the Synology Cloud Sync package, only the Backblaze B2 is supported.
-Michael
Thanks for the excellent article!
Do you know if there is a good way to make two backups for a home office?
1) Local: backup specified macs’ and PCs’ folder to the NAS (with given retention and versioning policy).
2) Offsite: NAS maintains an offsite copy of the same backup archive at backblaze, s3, etc (preferably with different retention and versioning policy).
One way that comes to mind is to simply sync Time Machine and Windows Backup folders from Synology NAS. But is copying these files without stopping Time Machine/Windows Backup reliable? Probably not. Besides, this way you cannot keep retention configuration separate.
Is there better alternative?
@sergeybatishchev:disqus I use Cloud Station Drive which sync’s a copy of my files on my local devices back to the NAS which does keep several versions. My NAS is then backed up to Backblaze. So my important files are on my PC, NAS and Backblaze.
Cool thanks!
I see in Synology docs that they support restoration of the deleted files, so this could be good way to go. I’ve found they have something called “Cloud Station Backup”, which might work even better for me.
Mike, thanks for this timely post. I’ve just been trying to get my Synology NAS connected to Backblaze B2.
One thing that is confusing me is the concept of the B2 Cloud Storage Buckets. Note that Backblaze uses the plural Buckets. In your example, you created a bucket that looked a single Bucket to hold all your NAS files destined for B2. I also note that when one creates the Application Key, there is a little warning (or explanatory) note “When you create a new application key, the old one will no longer work.” .
What I wanted to do with my B2 account is backup/sync each of several top level folders on my NAS to a separate B2 bucket (for example, Photos, XYZ Data, ABC Data). Do I need a separate Account ID/Application Key for each B2 bucket? And, if I create a new Application Key, how do I tie it to a new bucket since the old one may no longer work. Or, is the intent to have one big B2 Bucket for each user/account and then the user can backup/sync multiple root level folders to the single bucket.
I’m just not finding the simple answers to my question in the Backblaze Help files, so I was delighted to come across your blog post………..TIA for any help, direction, or advice you can offer.
I use one bucket and separate my NAS top level folder with folders within the B2 bucket.
No need for additional accounts.
-Michael
I was looking at the same so made some tests:
Do I need a separate Account ID/Application Key for each B2 bucket:
Answer is no, you have one Account ID/Application Key for all your buckets.
if I create a new Application Key, how do I tie it to a new bucket since the old one may no longer work.
Answer is Clould Sync will see the key has been revoked for your job and present you with a pop-up where you can enter the new one. The only reason you would need a new key is if you do not have a record of the previous one.
Good luck.
I had spent quite a bit of time trying to figure out how to backup my Synology NAS to Backblaze B2, and came across this article. This article confirmed some of the things I learned on my own and gave me ideas for other aspects of the overall setup. Now, how does one restore from B2 back to the NAS? I’ve looked through Cloud Sync multiple times and don’t see a Restore action. Since I enabled encryption of the data so that it is encrypted at rest in B2, web downloads will of course not give me usable files due to the encryption. I read somewhere that Cloud Sync will decrypt, but again, I’m looking on how to do a restore.
What happens if a file is deleted from the NAS itself? Will the file still be stored in B2 and recoverable through previous versions?
Unfortunately, it looks like Windows images/snapshots and macOS Timemachine/sparsebundles do not upload to Backblaze B2 cloud nicely =(. I tried to restore both Windows and macOS snapshot images and neither of them worked. I also noticed a size discrepancies between what I have in my Synology vs what is uploaded in Backblaze B2.
I reached out to Backblaze and they said the problem was most likely the way Synology’s Cloud Sync was uploading them to Backblaze. I’m still hoping that Synology starts using Hyper Backup.
Hopefully someone reads this and recommends a better solution =(. By the way I always enjoy reading your tutorials Mike, thanks for the work you put into them.
Are you noticing the size discrepancies from the Windows images or just from folders on your NAS? I don’t create backups of my computers as all my files are stored on the NAS. That said I’ve not seen any issues with what I have backed up on my Synology vs what is backed up to B2.
-Michael
Hey Michael – I am seeing discrepancies with the Windows images as well. I talked to both Synology and Backblaze. Backblaze said that it is probably the way Cloud Sync is uploading them to their cloud and Synology says that they don’t have a problem.
I am wondering if you have a recommendation, my problem is that I just need the images of my machines, no matter how big they are, to quickly re-image them in case a problem comes up, I don’t need specific files either I just need an exact copy of the machine with the few programs that I use.
Thanks!
Has this issue ever been resolved. I was just about to pull the trigger on Synology NAS/Backblaze when I found this. Obviously, if you can’t restore the backup, it’s pretty useless.
Hi, looking to replace CrashPlan, like most everyone else. Prior, I had my Mac and PC transferring files to DS and then CrashPlan would backup DS. Relatively inexpensive. :-)
I’m hoping my math is wrong, but Backblaze B2 would be in excess of $20 / month for me. I figure I can parse down 4 TB of data (between Mac, PC, DS). So, not inexpensive (to me).
Am I missing something, are folks just really limiting what they send to BackBlaze or is my math totally off?
-Chris