How to install CrashPlan on Synology Diskstation

A little while ago I posted several ways to improve the security on your Synology NAS and was recently asked about how to install CrashPlan on a Synology NAS. Synology doesn’t have it’s own pre-built package available, but luckily PC Load Letter from the Synology community has stepped up and made a Synology package that works beautifully – the only downside is his instructions are a bit dated and I found harder than they needed to be.
If you don’t already have a CrashPlan account, go ahead and sign up now.
Install headless CrashPlan on Synology NAS
These steps are being done using a Synology DS412+ running DSM 5.0 Update 7. (Tested to work on latest DSM 6.1)
- Log into your Synology admin interface
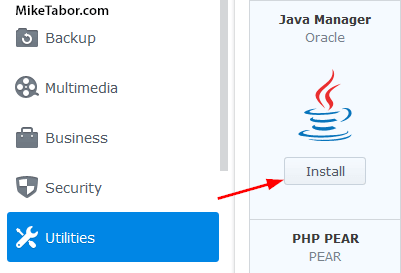
- Install Java Manager package. Go to your Package Manager > Utilities > and click on Install under Java Manager.
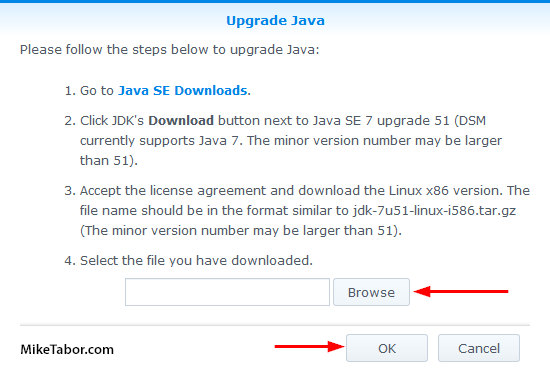
- Open the Java Manager app and click on “Upgrade Java”. You’ll be prompted with a few more steps to perform:
- Go to Java SE Download page
- Download the latest Linux x86 version, at the time of writing that is: jdk-7u67-linux-i586.tar.gz
- Upload the jdk-7uXX-linux.i586.tar.gz to your Synology NAS by click on Browse in the Upgrade Java window then click on OK.
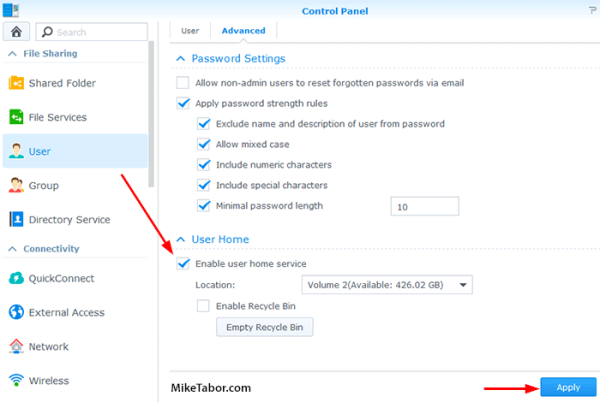
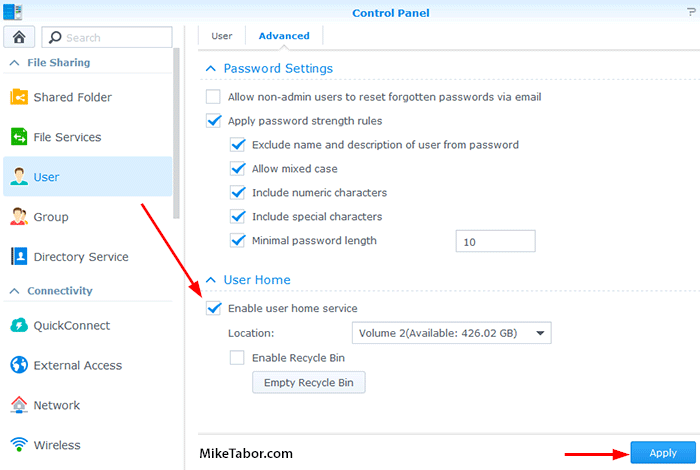
- Now enable user home service on the Synology by going to: Control Panel > User > Advanced Tab and check “Enable user home service” and click Apply.
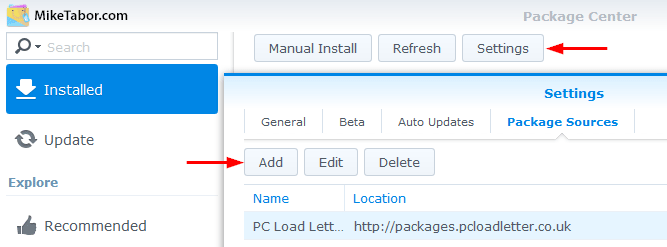
- Now we need to add a new package source to our Synology so that we can install the CrashPlan client. So open Package Manager and click on Settings > Package Sources > Add and type in: http://packages.pcloadletter.co.uk for the location and name it whatever you’d like.

- Next, we need to allow the Synology NAS to install “un-official” packages to do so go back to the “General” tab within the same Settings window as above and change the Trust Level from “Synology Inc.” to “Any publisher” then click on OK.

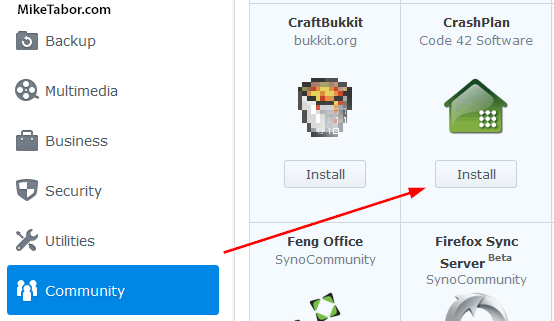
- We’re now finally ready to install CrashPlan on the Synology! With the new PC Load Letter package source added you’ll have a new tab in your Package Manager titled “Community” – click on it and find the CrashPlan package and click on Install.
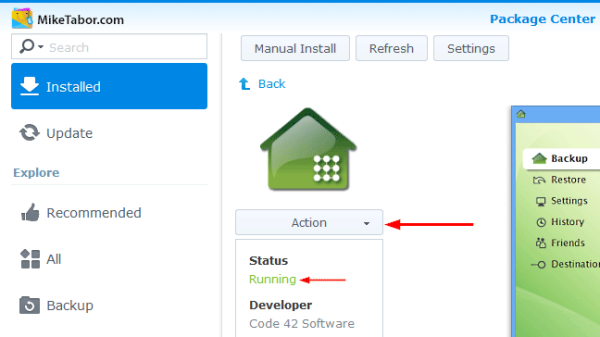
- After the CrashPlan package has been installed you will need to stop the package and start it again. You can do so by going to Installed > CrashPlan > and use the Action drop down menu to stop, then start it again.
- While we’re on the Synology, lets quickly enable SSH by going to Control Panel > Terminal & SNMP > and checking “Enable SSH service”.
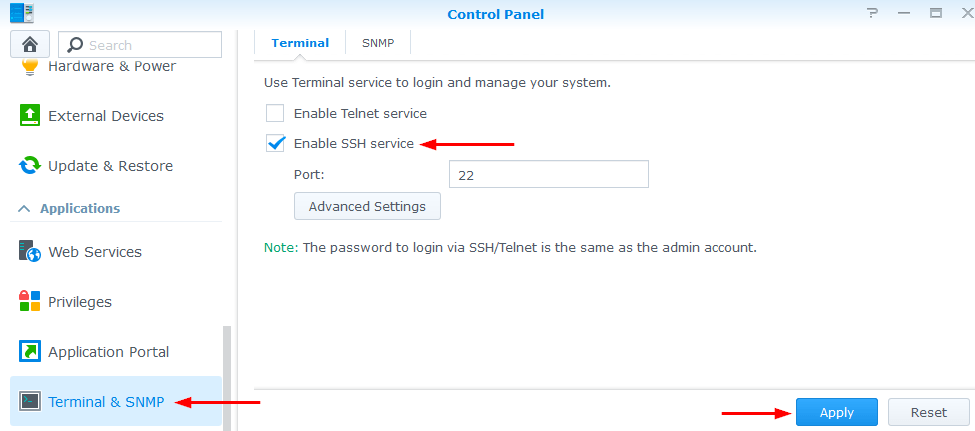
NOTE: Don’t forget to disable SSH once you have everything up and running. - That’s it on the Synology side. But to configure what gets backed up and additional settings you’ll need to download and install the CrashPlan app on your computer.
Once installed, you’ll need to make a quick edit to the UI.Properties file located here: C:\Program Files (x86)\CrashPlan\conf\. Edit the second line, “serviceHost” so that it points to the IP address of your Synology NAS like shown below then save the changes.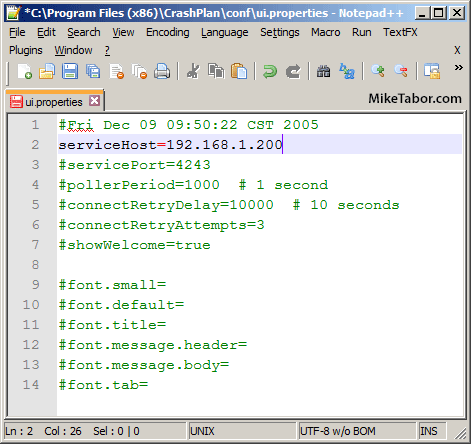
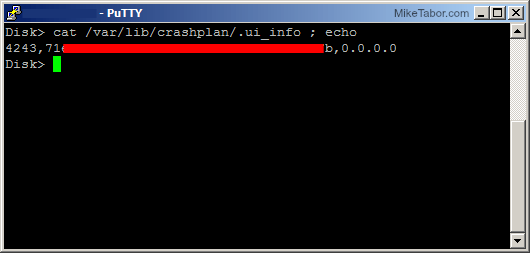
- Log into your Synology SSH using PuTTy or similar app using the admin account and password for your Synology NAS.
- The crashplan app also requires a special GUID key and is currently only available via SSH, so in the PuTTy window (or whatever you’re using to connect to SSH) type the following command:
cat /var/lib/crashplan/.ui_info ; echoThe output will be something like:
- Now edit the .ui_info file located at C:\ProgramData\CrashPlan removing the GUID key that might already be listed and replace it with the output from the above step. Also, be sure to edit the 0.0.0.0 to the IP address of your Synology and Save the file.
NOTE: File location for MAC users: /Library/Application Support/CrashPlan/.ui_info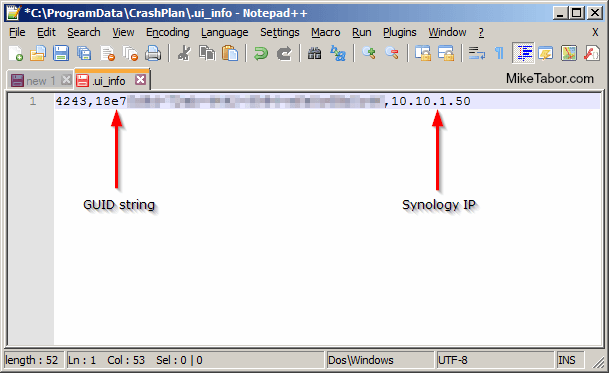
- After saving the .ui_info file above, change it’s file permissions to “Read-Only”.
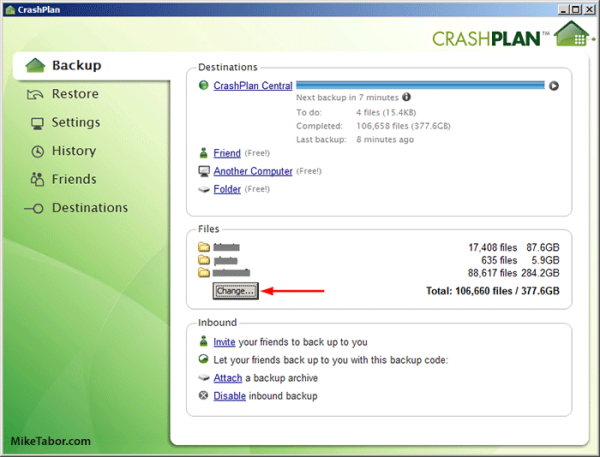
- The final step is to now open the CrashPlan client on your computer and under “Files” click on Change. From there you’ll be able to pick what folder / folders / files / or even the entire NAS, you want to ensure are being backed up to CrashPlan. Using this same client you’ll also be able to change a number of other options such as backup versions, retention, etc.


Once you’ve setup your CrashPlan backups the way you like it you can actually uninstall the client from your computer as it’s ONLY needed to change what gets backed up, change settings, or restore files (though you can perform a restore from the web too).
I personally have CrashPlans Individual Plan since I have all my computers set to store their My Docs, Pictures, etc on the Synology, though if you have other computers you want to backup in addition to the Synology NAS the Family Plan would be your better choice as you can have up to 10 devices.
Fix, Crashplan on Synology won’t start
On January 8, 2015 CrashPlan pushed out a new update, version 3.7.0, which has caused the Synology Crashplan package to stop responding. While I have no doubt that PC Load Letter will release a new Crashplan package to fix this issue, as of Jan 12th there has not been a said update. There is however a work around that’s been posted by @chrisnelsonca which resolves the issue and allows the Synology package to start and continue working again. Following the below steps should resolve the issue for you until a new package is released, it did for me.
- Enable SSH (if not already enabled) on your Synology and connect to SSH using the ROOT account (which uses the admin password). Note: You must use the username root and not admin.
- Once logged in run the following commands:
unzip -o /var/packages/CrashPlan/target/upgrade/1388728800370.jar *.jar -d /var/packages/CrashPlan/target/lib/unzip -o /var/packages/CrashPlan/target/upgrade/1388728800370.jar run.conf -d /var/packages/CrashPlan/target/bin/unzip -o /var/packages/CrashPlan/target/upgrade/1388728800370.jar lang/* -d /var/packages/CrashPlan/target/ - Next run this command:
ls -l /var/packages/CrashPlan/target/upgrade/1388728800370.*Note: Take notice of the numbers after the 1388728800370. as each file path is randomized.
- Finally run the following command, replacing “whatevervalue” with the path you found from the above ls command:
mv /var/packages/CrashPlan/target/upgrade/1388728800370.whatevervalue/upgrade.sh /var/packages/CrashPlan/target/upgrade/1388728800370.whatevervalue/upgrade.sh.old
From there go back to the Package Center and start the Synology Crashplan package. Big thanks to Chris for finding and sharing this fix!
Block future Crashplan upgrades
This is a temp fix to block upgrades from Crashplan, it is a handy way to prolong Crashplan working on your Synology while we wait for Patters to upgrade the Crashplan Synology package in between upgrades:
- SSH into your Synology NAS
- The following commands:
cd /var/packages/CrashPlan/targetmv upgrade upgrade.tmptouch upgradechmod 444 upgrade
Thanks to Per’s comment on PC Load Letter here.

What do you do when Step #6 fails? It just says “Failed to install “Crashplan”.”
Are there logs I can investigate?
I ran into the same issue. I changed the publisher trust level to “any publisher” under the package manager settings, and it worked. Hope this helps.
Andrew, sorry for the late reply. Been out of pocket the last few days with the holidays. The step Phil suggested is also needed and I forgot to add that to the article earlier. I’ve updated the post now.
Phil thanks for posting the “fix” so quickly!
-Michael
I had the exact same issue. Thanks for the info!
Saved the week!!! THX!!
this saved me .. thanks!
Looks like CrashPlan recently pushed out an update to version 3.7.0 and has caused a the package to stop working on the Synology. I’m sure there will be a package update soon but there is also a work around posted here (http://chrisnelson.ca/2015/01/10/fixing-crashplan-on-synology-after-the-3-7-0-update-synology-repairing-upgrade-in-varpackagescrashplantargetupgrade1388728800370/) that I’ve tested and confirm works.
That link does not work…. Can you give us the full link?
Colin,
What I posted in the comments is the full link. I’m not sure why it wouldn’t work for you. However, I’ve posted the fix by Chris Nelson at the bottom of the above article.
-Michael
Your work around fixed my Synology Crashplan installation on DS213. I had been trying to figure out the issue for over a week and had given up to only backing up one computer. Thank you very much.
Ever since the Jan 5th upgrade my backup stopped working. Followed the steps above and back up and working flawlessly. Just wanted to say thanks to Chris for the fix and Mike for posting.
Greetings. Any suggestions will be most appreciated. I have successfully installed CrashPlan on my Synology DS214+ NAS. And, I have verified it is running after the fix noted. The problem that I am having is that I cannot get my local CrashPlan client (running on my Windows 7 PC) to see my NAS. I have made the changes using Notepad++ to the C:Program FilesCrashPlanconfui.properties file (Changed service ip to local ip of NAS). But, the local client still only shows my local drives. I get it to see the NAS. Any suggestions? Thanks!
Ok .. I was able to figure it out. A Silly mistake! I failed to remove the comment “#” from the ui.properties file. :)
I had the same problem last night and used the work around. It worked fine for the night but Synology is set to automatically update and today the Crashplan process won’t start.
Crashplan 3.6.4
Synology DSM 5.1-5022
Michael,
I’d make sure you’re running the latest version of the Synology Crashplan package from PC Load Letter (0028) and then re-apply the fix as listed above. Since the fix I’ve not had any problems keeping the package running.
I’ve spent hours and hours through out the last few weeks trying to get CrashPlan operating on my DS413 for the first time. I’ve read through half a dozen blogs like this that made it sound pretty easy and even more support forums that mostly always leaded me to a dead end. Sometimes a small clue would pop up after carefully reading every line of a post and comments for the second or third time which brought me one step closer to a working product. Thank you SO much for posting this workaround! I was just about to quit before I found this! But now I finally get to see my DiskStation get backed up!
Daniel,
I can’t tell you how much I appreciate your comment. Thank you and I’m glad it’s back to working for you.
-Michael
You guys rule – the fix worked for me on DS411slim
Great! Glad it worked for you Matthew.
No words. Really no words.
Here we all understand how important backups are … and I had it broken until I read this …
MANY Thanks.
Eh… I mean the “Fix, Chashplan on Synology won’t start”
This looks like the exact fix I need except for one problem…I’m not sure how I’m supposed to execute the fix meaning I don’t know how to “connect to the SSH under the Root account” from step 1 and I’m equally unsure on how to perform step 2/3.
I am technically savvy but I’m a windows guy and these Linux based OS’s are new to me.
A huge thanks in advance for your information.
Thanks,
Matt
Matt,
You need to connect via SSH which you can do after you first enable SSH on your Synology and then second connect using a client such as PuTTY (available for windows). Hope this helps!
-Michael
Thanks for responding Michael!
So far so good. I’m logged in via putty and I’m stuck on the first unzip command. Where does it look for the zip file? I mean I’m not familiar with the synology file structure so where/how do I get the crashplan files in the correct location?
I got it running.
Thanks for your time and patience – it’s much appreciated! :-)
Matt
Thanks for this info, saved the day!
Thank you so much – these instructions are perfect and worked for me.
Thank you so much ! Your instructions worked for me too.
Your instructions worked for me for a few hours, but now there’s nothing backing up. I successfully applied this fix (thank you) two days ago and off the backup went. the program reported 1.2TB done and 600GB to go. Sometime during the night, the backup stopped, and yesterday morning, the client on my pc had gone from the screen, presumably disconnected from the Synology 415play NAS. Every time I restarted the client, it disappears before it’s finished scanning all the files.
Yesterday I spent all day doing every combination of uninstalling and re-installing the program, the client on my pc (now on version 3.7.0) and restarting the pc and the server, all to no avail.
Overnight the client stuck at 66.6% when synchronizing the block information. After restarting the NAS, the client actually finished with the block information and claims to be backing up. However, it now reports that over 600GB has been backed up and there is 1.2TB to go – the opposite of what was reported two days ago. I believe this is wrong as Crashplan has been backing up for several months and before the 3.7 update, had made steady if slow progress. I can see from the Source Monitor on the NAS that it’s not backing up as there is on 1KB/s of data uploading.
I’m sure I have correctly applied the fix described, otherwise the program will not run on the NAS. I’m alo sure I have made teh correct change to the UI.Properties file, otherwise the client wouldn’t connect. Everything was fine before the 3.7 update on the NAS. When I applied the fix with the previous version of the client, it worked for perhaps 12+ hours, but stopped during the night. I’ve had the NAS for perhaps eight months and I have only had to restart it once when it became unreachable.
Here is a screen grab of the log file from the client for the past two hours since I restarted the NAS. I don’t know why it says it started on version 3.6.4 and then apparently updated itself to 3.7.0. The log file also seems to show that the program keeps stopping itself (and thus the client disappears from my pc screen), but then restarts itself.
I’m completely stuck now and have tried over two days to get this to work. I’ve even considered ditching Crashplan and going with one of the supported backup programs, but the costs are prohibitive. I thought I’d try one of the business Crashplan accounts, which I assume uses a different program and client, but business packages are not available in the UK.
Has anyone else who applied this fix had the same problem, or are your backups still working? If the fix should continue to work, what have I done wrong and how can I fix it?
Many thanks in advance for your help.
+1 Same issue. I repaired the broken CrashPlan update using the information provided by Chris Nelson. The backlog of backups succeeded but now (only 24 hours later) the programme starts but will not keep running.
Any ideas, anyone? – or should we all be looking at a fully supported solution?
Just curious, what version of DSM are you running?
I’m using DSM version 5.1.
In the nicest possible way, I’m pleased to hear that someone else has the same problem.
+1 Crashplan on the NAS is starting to scan, then stops, then starts to scan, then stops. Rarely it actually completes the scan of all the files and starts backing something up. Client on mac crashes whenever crashplan on the NAS stops. It can’t be a memory issue, because crashplan is now not even able to scan the amount of files it had initially managed to work with for 2 months. Any ideas?
DSM 5.1, DS214se
did you uncomment for larger size in syno_package_vars (/volume1/@appstore/CrashPlan/) ?
How would that work?
Thanks for this suggestion. I made this change and then logged into DSM to see the upload speed. It wasn’t backing up, but there is now a platters 3.7 upgrade, so I’ve installed that. The directory you list is now empty in this new version(?!). However, your fix did make the program correctly report the amount of data still to be backed up, even if it wasn’t doing it!
The updated program also wasn’t backing up, so I’ve changed the selection of files and am awaiting the scanning and block sync to see if that does the trick.
The new version supplied by patters seems to be working, albeit slowly, for the past 48 hours. I’ve now stopped the back up and applied networkrockstar’s speed increase. On restart and after the scanning etc, it’s happily uploading at 10+Mbps. I’ll report back in another day or so.
I’m pleased to confirm everything is still running perfectly, so hopefully this will be my last post.
It seems that the screen grab which was in my post has disappeared. Neither the web interface on the NAS or the client will allow me to select the text – any ideas on how I get it into the post?
Nice one! Thank you very much for the section about Crashplan failing to start. I have just ran the steps that you outlined, and it is now all working for me again!
I got the same problem and uninstalled crashplan. Now, I am unable to reinstall it. Help!
have you changed the “trust level” to ALL publishers
Great, thanks for the post, the update is now working for me
Excellent. Many thanks for the original article and more importantly the timely update that has meant I don’t have to move all my backup files off my Synology 1513+ back to my PC :)
Awesome! Thanks for the help!
Thanks for the fix, I have been looking for that
Still trying to fix mine. CrashPlanPRO folder doesn’t have the same update file, in fact I can’t find a jar file anywhere for it.
ls /var/packages/CrashPlanPRO/target/
CrashPlanPRO.pid install.vars libjniwrap64.so log
bin jniwrap.lic libjtux.so marker.txt
cache lang libjtux64.so skin
conf lib libmd5.so syno_package.vars
doc libjniwrap.so libmd564.so upgrade
and
ls /var/packages/CrashPlanPRO/target/upgrade/
UpgradeUI startDesktop.sh startLinux.sh
start.bat startDesktopLinux.sh startSolaris.sh
start.sh startDesktopSolaris.sh
startDesktop.bat startFirst.sh
Jim, I’m sorry but I don’t use CrashPlan Pro so I’m not going to be much help in that department. You might want to check with @chrisnelsonca he’s the one that originally came up with the fix and “may” have an answer to your question.
If you do find a fix, please be sure to reply and share the fix.
Thanks,
-Michael
The CrashPlanPro client has started working again with 3.6.4. They must have had some issues or something. Or maybe it was something else completely. I can confirm that with the 3.70 front on my pc and the 3.6.4 client on Synology is reporting that it is in fact backing up again. (just to make sure this is the CrahsPlanPRO version)
Thanks for the reply though.
I followed the instructions exactly…I did the fix to get Crashplan to run on my synology 1812+, so that part works….however on my Crashplan Mac Client…when I select folders I don’t see any folder options to select my NAS files…
/Applications/CrashPlan.app/Contents/Resources/Java/conf/ui.properties
I updated the above file to point to my NAS…Do I need to change anything else? I can’t see my NAS files.
I have done the manual upgrade to Crashplan 3.7.0 on my Synology, and it seems to work fine. But my Windows client is now unable to connect to Crashplan on my Synology: “Waiting for connection” all the time. Any thoughts?
I think I had this happen to me as well. After doing the fix, and you started CrashPlan the first time, did you then stop and start it again? I seem to remember having to do this, before the client would work for me.
Yes, I have stopped and restarted Crashplan on the Synology various times. Still, I am getting the “waiting for connection” error.
Sorry to hear that you are still having problems. That is the only suggestion that I have, hopefully someone else will be able to help you out.
I would like to use your Fix, but need a couple pointers. I have been able to use Winscp to do rudimentary edits to some of the files per other posts. You recommend: “Enable SSH (if not already enabled) on your Synology and connect to SSH using the ROOT account “. I have enabled SSH. How do I “connect to SSH using the Root account”. Sorry if this sounds rudimentary, but I am up for learning. Thanks, Mitchell
When I applied this fix on my setup, I used the Putty SSH Client: http://www.chiark.greenend.org.uk/~sgtatham/putty/ Windows doesn’t come with an SSH client OOTB, I don’t think, and I have found Putty to work very well.
Mitchell,
When you connect via SSH, for the user name type root and then press enter it will then ask for the password. The root password is the same password you’ve set for the admin passwork when you setup the Synology.
-Michael
Gary/Micheal: that was terrific. It was so easy! Thanks so much to you and the others on the thread and especially Chris. Best wishes, Mitchell
Hi Mike. I’ve followed the article above and it all seems to be installed OK (Java, Crashplan headless, and the Crashplan client on my MBP). When I click ‘Change’ to select which files to backup (in the Crashplan client, last step) should I see a listing of the NAS directly (as the UI.properties file point to the NAS IP) or still just my local drives? ie Do I still need to map drives to the NAS from my laptop? For example I have a music directory on the NAS which isn’t presented on my laptop so it doesn’t seem to be visible as a choice. Can you clarify what to expect in that dialog?
Note, I needed QUOTES around *.jar, so
unzip -o /var/packages/CrashPlan/target/upgrade/1388728800370.jar ‘*.jar’ -d /var/packages/CrashPlan/target/lib/
I had to change the settings to All Publisher and reinstall Crashplan before running the commands listed. Without it, the commands alone didn’t fix the issue.
I’ve updated the above instructions to include the “all publisher” settings needed. I could have sworn I was able to install it with “synology and trusted” but maybe not.
Brilliant. Thanks so much for the “Fix, Crashplan on Synology won’t start” and the commenter with the the “trust level” to ALL publishers entry.
Back up and running.
I just installed the Crashplan upgrade that Patters published today. it is version 3.7.0-0029. It came with his Java upgrade. It wouldn’t run. I tried to use the instructions I used successfully 2 days ago, posted by Chris Nelson, and it could not find the programs for command listed. It said “can not find or open /var/packages/crashplan/target…” Has anyone else had this problem today? Thanks.
MFBrin, Patters has released a new version (0030) and this seems to be working for everyone. Try updating your Synology CrashPlan package to this latest version as of 01/22/2015.
Thanks Michael. I just did it and it is working. Did you also upgrade the Java SE Embedded 7? I don’t want to rock the boat since I am up and running now…
I’m not running the embedded java but instead using the Java Manager as shown in the post. That said I’m still using java version 1.7.0_67.
Thanks Michael. Is there a reason to use one over the other? I started with the embedded java, because I installed based on the pc load letter information. What is the difference? Thanks.
MFBrin,
I’d say probably no difference if any – other than the source of the package.
If I recall correctly the Synology Java Manager is a fairly new package from Synology and thus the need for Java made PC Load Letter come up with his own package (the embedded version).
At this point I’d say there isn’t any difference, both require you to download the java and then upload it to your NAS it’s just one is an “official” package and the other is not.
-Michael
Thanks Michael. All running now. I have a problem with speed, and will check the Heap size. If it is not at a gig, I will increase the size. Otherwise, I may post another message.
I was afraid to update, came to your site first to see the news. :) Updating now…
What is the default Heap size for Crashplan? In an attempt to make the system run faster, I uncommented the line in syno_package.vars so that it set the Heap to 1024, but I didn’t know what the default was with the line commented. Did I do the right thing? Thanks.
This is very helpful, but before I sign up for Crashplan, I have two questions…
(1) Is there any prospect that Synology itself will create a dedicated Crashplan plug-in, which would presumably get rid of some of the acrobatics required here?
(2) Synology does have an Amazon Glacier plug-in (I was thinking of using Glacier) but apparently it is so tied-in to the Synology platform that the plug-in is required to retrieve data, as well as store it. This means that, practically speaking, if your house (with your Synology and its hard drives) goes up in flames, you would need to buy another Synology in order to get your data off of Glacier. Does Synology + Crashplan have the same limitations?
Joe,
I’ve not heard of any official word about Synology making a CrashPlan package. That said the package from PC Load Letter has served me extremely well for the last year or two. This latest “issue” has been the first that I can recall of any importance but even still Patters was able to resolve the issue in just about a week. He’s very good about keeping the package updated.
I liked CrashPlan over Glacier as CrashPlan was much easier to use when retrieving files. If you just want to off-site storage and don’t care about retrieving process of the files then Glacier is going to be fine, maybe even a bit cheaper.
However if you want to be able to easier backup and retrieve your files from really about anywhere, even from your browser, then CrashPlan is going to be great. Monthly unlimited is only $5.99 and gets cheaper if paid by year and even cheaper if pre-paid multiple years.
-Michael
Thanks, that pretty much seals it for me. I like the concept behind Glacier but the way it integrates with Synology was somewhat discouraging.
Since using the workaround it has since stopped working again, so I thought I’d update to the latest ‘fixed’ package, that also fails to install now :( I’m assuming I’ll have to uninstall the existing ‘fixed’ version then install the new one. Hopefully my backups will remain.
It seems that that ‘any publisher’ option had been de-selected for some reason. I uninstalled crashplan and java, reinstalled the lot.
Worked like a charm. Thanks for the easy to follow instructions.
One small (newbie) mistake….. when you edit the UI.Properties file, be sure to remove the hashtag at the beginning so it is un-commented.
This is great. Many thanks. I got the headless installation on my DS212 and the client on the MBP. But now I would also like to back up the MBP to Crashplan as backing up the MBP’s time machine sparse bundles on the DS is discouraged by Crashplan. Is there a way to have two installations of Crashplan on the MBP, one as the client for the DS headless, the other for backing up local files? I guess I could go back and forth by changing the ui.properties file.
This may be a newbie question, but this step confuses me:
“The final step is to now open the CrashPlan client on your computer and under “Files” click on Change.”
I have CrashPlan running and backing up all my computers (except the Synology of course). Will doing this mess up the backups on the computer on which I do this? Does this make sense?
– Thanks
Mark,
I’ll start by saying that I don’t use the same method you’re planning as my PC’s all backup to my NAS then from my NAS to CrashPlan using the above instructions.
However, you should be able to un-comment the ui.properties line to point to the Synology so you can configure what gets backed up on the Synology then re-comment the line again and that should work for you. Once the client on the synology has been configured you don’t need to use the GUI anymore for the Synology.
In fact I have the GUI installed on a virtual machine within VMware Workstation that’s rarely ever powered on and Crashplan on the NAS continues to work without issue.
-Michael
Michael,
Firstly, love all the help you providing on your page!!! Secondly, I am curious what are the benefits in using your set up of backing up to the NAS then the NAS to CrashPlan. I already paid for a few years of CrashPlan family so I can’t benefit from single PC price (wish I would have came across this page sooner). Any other reasons that you prefer this method instead of having CrashPlan backing to the NAS and CrashPlan Central from every individual PC?
Thanks!
-Al
Hey Al, thanks for your comment and kind words. As for your question regarding my reasoning on the method I chose was really preference, simplicity, and cost.
Preference – The files I care most about that are on my computers are the ones located in my Documents, Pictures, and Videos folders. These are all I “need” the rest of the files on the machine are simply system files that would be replaced if I had to buy a new computer, re-install windows, virus infection, etc. For me, if something happened to one of my computers I’d rather just do a clean install and then restore my important folders.
Simplicity – All my stuff goes to one location, my Synology. This makes it simple for me as I don’t have to worry about “did I backup that file or that folder?” or “where did I put that file and on what computer again?”. Everything is all in one location. This also allows me to keep my files consistent across all my computers as all I have to do is set, for example my “Documents” folder to the location on my NAS and now the Documents folder on computer 1 is the exact same on computer 2.
Cost – The CrashPlan Family plan costs more then twice as much than what I’m paying now for a single PC with unlimited storage. The only thing the Family plan adds would be the ability to add backup multiple computers which as I’ve mentioned doesn’t benefit me since all my computers are storing my most important documents and files in a central location.
Bonus – CrashPlan is GREAT and I highly recommend it and have set it up for a number of friends and family as well but it’s only one backup method and using the Synology gives me another method to protect my data with the use redundant disks via the RAID10 setup on the Synology – further protecting my data (for a 3rd layer I also backup to USB removable drive). In addition I have a lot of other data on my Synology that isn’t located on the computers such as my home lab virtual machines, media library, websites project files, etc so without my current method I’d be forced to pay more than twice as much for the Family plan as I would still need the NAS to be backed up along with all my PC’s.
Sorry for the long winded reply, but you asked for it. ;-)
-Michael
Thanks for this article! I installed this last night and these instructions were right on. (I’m using a DS415play.)
Matt you are most welcome. Glad to have been able to help!
-Michael
I just got a ds415play. I’m stuck on getting the crashplan client to connect. The client is on a Mac. I tried both the serviceHost setting, and also the servicePort setting and an SSH tunnel as mentioned on a Crashplan support page, but the client fails to connect.
If I ssh into the synology netstat shows the crashplan server listening on port 4243. It’s like the port is being blocked even to the lan.
Any ideas?
I’m not familiar with Mac’s but I’d make sure that there isn’t a firewall either on the network or on the Mac that’s blocking the connection first.
-Michael
This procedure works! Thank you very much!
BUT…
DiskStation looses its ability to enter sleep mode as soon as I start CrashPlan package on it, and it regains that ability as soon as I stop the package.
Is that expected? ( I hope not…)
Any ideas how to fix that?
Vladimir,
In it’s default status you this will prevent the NAS from going into sleep mode, however this isn’t an issue for me as I run my VMware ESXi lab on the Synology as well and several machines are on all the time and would prevent sleep mode from kicking in anyways.
That said, you can edit the crontab to start and stop CrashPlan at certain times of the days which would allow your NAS to go to sleep. I can write up a quick post how I’ve done this before if you need help.
-Michael
Yes, sir, absolutely! I think this addition to your main procedure will be a lot of help to many people.
You’ve been so much help already! I think you know that :o)
Thank you very much!
I’m glad to be able to help. As requested, here’s how to schedule when CrashPlan starts and stops – https://miketabor.com/how-to-schedule-crashplan-on-synology-nas/
WOW! thanks so much. i followed other tutorials recently, and it just didn’t work. this has been a life saver!
Thanks Erik. Glad to have helped.
-Michael
I got everything setup and it appears to work. However, the Crashplan client crashes after a minute or two. When I look at the “backup_files.log.0″ file I see that Crashplan seems to restart the backup every 2 minutes. Is this normal? The log that can be viewed via CrashPlan in the Package Center shows something like this:
I 03/01/15 04:52PM Backup scheduled to always run
I 03/01/15 04:52PM [Default] Scanning for files to backup
I 03/01/15 04:52PM [Default] Starting backup to CrashPlan central: 5,285 files (20.70GB) to back up
I 03/01/15 04:54PM Stopping CrashPlan
I 03/01/15 04:54PM Scanning for files stopped
I 03/01/15 04:54PM CrashPlan started, version 3.7.0, GUID 575184365997785489
I 03/01/15 04:54PM Backup scheduled to always run
I 03/01/15 04:54PM [Default] Scanning for files to backup
I 03/01/15 04:55PM [Default] Starting backup to CrashPlan central: 6,756 files (26,20GB) to back up
I 03/01/15 04:56PM Stopping CrashPlan
I 03/01/15 04:56PM Scanning for files stopped
I 03/01/15 04:57PM CrashPlan started, version 3.7.0, GUID 575184365997785489
etc.
The last few lines of the /volume1/@appstore/CrashPlan/log/backup_files.log.0” file are below.
I 03/01/15 04:37PM 42 [Default] Starting backup to CrashPlan Central: 5,513 files (21.50GB) to back up
I 03/01/15 04:40PM 42 [Default] Starting backup to CrashPlan Central: 5,134 files (20.10GB) to back up
I 03/01/15 04:42PM 42 [Default] Starting backup to CrashPlan Central: 9,469 files (44.10GB) to back up
I 03/01/15 04:44PM 42 [Default] Starting backup to CrashPlan Central: 6,320 files (24GB) to back up
Thank you.
Thanks for this latest writeup, glad to know the official syno java package will work too! Crashplan through bootstrap stopped working for me several months ago, and I can’t seem to get this much easier method to work. Pretty sure I successfully removed any traces of previous versions. I’ve installed Java Manager and the Crashplan package, stopped and started it, and rebooted just because. Java and Crashplan claim to be running but I don’t believe it. Can’t connect from client, ports aren’t open, there are no log files in the Crashplan package, or messages in the log manager. Any insight would be invaluable, I haven’t backed up in 4+ months. Everything’s up to date. DS1813+ DSM 5.1-5022 Update 3, Java 7 update 75, Crashplan 3.7.0-0030.
Have you tried disabling the Synology Firewall and then connect via the CrashPlan client on your PC to make sure ports are not being blocked?
That’s a good thought, but I don’t have the firewall turned on. My Synology lives completely behind my router right now.
No log files was a cue that the engine was silently failing to start in the first place. It turned out to be a conflict with bootstrap/optware/ipkg. I may post on the Synology forums about it. pcloadletter’s startup script sources the /root/.profile, which I had altered to automatically start bash when I (rarely) log in as root. I took that out and everything fired right up exactly as it’s supposed to. Thanks for this article and timely reply! If I post on the forum I’ll include a link to your post here for sure.
Thanks for the instructions, I found it a doddle to follow and install. So to confirm it runs 24-7 even if you set up a backup schedule from the client or the web interface?
Adrian,
You are most welcome and I’m glad this was able to help. To answer your question – Yes, crashplan will run 24/7 but I do have instructions that you can use to schedule when CrashPlan is running on your NAS here: https://miketabor.com/how-to-schedule-crashplan-on-synology-nas/ Hope this helps!
-Michael
Thanks. So pretty much everything save the basic backup settings aren’t implemented from the client?
Well I believe you CAN schedule when CrashPlan will and won’t backup from the client, however that doesn’t stop the app from running on the NAS and thus taking up resources. The link I provided WILL start/stop the CrashPlan app on your schedule.
-Michael
Aha. Thanks. That’s clear now. I’ll check it out.
My crashplan to synology (windows) was working great up until 3 days ago. It has the latest Java SE7u75, Crashplan is 3.7.0, DSM is 5.1-5022 Update 4. But for the last 3 days it has stopped working, I have tried to restart the service, checked the updates, checked the logs, checked the memory, nothing makes sense! All that happens is it loads up, and then begins scanning, and just disappears. I check the logs and it just says “service stopped”. Thoughts?
Is anyone else having an issue writing to UI.Properties? I keep getting “Access Denied” messages despite having closed out of the CrashPlan client and stopping any associated processes I could find.
Ah, never mind, just had to change to folder permission for general users. I was under the mistaken impression that CrashPlan had the file open.
Peter,
Glad you got it working!
-Michael
I appear to have an upload speed issue. I’ve set networkrockstar’s fix which for the first 1TB of my upload everything uploaded at around 13Mbps – perfect. Since hitting ~1TB the upload speed has dropped to <4Mbps. CPU use is at 1% so the fix must be working and memory use is just below 50% of the 3GB that's installed in my DS1512+. If anyone has any insights into this I'd be very grateful. Thanks :)
Adrian,
Sorry for the late reply. My daughter was born early in the morning on the 28th and things have been a little busy since. ;)
I’ve been aware of Network Rockstar’s CrashPlan speed “fix” for a while now but never did use it myself due to a reply from CrashPlan suggesting not to and the implications of performing the “fix”. You can see the comment posted here: http://lifehacker.com/we-were-very-proud-when-lifehacker-readers-voted-us-the-1659807506
-Michael
No need to apologise. I posted it hoping anyone with experience might see it and pipe up. I had a similar response from Crashplan support and have reverted my settings to the default for the reasons that you didn’t choose to use the “fix”. I have a steadily declining speed now at about 10% of what it was before I started the upload. Although the difference with the fix applied or not was negligible. My CPU and RAM are showing plenty of headroom so I’ve got a strong sense that the backup speed is throttled either directly by limiting network speed or by some complex process that is creating a bottleneck. I also suspect that it may be by design. They say that 1Mbps or about 10GB per day is what they aim to preserve for their clients. I’m still at 2Mbps but it’s steadily declining and for me as a photographer this is just about on the line of being acceptable. If it drops any further, unless work dries up for a period, I’ll never be able to complete a backup cycle so the online service will be verging on pointless.
I don’t seem to be able to fully backup my server, even though it has been many months. I have sufficient bandwidth and speed to do the upload. When I look at the specs on the Crashplan page, it says:
“To do: 1,068 files (249.6GB
Completed: 598,645 files (1.9TB)”
How do I debug the problem?
Thanks,
Mitchell
What speed are you getting? My speed kept dropping so the first backup was always 5 days from completion. It sped up though for a day and completed. A second set is now running at a snails pace. I have about the same amount of data backed up.
Michael,
Per Synology support, it is not possible to migrate existing incremental backups a new NAS. Here is the scenario I presented to them:
NAS A backs up to NAS B daily, on-site, for quick restores. A third device, NAS C, is purchased to handle off-site backups. NAS C receives an initial seed from NAS A on 4/15/15. NAS A and NAS B die a watery death and all data is lost on 4/20/15. Thankfully, we were able to restore data from NAS C on 4/22. Two months later, a user needs to recover data from January 2014. This file was deleted on 3/10/15, but present in NAS B incremental backup. If NAS C was first synced on 4/15/15, how do I recover the user’s file?
Synology Support response:
“It sounds like you are referring to Backup to Volume versioning in which case, current past versions wil not transfer over– it will create new versions after subsequent backups from there.
If you need a more extensive backup solution with versioning, then you will need to use third party software that has this capability to backup files to the original NAS, then user Backup & Replication within DSM to push it over to the other offsite locations.Instead, one may only backup today’s data.”
Given the above, would CrashPlan meet the requirements of backing up previous versions off-site? If not, what would you suggest?
Thanks!
Jason
Jason,
That sounds like a horrible scenario with the watery death. Yikes!
Crashplan does in fact support versioning and will even retain files that have been deleted from the NAS for extended periods of time, or forever. Here’s a link with a lot more detail about Crashplan version control: http://support.code42.com/CrashPlan/Latest/Configuring/Specifying_Version_Settings – I think you’d be very impressed with them.
That said, if you start up with Crashplan right now, it can only backup what’s currently on the NAS right now. It doesn’t have magic to recovery files deleted before you started using it. It will however fully protect you for this type of scenario from this point forward.
-Michael
Michael,
Indeed! Some doomsday scenarios are more tame than others.
Lots of good info in your response, definitely appreciate the reply! The challenge is moving the existing versioning info on NAS B to NAS C. These records go back a couple of years. Any insight on that front?
Thanks,
Jason
Cheers,
I’m considering buying a Synology NAS, and the ability to install CrashPlan is one of the key features for me. What I’m thinking to do is use CrashPlan Free off-site backup on my family computers on the NAS, and then CrashPlan Individual on the NAS to put everything on the cloud.
Does that sound feasible? I would check it myself but, as I said, I haven’t bought the NAS yet.
Thanks a lot.
guindilla,
That should work just fine.
-Michael
Thanks to both.
Adrian, good point. I’m looking at the Synology DS415+, which fortunately has a 64 bit INTEL Atom C2538 processor.
You’d best check on that. I’m sure my processor is 64 bit but for whatever reason I can only run 32bit Java. It may be to do with what crashplan will play nice with on the unsupported hardware. That’s another point, you’ll be on your own as far as support goes. I’m not saying don’t do it. Just that it’s tricky if you expect to be going over 1.5TB in the near future. I’d definitely stick with it for less data.
One major limitation to consider is that if your NAS can only run the 32bit version of Java, irrespective of how much memory is installed in the NAS, once you get beyond 1.5TB of backup up data the process will slow significantly. I was looking at just under 10GB backed up per day meaning months to complete my 2.2TB which was quite impractical as a solution.
Michael
Thank you for your guide. Unfortunately this isn’t working for me. Even after editing the ui.properties config file, Crashplan still points to my desktop drives. I’m pulling my hair out as I’ve followed your instructions from scratch multiple times.
User home service is enabled, Java is running, Crashplan is running on the Synology, the properties file is edited (including deleting the #…), and still I just see my C: drive. I am running the most up to date DSM. Any suggestions?
Alex,
When you set the Crashplan properties file to your Synology NAS IP address and it’s not able to connect the crashplan app on your desktop will timeout and give you an error. In this case you’re not getting that but instead are being shown your C: drive on your desktop which sounds to me like the file isn’t being modified as it should be as you shouldn’t be seeing the C: drive.
-Michael
I guess I don’t know what I”m doing wrong in modifying the properties file. I right click -> edit with Notepad++ -> Change the address to my NAS and delete the # -> save -> Launch Crashplan
And it still just shows the C: drive…
I guess I’m at a loss because I simply don’t know what I should be troubleshooting at this point.
EDIT: Apparently it was something to do with notepad++. I used the regular notepad running as admin and it worked. Cheers.
Hi I have followed all the steps and it worked perfect for 3-4 days.
But now the Chrasplan App on my Synology doesn’t work anymore.
I can find it and under “Actions” I can click on run, but it doesn’t start.
Needless to say, I also cannot connect the Crashplan Central from my PC.
Until yesterday I was happy seeing my files being backed up, to day it gives me grey hair.
I have tried uninstalling and reinstalling.
All the settings are like you have stated them above.
HEEEEELP!
Has the latest DSM update knocked crashplan off line again? I’ve logged onto the Package Center on Crashplan has stopped – i’ve even gone as far back as to unistalling crashplan and Java 7 – download the latest tar.gz file and reinstall Java and Crashplan – still no luck.
Does say in the log – 10.46am Synology repairing upgrade in / var/packages/crashplan/target/upgrade/1425276000420.1431682023965
Mark,
While I haven’t had any issues with CrashPlan on DSM 5.2, others have expressed issues and Chris Nelson has released a workaround until PCLoadLetter releases a new CrashPlan client that seems to be working for those that are having problems with DSM 5.2
Take a look at the workaround here: http://chrisnelson.ca/2015/05/12/fixing-crashplan-4-2-0-on-synology-after-dsm-5-2-update/
-Michael
Thanks for replying Michael. I’m not comfortable using SSH so looks like I will have to wait for the awesome Patters to re-release the new CrashPlan client.
If you find out that he has released it could you let me know on here please? Many Thanks
Mark,
There is a new CrashPlan package update today, version 4.2.0-0031. So far so good for me.
i’m running the 030 version of patters’ package + 3.7.0 on my mac and crashplan just starts and stops every 2 minutes on and on.. it used to work fine (i have already backed up 2.1TB) but now it seems to be stuck in an endless loop. the other day i tried to reinstall everything again but i’m still having this issue. any advice on how to troubleshoot? the log is pretty worthless as it’s literally just “CrashPlan started, version 3.7.0” and then “CrashPlan stopped” every 2 minutes over and over.
I was previously running CrashPlan successfully (on a DS414j), but this stopped working for me recently and I’m not sure why. I’ve uninstalled and re-installed Java and uninstalled and re-installed the CrashPlan package, but it refuses to run. After a re-install it initially shows as running, but after attempting to stop and restart it, it refuses to restart. Very frustrating! I’m running DSM 5.2-5565, CrashPlan package 3.7.0-0030, and Java Manager version 7.0.51-0032. Is anyone at all seeing similar behavior? Any help would be greatly appreciated!
Update – I also looked at the log file, and found the following:
I 05/16/15 11:19AM CrashPlan started, version 3.7.0, GUID 682498807046865656
I 05/16/15 11:20AM Upgrades available at central.crashplan.com:443
I 05/16/15 11:20AM Downloading a new version of CrashPlan.
I 05/16/15 11:20AM Download of upgrade complete – version 1425276000420.
I 05/16/15 11:20AM Installing upgrade – version 1425276000420
I 05/16/15 11:20AM Upgrade installed – version 1425276000420
I 05/16/15 11:20AM CrashPlan stopped, version 3.7.0, GUID 682498807046865656
This happened immediately after a reinstall. Googling for that led me to this post: http://chrisnelson.ca/2015/05/12/fixing-crashplan-4-2-0-on-synology-after-dsm-5-2-update/
That fixed it! I hope this is helpful to someone else!
Thanks very much for this. I got as far as Step 9, but when I click “Change” under “Files” in the CrashPlan client on my computer, my Synology DS413j is not showing in the list that pops up. Any ideas?
Chris,
You’ll need to make sure your UI.Properties config file has been edited to connect to the IP address of your Synology NAS. Second thing that comes to mind is make sure there are no firewalls blocking the client from talking to the NAS.
-Michael
Thanks for the quick reply. I followed the instructions for the UI.properties config file and I’m pretty sure I did it properly. The IP address for my Diskstation is 10.0.0.4 according to its control panel…does that seem right?
Also, I’m not sure if this matters, but the CrashPlan client software is stored on my laptop in “Program Files” rather than “Program Files (x86)”.
And you mentioned that it could be a firewall blocking the client from talking to the NAS…the only firewall I’m aware of is the Windows firewall. While I’m not 100% sure what the settings should be to allow access, I think it’s probably not a firewall issue because the Diskstation and any drives I have mapped are showing up in Windows Explorer. Would that lead you to believe that it’s not a firewall issue as well? (I admit I’m very much a novice with this sort of thing.)
Thanks again for your help.
I installed the updated CrashPlan 4.2 package that was in the Package Repo today on my Synology DS413 which is on DSM 5.2-5565. After installing CrashPlan never starts. When I click run it just says launching then goes back to the Stopped state. I had implemented the 3.7 fix earlier to this and it was running fine. Any ideas? I uninstalled and reinstalled Java and CrashPlan to no avail. Also nothing shows in the logs when I click View Log in the UI.
Aniket,
I had a similar issue when I did the previous fix when this happened several months ago and why I hate doing “fixes” now. For me I was able to get it back in working order by removing Java, Java Manager, Crashplan and rebooting the NAS and then re-did the step-by-step instructions using, at the time, the latest version of CrashPlan package, java, etc.
Hope this helps. My lesson learned was to just stick with “official” releases of CrashPlan from PCLoadLetter instead of trying to patch it. Luckily I didn’t have a problem with CrashPlan this latest go around after I upgraded my DSM.
-Michael
Hi Michael,
Not matter what I do I can’t get Crashplan to run anymore after the recent Synology DSM and Crashplan updates. I’m running a Synology DS213+. Does anyone else still have problems getting Crashplan to work?
Thank you
Thanks Michael. Uninstalling both Java and CrashPlan, rebooting and installing v31 after the reboot worked for me! I appreciate it!
Just wanted to share one thing in case there’s someone in the same situation. Crashplan was “stuck” in the installing phase for me. I thought there was something wrong with the package, but it turns out that the server you download it from is just VERY slow. Guess I’ve been spoiled with good speed nowadays. :)
Update: Needed to stop it and start it, just like the guide says. Then it works. Running DSM 5.2-5565 Update 1
Glad it’s working for you! :)
-Michael
I seem to be stuck in this loop of “waiting for connection” proceeded by “analyzing files” and then back to “waiting for connection” with no actual files being uploaded to Crashplan. Any ideas why is this happening?
Does this fix also work on Mac ?
I’m not a mac user so I really couldn’t say.
-Michael
I get to the 3rd command – running the ls and this is the error i get:
ls -l /var/packages/CrashPlan/target/upgrade/1427864410430.*
-rw-r–r– 1 root root 9896545 Jul 2 17:33 /var/packages/CrashPlan/target/upgrade/1427864410430.jar
I have the same problem…
@WoodiE55:disqus I have just had my Synology DSM Auto Update, and now Crashplan is failing to start. It has been working well, following your instructions for several months now. I have tried uninstalling and reinstalling, but no joy. Do you have any suggestions on how to proceed? Thanks!
Gary,
This is a known issue that PC Load Letter is working on resolving. Should be a new crashplan package soon.
-Michael
Thanks for getting back to me so quickly! I will keep an eye out for an update to the Crashplan Package.
Hello again, I have just installed the latest package from PC Load Better, and I am happy to say that it is successfully running on my Synology Server. However, I am having a problem with the CrashPlan client, when trying to connect to the NAS just to make sure everything is running ok. I have installed the latest 4.3.0 client, and I have updated the ui.properties file to point at the right IP address, but when I start the client, it just sits there, never reaching the actual UI. Are you seeing the same thing? Any suggestions on how to proceed? Thanks!
Ok, I am now all back up and running. According to a very helpful article that Scott Hanselman pointed me at, I was able to make the necessary changes to the .ui_info file to include the GUID to allow connection to the headless client. Here is the article in case anyone else is running in the same problem:
http://chrisnelson.ca/2015/07/02/fixing-crashplan-4-3-0-on-synology/
Gary,
Sorry for not getting this updated sooner, but I’m glad you got it working. I’ve also updated this post with the additional steps for others to follow as well.
-Michael
That’s great! Thanks for this valuable resource!
Can somebody help. I get to the step 3 but when i run this code i do not get an individual code to include into the line “watervervaluehere”. The only code i get is below. Any thoughts!?
ls -l /var/packages/CrashPlan/target/upgrade/1427864410430.*
-rw-r–r– 1 root root 9896545 Jul 2 17:33 /var/packages/CrashPlan/target/upgrade/1427864410430.jar
This seems to be broken again… I suspect the ps command in the syn distro of linux is not playing well with the new CrashPlanEngine executable…
I tried installing today and CP did a couple of upgrades:
I 07/07/15 05:40PM Download of upgrade complete – version 1427864400430.
I 07/07/15 05:40PM Download of upgrade complete – version 1427864410430
I 07/07/15 05:40PM Installing upgrade – version 1427864400430
I 07/07/15 05:40PM Upgrade installed – version 1427864400430
I 07/07/15 05:40PM CrashPlan stopped, version 4.2.0, GUID 550807193405358262
I 07/07/15 06:43PM Synology repairing upgrade in /var/packages/CrashPlan/target/upgrade/1427864400430.1436308826883
and then it just hangs in there.
It seems Chris fixed it, he outlines it here:
http://chrisnelson.ca/2015/07/02/fixing-crashplan-4-3-0-on-synology/
I’m dying here, wondering if you can offer any assistance? Like others here, my headless CrashPlan client (running a Synology DS415+) was working, and then yet another upgrade broke things big time. I didn’t see the v4.3 fixes before i started trying things out on my own, and long story short, I have the CrashPlan app running again on the Synology and the desktop client seemingly connected to the IP of the Synology, but all the locations previously being backed up are labeled “Missing”. I’ve spent a week on this problem, getting nowhere. I should note that i’ve uninstalled/reinstalled the desktop client multiple times, and each time i’ve “adopted” the previous backup set. Not sure if this is doing more harm than good, but it seems like it’s right since it shows my previously-working 1.6TB backup set. Any tips/insight/help is VERY MUCH appreciated. Thanks so much.
I got everything running, but the only issue I have is that it won’t start on boot. Is there a way to enable this that you know of?
Tomas,
Anything in the logs after reboot?
-Michael
My server starts without issue. However, I’m running Mac Yosemite, after modifying the “my.service.xml” file to point to the NAS server, and modifying the GUID when I start the admin client it asks me to register (this is the first time the admin client has executed) The admin client reports “System error: if problem persists re-install CrashPlan”
Is there a workaround?
fantastic hand holding guide, thank you Mike. I followed up to activity 11. Logging onto my Synology DS SSH using PuTTy has beaten me !! Have installed PuTTy but don’t know where to go from here. Don’t seem to have file .ui_info and have scouted around for reference to GUID key in other files.
Sorry to be a pain, but any help graetly appreciated
Dave
Dave,
Thanks for the kind words. Back up to step 9 and ensure you have SSH enabled on your Synology. Then when you open PuTTy type in the IP address of your Synology. Once connected log in as admin for the username and password is your admin password. Then continue to Step 12.
Hope this helps!
-Michael
I had this running perfectly for 8 months and then the client moved offices and had to change their internal IP addresses. I changed the ui properties file to reflect the new IP address of the NAS, but no luck. Uninstalled CPlan on both the computer and the NAS and reinstalled it. Checked the GUID and now when I try to open the app on the computer to check the settings on the NAS I get “Unable to connect, check network settings”.
I opened CPlan on one of the computers backing up to the NAS and it can open, but the NAS shows not being available. I have rebooted the NAS, nada. I uninstalled and reinstalled everything per the above instructions and get the same Unable to connect.
CrashPlan says to disable the firewall and AV software, so I did that as well and nothing.
Any ideas?
David, which of the steps in the guide are you able to complete successfully?
– can you ping the NAS?
– does Crashplan show as running in the Synology OS?
– any clues in the log files?
Everything thing says it is running on the NAS and I get all the way to the end to launch the application on my computer. That is when it says it is unable to connect, check network. I go to another computer in the office and it does not show the NAS in the list of destinations as being available. There was an update on the NAS to CrashPlan, and I applied it and went through all the steps again so not sure what I have done to not make it connect. I tried several accounts and tried to create a new one and it is unable to connect. On the other computers, I can see other remote computers so it isn’t a firewall issue I don’t think.
Firstly, thanks so much for the excellent guide! Also that you continue to provide assistance to those in the comments – it is much appreciated.
I had a couple of stumbling blocks. This was on a DS214Play running DSM 5.2-5992, setting it up from Windows. Perhaps you would like to integrate some of them into your main article.
a. For step 10, you’ll need to run your text editor as admin to be able to make the changes (Run as Administrator)
b. Prior to step 11, I had to enable the Synology admin account (Control Panel -> User -> Highlight ‘Admin’ -> Edit -> Remove tick from “Disable this Account”. If you don’t do this, Putty will immediately close after entering the correct password.
c. After step 13, the Crashplan client still wouldn’t connect to the Synology NAS. A restart of Windows unlocked this (or by killing the stuck process in the Task Manager).
Thanks again!
George,
Thanks for the kind comment.
In response to your points.
A: I can’t say I’ve had to ensure the text editor is “Run as Administrator”, not that would change much but I also use Notepad++ then just the plain old notepad shipped in windows. But certainly a good point.
B: Another good point and I’ll have to add that to the post as I typically do disable the default root account, though lately as much as I log in via SSH I have it enabled and didn’t even think about it for this tutorial.
C: Was the client from a past install? Only reason I ask is because only in the last step does the client get opened and so far I’ve not had any problems with stuck processes or having to reboot Windows.
-Michael
Looks like there has been some kind of update in the last day or so. The .ui_info file in my c:programdatacrashplan folder not has a datestamp of yesterday and a completely bogus authentication token in it. I’ve repeated step 13 from the article to re-paste the contents from the .ui_info on the Diskstation and have restarted the Crashplan service on my Windows PC. For good measure I’ve also restarted the Synology device.
Now I find that the Crashplan client is unable to connec t to my storage device and looks like it’s unlicensed. Now when I go to the “Account” tab under “Settings” and paste in my subscription ID it seems to licence the machine I am running the client on, rather than the Synology device.
Has anyone else come across this and have any suggestion on how to rectify?
relevant extract from the log on my client is here:
I 09/30/15 10:05PM CrashPlan stopped, version 4.3.0, GUID
I 09/30/15 10:05PM Upgrade installed – version 1435726800441
I 09/30/15 10:05PM CrashPlan stopped, version 4.3.0, GUID
I 09/30/15 10:05PM CrashPlan started, version 4.4.1, GUID
I 09/30/15 10:05PM Backup scheduled to always run
I 10/01/15 03:00AM [Default] Scanning for files to back up
I 10/01/15 03:00AM [Default] Scanning for files completed in < 1 minute: 0 files (0MB) found
If all I want to back up to the Crashplan Cloud is my NAS…will the “Individual” subscription (for one computer) be sufficient?
Mike,
Yes, an individual account will work just fine. In fact that’s exactly what I use myself.
-Michael
Thanks for the quick reply! One more question….do you have more detailed instructions for the Mac client? I do not own a PC, and steps 10-13 do not match up with the Mac file structure for the crashplan client. Thanks!!!
I have the opposite issue… I don’t own a Mac.
-Michael
I have the opposite issue… I don’t own a Mac.
-Michael
Quick question: why do I need to enable user home service? Is this where the app installs? Thanks.
Aleksander,
This is for the “crashplan” user to have a place to keep it’s files.
-Michael
Mike,
I have just been through this process again, after installing the latest CrashPlan update for the Synology. This meant also updating the CrashPlan client on my desktop machine. When editing the ui_info file, I had to once again change the IP address at the end of the line in the ui_info file, as I think this had been overwritten with installing the new client. Might be worth adding a note to that section of the article to make it clear that this is required.
Thanks again for all your help, and continued support, of this blog post!
Gary
Thanks Gary, I’m trying this install for the first time and your post fixed it for me!
I was just coming here to post what Gary said. I had followed this guide before, but it wasn’t working this time. I found out via the pcloadletter site that the v.4.4.1 of the Crashplan client has a change in the step where the IP of the ui_info needs to be changed from 0.0.0.0 to the IP of the Synology device.
Mike, please update your excellent guide to reflect this, as most visitors won’t see these comments (especially as the oldest comments appear first).
Thanks.
Gary,
Thank you for providing help on the comments and for sharing the info. I meant to update this post over the weekend, but unfortunately had a funeral to attend instead. However today is a new day and I’ve now updated the post with the newly needed info. I’ve also updated the screenshot in step 12 and have added a new screenshot for step 13.
Thanks again and I hope this continues to help others.
-Michael
Nice one, thank you for doing that, and sorry to hear about the funeral! I never know what to say in these situations! :-(
Simply put, this blog post is an invaluable resource, and it is my default destination whenever there are updates to either the Synology DSM or the Crashplan package :-)
Hi,
I’ve recently signed up to Crash Plan and thought i’d try and get the backup to work from my NAS instead of leaving my laptop on…..
I’ve followed the guide, have got Java and Crashplan installed on the Sinology, all runs fine.
I just cannot get the local client on my Laptop to connect to the synology even though i have updated the ui.properties file to include my Sinology IP address……As far as i can see, i have included everything, but it just doesn’t recognised the NAS…..
MAC OS X Yosemite, Synology DS212 running DSM 5.2-5592 Update 4
Any ideas?
Thanks
Have you also gone through the steps to update the ui_info file with the GUID that you will get from the Crashplan instance on your NAS? You will also need to make sure that you have the same version of the Crashplan client on your machine as you have of the Crashplan server. At the time of writing, this is 4.4.1.
I updated the GUI with the correct IP address….
The clients have been installed on MacBook and nas only in the last couple of days, so should be the latest versions…..
Funny enough, on my MacBook, I can see the public folder on my Nas, so it almost looks like a permissions issue…..
You mention the GUI, but I am referring to the GUID which you get from the crashplan server in steps 12 and 13 above. Have you also done that? I would suggest going through all the steps listed above again, and ensure that you have done them all.
Also, you might want to see my comment here:
https://miketabor.com/install-crashplan-synology/#comment-2300247246
Where you also have to update the IP Address in the ui_info file, which isn’t, currently, mentioned in the article above.
Got it working now! :)
Turns out i was editing the incorrect file – i blame the dodgy file system in Macs! :)
Thanks for your help….
Glad to hear that you got this working!
Vishal, what file did you change, I am stuck on step 13, can’t find ui_info
Are you on a mac? I think I had to show the hidden files, and found this file in a different location. I can check tonight if that helps. Mine still isn’t working properly :(
Thank you so much for this advice. I have been using Synology NAS:es for a decade and Crashplan for some years, and this was the answer for how I can use my NAS as target for my CrashPlan jobs. I will continue to use Amazon Glacier for backing up my NAS though.
Is there anything to be done to maximise upload speed? Crashplan is installed on my DS415+, I have upgraded the RAM on that NAS to 8GB (instructions here – http://forum.synology.com/enu/viewtopic.php?f=140&t=91905), and RAM usage on the DS415+ is at 25%, while CPU usage is about 5%.
Crashplan is uploading at about 2.5Mbps, which is only about 15% of the available uplink speed. The crashplan/setting/network have no limits in place.
Any way to increase the speed of the upload?
Eoin Ryan,
The official answers is no. There isn’t anything you can do about the upload speed. The unofficial answers is you can apply a hack that will make the data appear to upload much faster. I’ve never wrote about it nor have I linked to it (though someone has linked to it in the comments I do believe) solely based on the reply from CrashPlan themselves which you can find here – http://lifehacker.com/we-were-very-proud-when-lifehacker-readers-voted-us-the-1659807506 – which points out that while the speed appears to increase the amount of data needed to transfer is now far larger.
In short it’s best not to apply any hack and if this is the initial backup then let it take the 2-3 days or in some cases even a week to have the initial backup complete. Be assured that once the initial backup is complete, however long that may take, that future sync’s perform very quickly. In fact I’ve yet to see my backups take more than a couple hours now once the initial backup has completed.
If you have a very large amount of data and you simply wait the days or week for it to be backed up, Crashplan does offer a service to have you send them your drive and they will copy the data to their servers and send the drive back.
Interesting concept. I’m not sure it would help me to turn off the de-dupe, since I have oceans of CPU and RAM available to Crashplan, and it’s only using a portion of both with much unused.
My initial backup is estimated to take 5 weeks, and that’s at 3Mbps upload speed, with the upload pipe giving 18Mbps available.
It’s possible either my ISP or Crashplan are throttling the traffic; but I may experiment with the hack for curiosity. It is a data set that is already de-duped, so no concerns about the volume ballooning.
Very helpful as always Mike, thanks.
Modified Crashplan Settings to maximise throughput for initial backup. In Settings/Backup/Frequency; changed backup frequency to every 12h from every 15 mins. In Settings/Backup/Advanced Settings; changed de-duplication to Minimal and un-ticked watch file-system in real-time. (will change these settings back to normal after initial backup)
Upload speed increased by about 50% from 3 Mbps to 4.5 Mbps, which doesn’t sound like much but will shorten the initial upload by at least a week if it is sustained.
There is still something that can be improved, but not sure if I’ll be able to figure it out, need to move on to the next task….
Those settings above have sustainably increased the upload speed from 3Mbps to about 5.5Mbps; I’d recommend them for anyone else doing a large initial upload. Remember to put them back to normal afterwards!
Great! Thanks for sharing.
-Michael
I tried to edit the ui.properties file and was denied save rights. I am an administrator. I am running windows 10, and the file is installed in Program Files as opposed to program files (X86). What do you recommend? Thanks. Mitchell
What tool are you using to edit the file? When opening that application, right click on the shortcut that you are using, and choose “Run as administrator” and see if that helps.
Running as Administrator did it! Thanks.
Gary beat me to the punch again! :-)
Glad that worked out for you MFBrin.
-Michael
im having some issues on the lastest versions of this where my local crashplan clients never makes it passed the splash window when set to connect to the synology
Erik,
I had an issue this morning where the package on the Synology wouldn’t start. I also have been getting a nice collection of “crashplan_X” folders on my Synology.
I decided to do some house cleaning and first I restarted the NAS, then removed the crashplan package, enabled SSH, then removed all the crashplan_X folders from the NAS. After all that I then re-installed the Crashplan synology package and got the new GUID key for the .ui_info file – as explained in the steps above.
After the new install the of Crashplan package I’m back up and running with no issues.
-Michael
Patters from PCLoadLetter has just released a new update for the Synology Crashplan package:
0035 06/Nov/15 – Fixed the update to 4.4.1_59, new
installs now listen for remote connections after second startup (was
broken from 4.4), updated client install documentation with more file
locations and added a link to a new Code42 support doc.
EITHER completely remove and reinstall the package (which will require a
rescan of the entire backup set) OR alternatively please delete all
except for one of the failed upgrade numbered subfolders in /var/packages/CrashPlan/target/upgrade before upgrading. There will be one folder for each time CrashPlan tried and failed to start since Code42 pushed the update
Thanks Mike. Is there way to browse to the var/packages/Crashplan/target/upgrade folder through the Synology GUI? I’ve been looking around in File Station, and while there is a crashplan folder at the root level (with photo, video etc), it only has a sub-folder called BackupArchives so I presume the /var folder is on the same filesystem as the DSM OS. Can we see it in a GUI? Maybe something like https://winscp.net/eng/docs/introduction ?
Eoin Ryan,
You’ll need to enable SSH on your NAS then use either WinSCP or PuTTy to log into the NAS as root and then browse to that directory.
-Michael
Hi there. Just wondering if Crashplan, as installed here, has been running in a stable way since all of the issues documented below. I’m thinking of buying a Synology, but quite frankly don’t want to deal with the issues like this that may crop up. I’m also not interested in moving to a synology-supported backup service (glacier, etc…). Crashplan via docker looks like a mess from a networking standpoint. Any perspectives on how stable this is running at this point? Thank you!
Since I bought my Synology about a month ago, Crashplan stopped working just the once when I did a recommended update to the Synology OS. That was earlier this week, and then yesterday I saw there was a new version of the community (pcloadletter) Crashplan app, along with upgrade instructions here.
Between Crashplan and Synology updates, I’m expecting to have to do this maintenance once a month PLUS I have a huge reliance on both pcloadletter for updating the app and Mike for updating this page. All told, I consider this a temporary fix; Crashplan seem determined to go about their updates in a way that deliberately stops this method from working, to make it difficult for people to use.
As far as the Synology goes, it’s been one of the best purchases I’ve ever made. I got a DS415+, upgraded the RAM to 8GB (Crashplan uses up to 4GB of RAM, at times), and it’s a fantastic platform. Simple secure remote access is baked in (e.g remote playing of audio/video from outside my LAN); and I’ve been able to share large folders with friends direct from the NAS without uploading things anywhere.
From the research I did before purchase, I think Synology & Crashplan is the best option for online backup at the moment. I intend to move to rsync using my old NAS as a destination to reduce my reliance on fantastic volunteers like patters & Mike here. Big thanks to both of them; there’s no way I would have taken the leap without them doing the hard yards.
Thanks for the thoughtful response Eoin. Much appreciated! As much as I like tinkering, I would prefer simplicity and reliability. Not sure why Crashplan doesn’t put resources behind this, to make the plugins stable? Anyway, thanks again, and perhaps you’ll see me again on the thread, if I decide to take the plunge.
You’re missing the point. IF anything, Crashplan are putting minor effort into BREAKING this (update mechanics), since they don’t really want people to use it. If too many people back up too much data on unlimited plans, Crashplan lose money. They’re nice people, just probably not keen on losing money.
jzlandau,
I have been very happy with both my Synology and Crashplan on the Synology. Has it been all roses every single moment? No, but it’s been up FAR more than it’s been down. There have been just a few small hiccups and the longest I’ve been without a “current” Crashplan backup has only been 4-5 days.
I feel it’s pretty stable and well worth the time and effort as far as I’m concerned.
-Michael
Thanks Michael. Much appreciated!
To speed up the Crashplan upload, has anyone experimented with editing the dedupe parameter in my.service.xml as per https://www.reddit.com/r/DataHoarder/comments/3bms4u/crashplan_uploading_unbelievably_slow/
The reddit article says the file is in /usr/local/crashplan/conf/, but that path isn’t the same on the Synology. I’ll search for it. Anyone got any advice about trying the change or not?
Eoin,
It’s been brought up a time or two in the comments already and I have no interested in doing any such hacks based solely on comments CrashPlan themselves have made about the effects of such “hacks” here – http://lifehacker.com/we-were-very-proud-when-lifehacker-readers-voted-us-the-1659807506
Feel free to try on your own and let us know though!
-Michael
Anyone have the issue of Crashplan constantly scanning for files?
It seems as though my backup is continuing to run, but just seems as though it is constantly scanning for files?
I’ve never had this issues before…..I know that it can scan from time to time to verify files, but mine seems to be constantly scanning, and no longer shows the percentage of the backup that is complete……This seems to happen with the latest update…..
The Synology has version 4.4.1-0034, and crash plan client on my Mac is 4.4.1
Vishal,
I’m running the latest stable version of DSM as well as the latest Crashplan package with no issues. Have you tried stopping and starting the Crashplan package?
-Michael
I have the same problem, someone know how to solve it ?
The headless client on the Synology is running fine, but each time I reboot the laptop with the Crashplan client installed to configure/monitor the headless client, the connection is lost. It’s a simple fix, to just edit the config file to point back to the headless client, but is there a way to avoid needing to do that?
I have the same problem :(
Does anyone else’s Crashplan constantly scan for files?
Mine seems to be doing this recently?
Also, is there a way to verify how much data has actually been backed up to the cloud? Mine used to give me a percentage, but now that has gone too…..just says backup running….When checking the Crashplan website, it says it is 99% complete, which i don’t think it correct :(
Michael I am having an issue with CrashPlan on my Synology. Things have been working great until the last couple days. Are you aware of any problems? I have just checked the logs within the Synology DSM, and I am seeing this:
Downloading a new version of Crashplan
Installating upgrade – version 1435726800450
Upgrade failed – version 1435726800450
And I am guessing that that can’t be good :-(
Any ideas? Thanks!
Gary,
There has been a new CrashPlan package released, please try upgrading to that package then stopping and starting CrashPlan. You should be all set afterwords.
-Michael
Yip, I got that installed last night, and it all seems to be working again :-) Thanks for getting back to me!
I was away for a few weeks, and the upload to Crashplan stopped for some reason. I’m trying to get things back working. Synology Crashplan App is 4.5.0-0036 – latest. DSM is 5.2-5644 Update 2 – latest
Crashplan Windows client is latest version.IP & GUID adjusted.
In the synology crashplan log it just says ‘started’ (for a few weeks it said backup destination unavailable).
In the Crashplan desktop app, the Backup tab says ‘synchronising file information’ & has been stuck on the same % for the last hour. In the Files tab, only 2 of the 4 selected folders have sizes, the others are blank.
Any ideas what I should try next?
Try this solution, it helped me a lot!
http://chrisnelson.ca/2015/07/02/fixing-crashplan-4-3-0-on-synology/
Other Solution:
Step1: Uninstall Crashplan, install again -> stop -> start.
If it won’t start up, go back to step 1.
After waiting a few minutes my DS1513+ fixed the issue by itself.
wow; I had no idea about chrashplan. Hope someone can share his knowledge and help me with 2 doubts i have.
Is this better than the rsync mode the synology nas includes?
Is this “dangerous” for my nas? I mean can it delete, because of a bug or an error all the information on my nas?
I’m asking this because I read about some people who lost all the information on the nas, when using cloud station to sync the nas with another nas or pc.
Regards!
Jorge,
“Better” can be very subjective. To use rsync you still have to have another location to which you are going to sync your Synology NAS to, this may or may not be more expensive than the cost of a crashplan subscription. Also with CrashPlan, I have a very easy interface to restore files from a desktop app or even a web client. Crashplan also keeps multiple version of files which has saved me in the past with my password manager.
Crashplan does not delete files from your NAS. It’s only reading the files on your NAS and sending them to their servers encrypted.
-Michael
Thank you Michael,
yes indeed to have a crashplan subscription would be cheaper and better , the problem is that I have more than 20Tb, and the time to upload everything would be very long..I only have 50mb for uploading..
I’m glad it only reads and replicates to another location, I was afraid of a Sync environment, where files deleted in one server where deleted automatically on the other server to.
I went to see if I could do this on my new DS216 and it appears this platform is not supported yet. Do you know when it might be? Thanks!
Hi
I have amended all the local files to point to the Synology, selected the folders to backup, but the in the client I have the issue where the Backup Destination ‘Crashplan Central’ is ‘Waiting for connection’
Does anyone have any ideas on how to resolve this?
Thanks
I’m still at a loss on how to resolve this. I’m grateful if anyone can offer some advice.
Thanks
Andrew,
I just purchased a DS1815+, I’ll see if I can replicate the same problem and get back to you.
-Michael
Thank you
Hi I have followed the instruction right up to 12 , but now stuck on 13 ( Typical).
I have looked on my MAC, but I cannot find ‘NOTE: File location for MAC users: /Library/Application Support/CrashPlan/.ui_info ‘
The .ui_info file is not in either the root library or the user library folder.
Also I have the App running on my Synololgy DS412+ as noted in the Packages window, but nowhere can I find an Icon to open a GUI to configure anything.
Please help I wish to use the Crashplan on the NAS store files from my computers.
Malcolm,
There won’t be a GUI on the Synology NAS. You need to install the Crashplan client on your computer and then edit the files to point to your NAS then use the GUI to decide what to backup.
-Michael
Hi Michael, Thank you for the reply, can you help on the second point of my post, I cannot point to the NAS as I cannot locate the .ui_info file in the locations stated in the instructions ( for MAC OS)
Malcolm,
If you haven’t installed the Crashplan app yet on your computer then you won’t find the file. You first need to install it then you should be able to locate the file, if you’re still unable to locate it try setting your MAC computer to show hidden files and see if that helps.
-Michael
I’ve gone through the instructions, and have got to the bit where I’m asked to edit the .ui_info file – except that I don’t have one! I’ve checked the different locations it might be in (i.e. the install for all users versus just me), but still no joy… anyone got any ideas?
Kevin, Im I in the same situation and still waiting for an answer, ( 4 days). the other problem I have no GUI on the NAS. do you have a GUI?
Kevin,
Have you installed the CrashPlan application on your computer already?
-Michael
Michael, I am in the same situation stuck at step 13, version 4.5.2
Hi Kevin, I have got a lot further by scrolling through all of the above messages to arrive at the solution. Hope this helps, in a nutshell you have to enable ‘show hiding files’ on the Mac OS
try this link to explain
https://www.mikesel.info/show-hidden-files-mac-os-x-10-7-lion/
When I now run the CrashPlan app, it shows the settings for the NAS, I have invited my Client to save to the NAS, just need to read the rest on how to select local computer files to save to NAS
Does anyone have this working successfully?
I thought i’d re-visit this tonight, in the hope that it will work. It was loading files fine, and then just seemed to stop.
I have tonight, updated to the latest client on my Macbook (4.5.2). I then updated the client on the Synology. I then couldn’t connect from the macbook to the NAS eve after updating the UI_Info with the correct IP etc….
I then updated the DSM on the Synology, which then looked like it was going to work….it was scanning for files etc. Once the scan was complete, i tried to start the backup, but it wouldn’t start…… i then closed the app on the Macbook, and re-opened, its asking me to create a new account or enter existing details and down the bottom, it says, “Logged out by authority, Computer De-activated”.
I then try to enter my login details, but it says “unable to connect, check your network”. I know its nothing to do with connectivity at all….
Any ideas?
Vishal,
I just added a DS1815+ to my collection a week or two ago. During the setup I opted for DSM 6.0 beta 2 for the DS1815+ and can confirm the directions above worked fine and continues to work this evening.
-Michael
Hi Michael,
Thanks for coming back to me. I spent a good few hours on it last night, and hit pretty hacked off with it all :(
I read somewhere that someone tried setting up OpenDNS which resolved their issue. I did try and set it up, but couldn’t even get that working properly.
But I don’t see how that should make any difference as I assume you don’t have this setup?
I’m thinking of doing a complete new install on everything :(
So, i have done a fresh install on the DiskStation (both crash plan client and java), a fresh install on the macbook, but am still unable to get this working.
I change the GUID and IP of the DiskStation in .ui_info, and when trying to run the client on my Mac, it comes up with “Unable to connect, check your network.”
Anyone have any ideas on how i could get this working again?
Frustrating that it was working fine, and now it’s not :(
Any help would be much appreciated.
Thanks
I got into contact with Crashplan, and they suggested deactivating the computers.
I’ve now done this, and can run the app on the macbook, but the Synology just doesn’t appear under destinations/computers. Only the macbook shows up :(
Any more ideas?
There are java packages available from Oracle once 3rd party packages are enabled. Is the Java Manager steps still needed or can the JRE 7 package be installed directly?
I’m running the Java package from Oracle on my DS1815+ now without any issues. So either will work just fine.
-Michael
I had to mark the C:ProgramDataCrashPlan.ui.info file RO as it reset to defaults after a PC reboot.
lophat,
I was actually just updating the blog to include this step as I just made the change to Read Only this afternoon as well.
-Michael
You sir are a champion! Updated my DSM to 6.x and CrashPlan to 4.5.2-0037 and everything seemed to crumble until I walked through your instructions. Thank you!
Now that everything’s running fine. How do I use the UI on the client computer to config a local backup to go to the Synology? Is there a way to switch between controlling the client system and the Synology from the same session?
First, thank you for the instructions. After several hours it seems like I’m close. I have it so that my synology appears to be backing up (well…only on restart). For some reason the following is true:
– When I go to crashplan online the synology “last connected” never gets updated.
– I don’t think the files actually get backed up unless I stop the crashplan service on the synology and restart it. Once I do, the “last connected” is updated online to < 1 min and the files are back of the backup.
– in the crashplan log file service.log.0 I see "Cancelling connection attempt due to timeout" repeatedly every few seconds after an initial period of "good" log statements. I don't see anything else strange in any of the log files.
NOTE: I have a synology dj216 (i.e., low end 512MB).
I have followed lots of the instructions here and elsewhere including:
– set java heap to 1024 (which works…much higher it doesn't start).
Any suggestions? Thanks in advance!
UPDATE: It seems to only run for sure at 3AM (I guess when it does a scan). What’s going on here. If I just drop a file on the NAS crashplan doesn’t “kick in”? It’s running and I can see things in the log – i.e., that it finds the file. Any help is appreciated!
Running 4.6.0 on synology and client with 6.x.x. update 7 and now keep getting “Upgrading Code42 crashplan Proe”….
How well does CrashPlan deal with the relative small memory size of the Synology NAS’s?
When backing up my files (120k+ photos) on a Windows PC, CrashPlan can end up growing to use several GB of memory footprint.
Seems like the GUID and server address are no longer editable since there is no ui_info anymore in crashplan client version 4.7.0. The client talks to 127.0.0.1. Ideas anyone or do you think the ‘backdoor’ is closed?
I’ve installed CrashPlan version 4.7.0. but I cannot find any .ui_info file neither in the mentioned folder nor in any other folder. On startup the GUID is shown. I assume this ‘backdoor’ was closed. Server IP used is 127.0.0.1, can’t find any config file to modify. Any idea how I can still use Crashplan backing up my Synology NAS? Rgds, Sven
Hi Sven,
I’m using version 4.7.0 installed on Windows and I have found the .ui_info file in this folder: C:UsersYourUserAppDataLocalCrashPlan
Hope this helps.
Alberto
My children required Taiwan Synology Developer Guide File Hosting Module last month and were told about a great service that has a lot of fillable forms . If others have been needing Taiwan Synology Developer Guide File Hosting Module too , here’s
http://goo.gl/BF2ZpR.Alright guys I need some help… I’ve been running CrashPlan PROe on my Synology NAS for years without any problems. About 200 days ago I tried to update to the newest version, but it failed due to not finding the proper package. Today I uninstalled CrashPlan PROe from the NAS and then installed it again with the native Java version. CrashPlan PROe installed without a problem and the service starts as well.
Unfortunately when I login to my CrashPlan PROe online interface the NAS shows up as offline. Next thing I tried is to connect to the NAS CrashPlan installation with the local client. I updated CrashPlan to the newest version and updated the . ui_info and ui. properties files. When I try to login to the client app it gives me the following error: Unable to connect to IPaddress :4243, check your network
Any ideas what I can do to fix this?
Thanks in advance
I’m running a DS212 w/ DSM 6.1 so cannot download Java manager… is there any other way to install Crashplan onto my NAS?
Do these instructions still work? I’m afraid to try this. The last comment was from 2017.
I’m running DSM 7.2-64570 Update 1 on an RS 820+
The year is now 2023…