First look at NAKIVO Backup and Replication v6.1
Earlier this month NAKIVO released version 6.1 of their Backup and Replication application which only adds to their popular 6.0 version adding features like Microsoft Exchange instant object recovery and log truncation as well as other features. As part of the VMware vExpert program NAKIVO has given me a NFR license to try NAKIVO Backup and Replication v6.1 in my home lab and I want to share my initial thoughts about this new version that I’ve had running for the last couple weeks.
NAKIVO has made it incredibly easy to deploy NAKIVO Backup and Replication in your environment by offering several deployment options such as a pre-configured VMware virtual appliance, Windows and Linux installers as well as an AWS machine image. They even have an app for your Synology and Western Digital NAS boxes!
Since my Synology DS1815+ has a lot of un-used resources (thanks to the 16GB RAM upgrade) I decided to install NAKIVO Backup and Replication directly onto the NAS.
Be sure to check NAKIVO system requirements to see if your Synology or WD NAS is supported for this install.
How to Install NAKIVO Backup & Replication on a Synology NAS
If you haven’t already downloaded the NAKIVO Synology package, go ahead and do that now by clicking here.
- First log into your Synology NAS and open the Package Center and click on “Settings“.

- Under “Trust Level” make sure “Any publisher” is selected and click on OK.

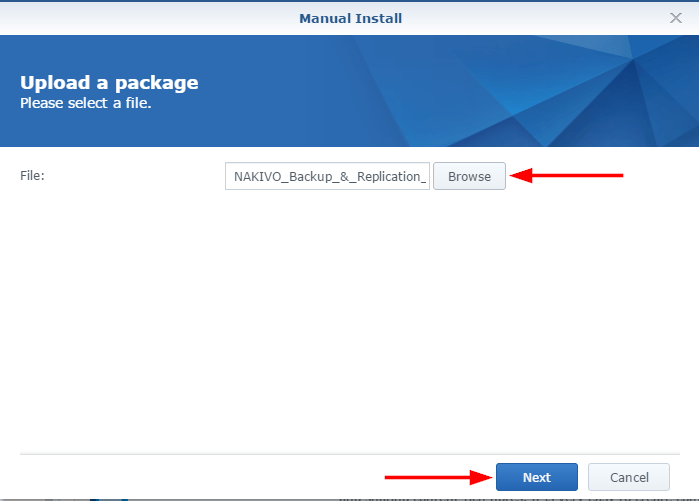
- Now back at the main Package Center window, click on “Manual Install“.

- Click on Browse to select the NAKIVO Synology package file then click Next.
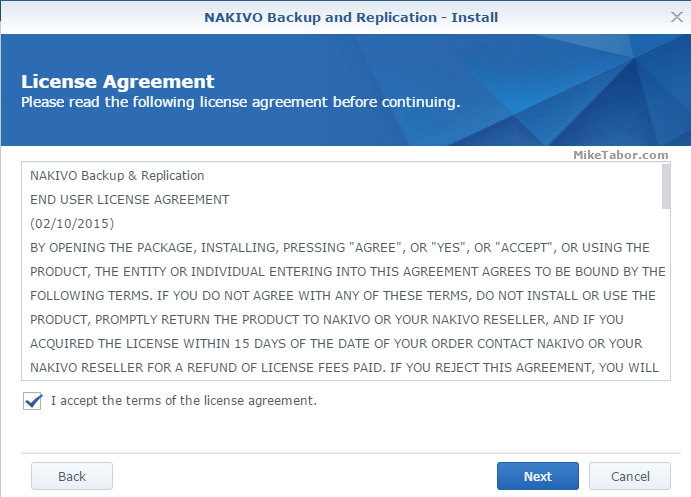
- Accept the license agreement and click Next.
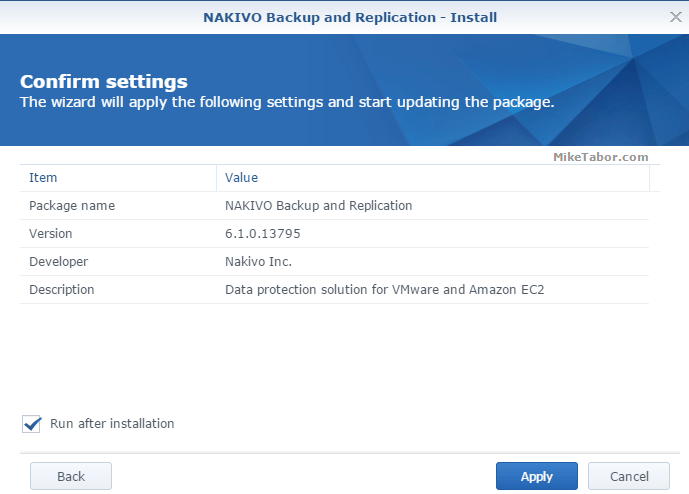
- Finally, confirm the settings and check weather or not you want the package to automatically start after installation and click on Apply.
That’s the install process, straight forward and very easy. Now just open a web browser to: https://<SYNOLOGY_IP_ADDRESS>:4443 to start configuring and using NAKIVO Backup and Replication.
Configure NAKIVO Backup & Replication
Once you have installed NAKIVO Backup & Replication and opened your browser to https://<SYNOLOGY_IP_ADDRESS>:4443 you’ll be immediately prompted to configure the appliance.
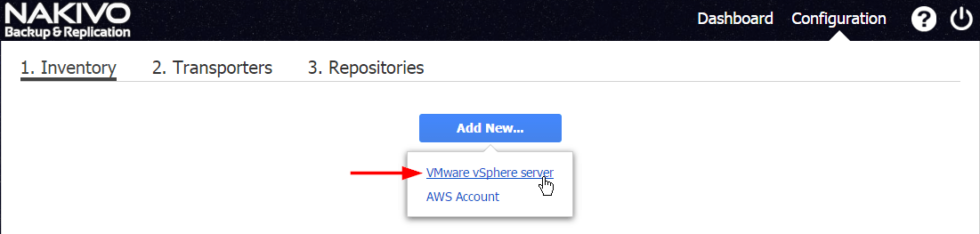
- First click on “Add New..” and select “VMware vSphere server”.
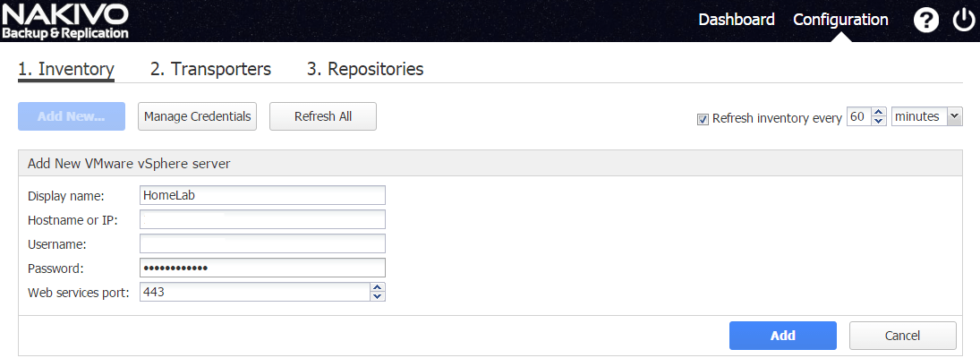
- Enter your vCenter credentials, then click “Add“.
- The transporter is what does all the work such as backups, replication, recovery, data compression, deduplication, and encryption. As your environment grows you’ll want to add more transporters to help with the load. For my home lab I’ll stick with the on-board transporter so click “Next“.

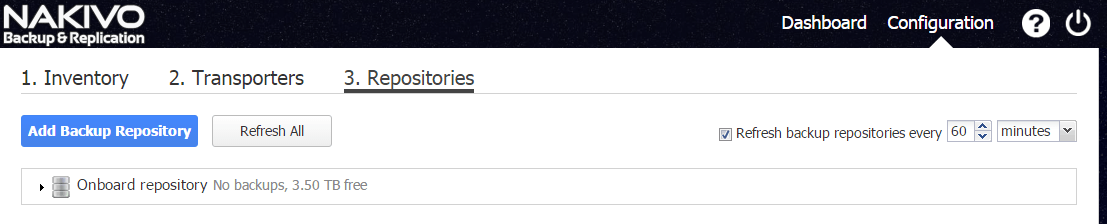
- I’m going to use the on-board repository, stored directly on my Synology DS1815+, but if you have another location you want to save your backups then add it here.

- It’s that simple, NAKIVO has been configured and you can now start creating your backup jobs.


My thoughts on Nakivo Backup
Everyone needs to be doing backups and NAKIVO makes this need a no brainer. NAKIVO provides several ways to quickly deploy their backup software from easy installers to a much preferred virtual appliances and having the ability to deploy directly on a Synology or Western Digital NAS is a huge plus for home labs or small businesses. It took just moments to download and deploy NAKIVO Backup and Replication in the home lab.
It doesn’t stop there though, thanks to their creating backup jobs or recovering files and VM’s in NAKIVO Backup and Replication is straight forward and also easy to do with their HTML5 web interface… no Flash junk here!
Another neat feature is the ability to enable screenshot verification. When a backup is completed NAKIVO will boot the VM, take a screenshot and email you the report. It’s pretty slick!
If you’re looking for a backup solution NAKIVO Backup & Replication should be on your short list to check out. You can download a free trial of NAKIVO Backup and Replication and if you’re a VMware vExpert you can also receive a free NFR license to try this out for yourself!
Nakivo Backup and Replication v6.1 – What’s new?
- Exchange 2013 & 2016 Instant Object Recovery – NAKIVO Backup & Replication v6.1 enables browsing, searching, and recovering Microsoft Exchange 2016 and 2013 objects, such as emails, directly from compressed and deduplicated VMware VM backups, without the need to restore the entire VM first. This feature is agent-less, works right out of the box, and does not require creating a special lab or running a special backup type.
- Exchange 2013 & 2016 Log Truncation – Microsoft Exchange Server database transaction logs record all changes to an Exchange Server database. Over time, these log files accumulate and can consume all of the available disk space, if not periodically removed. NAKIVO Backup & Replication v6.1 provides an option to truncate logs of Microsoft Exchange 2016 and 2013 after a successful backup.
- Hot Add – The new Hot Add feature enables writing VM data directly from/to the VM datastore, bypassing the network. NAKIVO Backup & Replication v6.1 automatically uses Hot Add in order to offload production LAN from the data protection traffic and to increase the data transfer speed.
- Job Chaining – Extends the job scheduling functionality by introducing job chaining. With this feature, a job can finish its tasks and then trigger another job in a chain. This way, for example, it’s easy to set up a chain where a VM backup job saves data locally, and then triggers a Backup Copy job that sends backup copies to Amazon cloud.