Securing your Synology NAS, Part 2
![]()
Earlier this year I posted instructions on how to install an SSL certificate on your Synology NAS. That was before the Dogecoin malware were found infecting Synology NAS boxes early this summer or now the “SynoLocker” ransomware that encrypts all the data on your NAS and forces you to pay $350 to decrypt the data. Below I’m going to list several ways to help protect your NAS, I’ll be using my Synology DS412+ for demo.
Securing and Protecting your Synology NAS
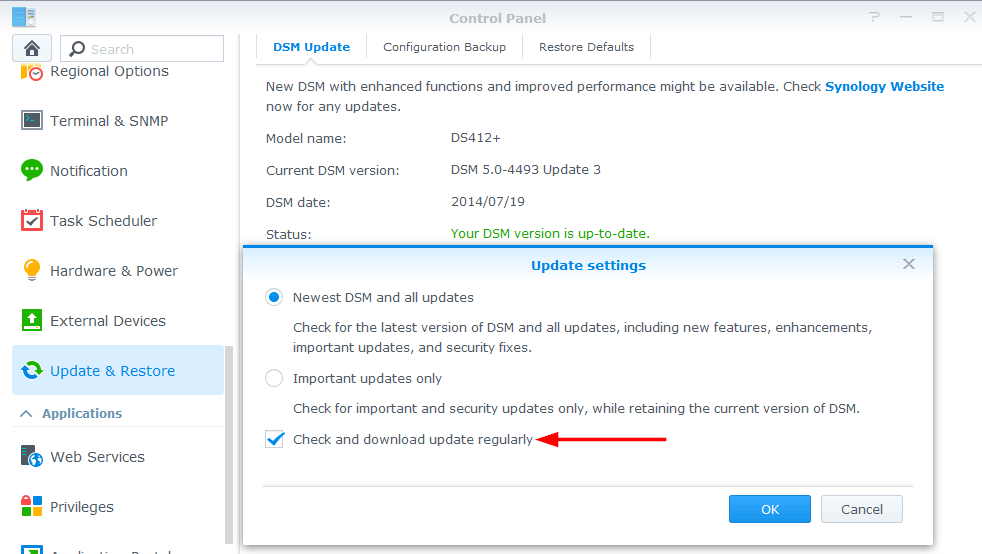
1. Keep your Synology Up-to-date
First and foremost would be to keep your Synology updated. So far, in both the dogecoin malware and Synolocker ransonware attacks it seems attackers were able to use known exploits in the DSM 4.3-3810 builds – a build that’s nearly 9 months old and has seen 6 updates to the DSM 4.3 builds alone. That’s NOT counting the newer DSM 5.0 builds and updates.
Update your stuff man! I know in DSM 5.0 you can actually make the NAS look for updates and notify you when there are updates available. Check the box!
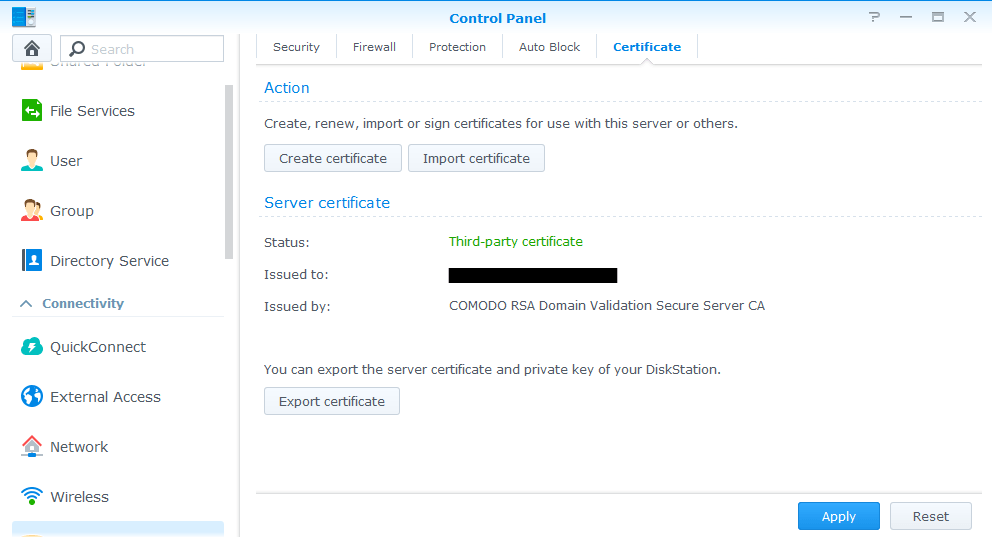
2. Install a SSL Certificate
The best way to prevent an attacker from the outside from reaching your NAS is to not even make it available online. However, this isn’t always possible. The Synology has a plethora of wonder features and many of those features become even better (or only possible) with the Synology NAS accessible on the internet. If your Synology NAS is going to be accessible via the internet, then you should also install a valid SSL certificate and stop using the default self-signed cert that can be forged. A $9.00 /year SSL cert from NameCheap is all you need.
Be sure to read: Secure your Synology NAS, install a SSL certificate
3. Configure the Synology Firewall
By default the Synology firewall is setup to allow everyone and their brother access. With your Synology accessible to the internet this is, in nearly every single case, a very bad idea. Setting up firewall rules are quick and easy – in DSM 5.0 go to Control Panel > Security > and select the Firewall tab.
I have three Synology firewall rules:
- one rule to block several countries (this is redundant, you’ll see below)
- a second rule to permit only certain ports to US IP addresses (all other ports are also blocked)
- a third rule is to allow every port open to my internal network.
The final setting you should enable is “Deny Access” for “If no rules are matched” which makes my first rule redundant. This option does as it sounds, if there are no ALLOW firewall rules above matching the request then the request is blocked.
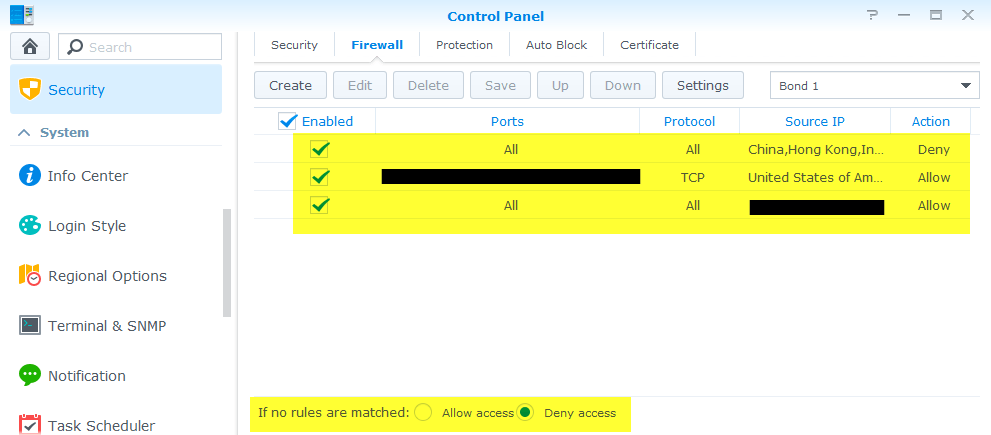
NOTE: It’s also a good idea to enable Auto-Block so that after X number of failed login attempts within X minutes the firewall will block that IP address. I like to set my auto block with very few failed attempts within a very long time period.
4. Enable 2-Step Verification
Since we’re on the subject of login attempts another feature you should enable is 2-step (or 2 factor) authentication. In a nut shell 2 step authentication requires both “something you know” (like a password) and “something you have” (like your phone). You’ll need to install the Google Authenticator app on your phone (Android / iphone) first then log into your Synology NAS and enable 2-step verification within your user options.
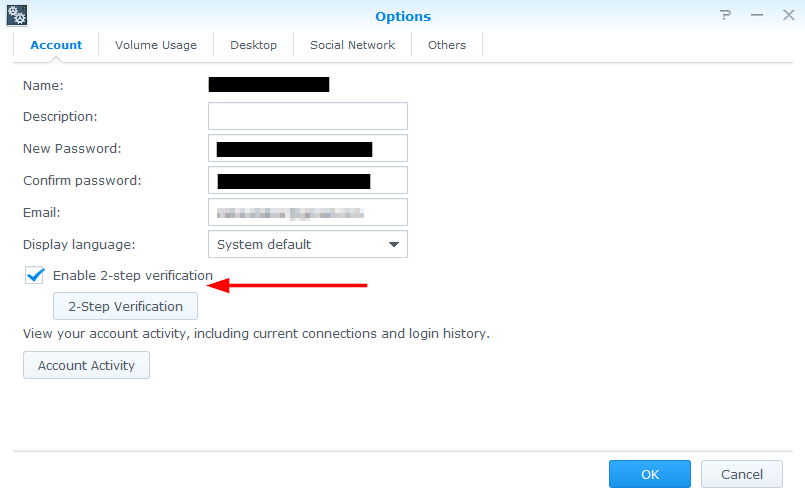
NOTE: 2-Step Verification should not be a reason to use weak passwords. Strong passwords should still be used!
5. Disable unused services and applications
I’ve seen several people enable and leave enabled SSH. There shouldn’t be any reason to leave SSH open all the time. If you need to do something via command line, enable it and do your work then disable when finished. I don’t even leave SSH enabled on my ESXi home lab and those hosts are not even available to the internet in the first place.
Other apps like Photo Station and so on are great but if you don’t use them uninstall them and make sure those ports are no longer open to the internet. Just because you can enable something on your Synology doesn’t mean you should. Think of it this way, the less open ports and running apps on your Synology secures it that much more but also frees up resources that can be used elsewhere.
This is also a good idea to think about changing the default ports (example: 5001) to something different.
6. Disable unused accounts
I prefer to disable the default admin account as well as ensure that the built-in Guest account is also disabled. I then create a new account and assign it administrator access which is used only for administrative tasks and then use regular user accounts for day to day tasks and access.
7. Install Antivirus Essentials
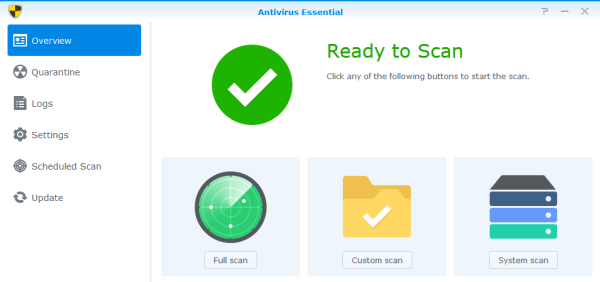
Located in the Synology package center is an app called “Antivirus Essentials“, which I’d also recommend installed on your NAS as you can have it scheduled to scan files as often as you like. I have mine setup to update virus definitions before each scan and have full scans kick off very late at night when I know I won’t be using the NAS.
I haven’t seen any reports or reviews on how this compares to other anti-virus programs you’d normally install on your desktop such as BitDefender, AVG, McAfee, etc and I don’t expect Antivirus Essentials to out do those other programs but it certainly doesn’t hurt to have yet another layer of protection.
8. UPDATE: Use the built-in Security Advisor
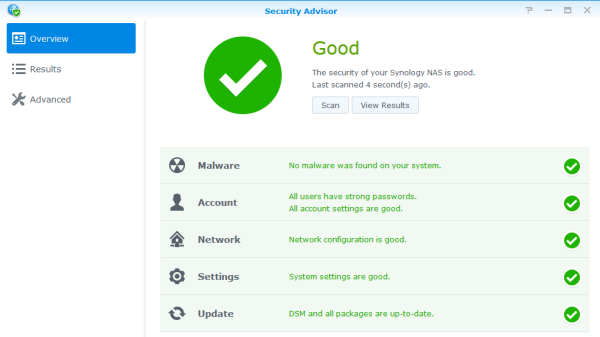
On November 6, 2014 Synology released DSM 5.1-5004 and within this update they included a package called Security Advisor which can be used to scan a limited number of settings they have configured to check and give you suggestions on ways to better secure your NAS.
My suggestion would be to configure the Security Baseline to “CUSTOM” and then check all items and perform a security scan.
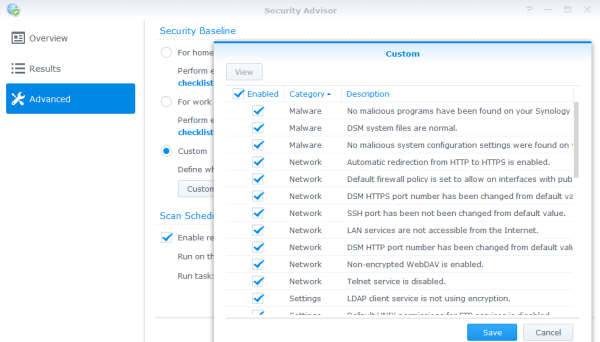
After the scan you’ll then be given suggested changes based on the following categories: Malware, Account, Network, Settings, Update.
Wrapping it up
One final thing I highly recommend would be to also backup your Synology NAS. That is, if you are using your NAS for more than an ESXi home lab as many people aren’t overly worried about their home lab VM’s being backed up. If you are using it for more than a home lab or do want those VM’s backed up then I’d suggest taking a look at setting up CrashPlan on your Synology.
CrashPlan is very affordable, encrypts the backups and provides file versions which is great if you get hit by Synolocker as you’ll be able to wipe the Synology and restore your files from a previous version!
HOW-TO: Install Crashplan on Synology NAS.
Do you have any other suggestions to secure a Synology NAS? If so share them in the comments below!
What will number 2 a Bought SSL Certificate prevent more? If you add your certificate to the certificate store as trusted root, you won’t get a message from your own devices until someone changed it..
But it doesn’t harden your NAS, it only makes your login information unavailable for network sniffers. The applications isn’t different because SSL is enabled.
Just my 2 cents.
Bas, it absolutely helps secure your NAS. Security is about layers, there isn’t just one thing that’s going to fix it all. With a Self-Signed SSL you run the chance of someone forging the certificate. The likelihood of this happening is next to none on a Signed SSL.
As for apps, yes it also adds an extra layer of security, for example Photo Station – I have this on a few computers and phones. Within the Photo Station app (and many other Synology apps) is an option to enable HTTPS and verify certificate. Both of which you’d want to enable as I wouldn’t want my username and password going across the wire in plain text… as it would without HTTPS. Network sniffers are a real threat and certainly a security issue.
Again it’s about layers, not a one switch fixes all.
I understand protecting your username and password from sniffers. But it won’t protect the application from a bug.
Having a self-signed certificate and import the public key into the certificate store will trust that certificate. If someone forges your certificate it is no longer trusted.
For most users it is to expensive to buy a certificate from a ca. StartCOM offers free certificates, but more and more people are distrusting them.
If you are the only one using the device, the self-signed certificate is good enough, but a check has to be in place.
I think you’ve missed the point of this post and that’s ways to secure your NAS. Forged certs and network sniffers are a security issue and a very real one.
Most, if not all of these steps won’t pretect you from a bug in the app such as a zero day exploit. But having layers of security will most certainly help. Security is NOT about one type of protection.
As for cost. I don’t buy that, if you can afford a $200-1000++ empty box you can certainly afford $9.00 a year.
Do you have to follow any of these steps? Absolutely not, but I would recommend it most people do. After all the most secure box is an unplugged one.
Btw. You can configure the apps to run through the quick connect service from synology instead of your ip dares and port. This allows you to close the port on the outside and still be able to connect.
Authentication is on your synology but proxied by synology. An additional layer, but you have to trust synology
Mike,
Thanks for sharing this with us. It is a great help.
Since the outbreak of synolocker I have been in the proces of trying to understand the firewall rules of my synology NAS.
I have a question about your firewall advice
“a third rule is to allow every port open to my internal network.”
Does this include the IP adress of your Router?
If so: does this not open up all ports on your NAS from traffic coming from “behind” the router?
Follow-up question:
How does the firewall know it is traffic from the internet and not from the router’s IP, since it uses NAT.
Thanks,
Kunk
Kunk,
My third firewall rule adds my NAT’ed IP range. For example if your home network NAT is 192.168.1.xxx I would setup the rule to allow the IP range of 192.168.1.0 through 192.168.1.254. This opens up all ports on my Synology to all machines on my private home network, not that I need all the ports open it’s just nice to already have them in place if I do need something opened. Being my home network I’m not worried about someone plugging in and attacking the box.
Hi Michael, thanks for your reply.
I’m worried about it, because your router probably has an IP adress belonging to the home Network (for example 192.168.1.1)
Traffic that comes for the WAN trough the router to your NAS would have all ports opened up by your 3rd rule.
How so? 192.168.1.1 is not accessible from the internet.
Probably your HOME-NAS is accesible from your work or somehere else.
Like this.
Internet (Work IP adress) –> Router WAN side (ip x.x.x.x) –> Router LAN side (192.168.1.1) –> NAS (192.168.1.2)
All this can be done on port 5000. In order to do this, you have to open up port 5000 on your NAS’ firewall. And use portforwarding in your router.
If we agree on this part, we can continue.
Your 3rd rule opens up all ports to your internal network (LAN) which includes your the router’s internal IP adress. Thus it opens up all traffic from the router, including the traffic from the internet. (or am I mistaken?)
Kunk,
That would be incorrect. My third rule ONLY applies to my internal network, not my external network – only IP addresses that have 192.168.1.xxx as their IP.
Further my router has it’s own firewall which also ONLY allows my NAS port to be forwarded (default is 5000 or 5001). The router (first line of defense) is alreay blocking all ports from the outside world. This is why when you enable CloudStation on the NAS you also have to enable port forwarding on port 6690 in your router regardless of what you may have set in your NAS firewall.
I could disable the NAS firewall all together and if I didn’t have port forwarding enabled on my router you’d still not be able to access my NAS. Because I do have management (5001 for https) accessable to the via port forwarding on my router I also have a second layer of protection on the NAS with it’s own firewall which allows or restricts access based on the rules above.
In addition, just because I’ve opened the firewall on the NAS to accept connections for all ports on the INTERNAL network doesn’t mean they are listening. I keep as few things running as possible, for example SSH is not enabled so even if you was to gain access to the internal network somehow port 22 while open on the firewall would not respond since it’s not listening or running.
You are right. Unless, the attacker can change its source IP to reflect an internal IP to get around it. A good firewall will know this is fishy. How can a source IP be that of an internal IP when it comes in through an external interface? Therefore, firewall rules are not just about IP, it’s also about the egress/ingress of the interface.
Hi Mike,
Good Tutorial. I have a DS412+ and installed a Third Party Cert and when i access http://nas.mydomain.com, it gets redirected to https and the certificate works fine. However, when i try to access Photo Station, i have the following problems.
1) http://nas.mydomain.com/photo still goes over port 80 and doesnot get redirected to HTTPS
2) If i type https:// myself in the browser, then it shows a Synology certificate (I have synology DDNS enabled and nas.mydomain.com is a CNAME record for mynas.synology.me.
What am trying to achieve is, if we visit http://nas.mydomain.com/photo, then it should redirect to HTTPS port of the photo station.
Any help / suggestions is appreciated.
Mike,
You can tell us how to use crashplan on synology diskstation?
Thanks,
Pradeep
Pradeep,
Certainly! I have just posted the steps here – https://miketabor.com/install-crashplan-synology/
Enjoy!
Hi, any thoughts on this setup?
– Enabling VPN only in your firewall for a specific country and deny everything else.
– Disable QuickConnect and External access.
Now when I want to use DS File or some other Synology App on my iPhone, I first connect my device using OpenVPN to my NAS. Then in DS file (or the other apps) I just fill in the local ip address of the NAS (ex. 192.168.x.x).
This way you will only be able to connect to the NAS from your local network at home or via VPN (only in the countries specified in the firewall or other specific rules).
KarmaRoot,
Sounds like a good idea to me. The more you can lock down the better off you’re going to be.
what do you enter as the source IP in firewall setup to allow access to all ports for your internal network- what is the syntax- the name of the local area network? can you give an example
Kirk,
I create a rule settings Ports to “All”, Source IP is set to “Specific IP” then within that I select “IP range” and put in the range of my home network. For example 192.168.0.1 to 192.168.0.254 and finally select the Action to “Allow”. This would say any device within that range would have access to any open ports.
Hope this helps.
-Michael
Thanks Michael, once I opened the edit section and saw the ip range there, it became clear. I have been making good progress- the proof is in accessing synology with the ssl. I’ll keep you posted.
Hi, great article. Thanks for sharing.
I have a question, I need to have the smb active, my infuse can only communicate with Sinology via SMB, even though it does support afp, not with the sinology, for some reason. My problem, when I activate SMB its activates the guest user with no password. What I did, was give no access to any folder to the guest user. Is this a good way around it or would you suggest something else?
Thanks
The two-factor authentication is not implemented properly on the DSM. The DiskStation running DSM (latest version as of today) does not require the DS File app for Android to supply the second factor – just username and password. So, if a user’s password is compromised, an attacker only has to install the DS File app to remotely access your files even though you have two factor authentication turned on (e.g., for remote access through quickconnect.to and file station).
That is poor security.
delafield44,
I can confirm that the Cloud Station and Photo Station app on Android also does not use two factor authentication on their apps. Then again I’m not sure I’d want it on those apps each time I saved a file to Cloud Station or took a picture on my phone and Photo Station uploaded it to my NAS.
To combat such an “issue” is I have additional login credentials for those app that have extremely limited access to a certain folder, maybe two folders, and no other access. So in the event that my phone was stolen and someone got past the screen lock, and then took the credentials from my Synology android apps the most they would be able to do is see the files in those restricted folders… then again if they did all that on anyways they wouldn’t need to bother with getting the synology android app user/pass as the files and photos are already on my phone too…
I would recommend creating another account or two with very restricted access to do what you need access to do without using a full blown admin account on the android (or even iphone) apps. Using admin accounts for doing everything is generally bad practice to begin with.
-Michael
Hi MikeTabor. I got my Synology DS415Play yesterday and I’m currently in the “configuration-phase”. Right now, it shouldn’t be available on the Internet at all since I haven’t enabled any such things.
I’m trying to figure out which way would be the best (easy AND secure) way of enabling access when not at home: Synology QuickConnect, setting up a VPN-server or going the own-domain-name-with-SSL route? Or perhaps a combination?
I’m getting a little confused about which things that would be the best and if mulitple things can be combined. You have a lot of wonderful guides here but none of them seem to mention QuickConnect nor VPN so I thought I’d just check with you what your thoughts are about them.
Thanks!
Tanaxia,
Thanks for the reply and questions. I have a VPN article started but have yet to publish it – I know I need to get that done. :)
To answer your questions, the more restrictive you can make your NAS the better. If you don’t need/want remote management access then I would not open that access and thus save the $9.00 a year for an SSL – a self signed cert will work perfectly fine so long as the management console isn’t opened up to the internet.
If you need access to all of your files then the VPN route would certainly be a much better option. As it doesn’t make your entire NAS management open to the internet.
Another option I use a lot is Cloud Station. I have created an account that no other access to the NAS or any other folders than the CloudStation folder. From there I place only the files I want to have shared across many computers and easily accessible from the internet if need be. This allows me to pick and choose which files “COULD” be put at risk since I don’t need access to every single file on my NAS. Another great feature of CloudStation is the verisioning… this recently saved my butt when I changed my password manager master password and then forgot what I changed it to… loaded up the previous version of the password manager database and I was able to access all my passwords again!
There really is no right or wrong answer and it depends entirely on what kind of access you want into your NAS from home, the office, or anywhere on the web. Hope this helps and congrats on the new Synology purchase!
-Michael
Thanks a bunch for the response, Michael!
I’m looking forward to your VPN-article and I hope you will bring up not only how to configure the VPN-server and how to connect to it but also how it can be combined with other security-related settings depending on the individual user’s needs and what they need to do :) Perhaps that’ll be too long of an article, hehe, but still!
Based on your response, I’m probably going to go the VPN-route, configure the Firewall for that so that it doesn’t allow external access (unless VPN).
Cloud Station sounds interesting. Will definitely take a look at that as versioning is awesome. Planning on setting up CrashPlan though so I guess “version” retention will be gained by doing that.
One thing though; How to I make sure that nothing is accessible from the Internet (except when via VPN), not even the management administration website? Is that done only in the Firewall settings or somewhere else too? So many settings.. I’m afraid to overlook some setting that might open it up for intruders, haha! :)
– Marcus
Marcus,
The above article is a great starting point and if you follow just the above recommendations (minus the SSL since you don’t need it) you’re going to be much better off. Strong passwords, 2 factor authentications, staying up to date, keep running apps and services to a minimum, and using the firewall on the Synology will block unwanted access and if you have a home router as well then it will provide another layer of security as well – as long as you don’t have open ports being forwarded to the NAS then it won’t be accessible.
Also the security advisor built into the Synology DSM is a nice addition and will provide you feedback based on a security baseline… for me I use a custom baseline and have everything checked in the checklist.
In the meantime I’ll work on getting that VPN article out soon. ;)
-Michael
Thank you once again, Michael.
I’ve followed your guide here but hit a snag when configuring the Firewall. I’m currently also following another guide on how to set up a VPN and the configuration to allow the VPN was very simple. However, when trying to do your “a third rule is to allow every port open to my internal network.”, I don’t know what my internal network IP address is and which subnet/mask to use? How can I find that out?
Also, regarding not forwarding ports, it is required to open up the port for the VPN in order for it to work, is that also not safe?
Security advisor works great. The Antivirus Essentials too. Is it safe to schedule them to do full scans at the same time or should I space them out a bit to not clog down the system too much?
-Marcus
Marcus,
What is your internal IP address on your computer? Most likely either 192.168.0.xxx or 192.168.1.xxx – which you’d enter in the range 192.168.0.1 – 192.168.0.254 with a subnet 255.255.255.0. You can confirm this by viewing your settings within your router. While you’re in the router you will need to enable the port forwarding for the VPN server else the router will block all requests.
I do stagger the security advisor and anti-virus scans by a couple hours, for the reason you already mention – so I don’t bog down the system.
-Michael
Mike thanks – What is the best on the fly scanner for malware that might help us. We just got hit with howdecrypt ransomware. Any recomendations
Why do you need three rules?
1:one rule to block several countries (this is redundant, you’ll see below)
2:a second rule to permit only certain ports to US IP addresses (all other ports are also blocked)
3:a third rule is to allow every port open to my internal network.
if you only allow us ip and certain ports in rule 2, you dont need rule 1? Because rule 2 will block every country that dont have an us ip?
Chris,
I did this for my own comfort really. I know rule 1 is not really needed as I point out in the post:
“The final setting you should enable is “Deny Access” for “If no rules are matched” which makes my first rule redundant. This option does as it sounds, if there are no ALLOW firewall rules above matching the request then the request is blocked.”
I’ve done it in case I accidentally open something up by mistake. I know I won’t be trying to access my Synology from China or Hong Kong, etc and I also know based on my web server logs a number of login attempts come from these places so I have an explicit rule to block them.
You really only need the two rules though (2 and 3) with the option of “Deny access if no rules are matched” enabled.
-Michael
Ok :) Thanks for answering! Great post btw, learned a lot!
Would you also recommend encrypting shared folders?
Chris,
I’m certainly pro encryption. I don’t encrypt my shared folders at the moment, mostly due to the performance hit on my DS412+, however I’m going to be upgrading my Synology to a DS1815+ very soon which features hardware encryption acceleration and I will be encrypting all the shared folders at that point.
-Michael
Michael,
thanks – great thoughts. One question on how you set up your fw rules: Do you apply them to all interfaces or just to the LAN and/or VPN? If the former, it doesn’t seem to allow to deny if no rules are matched?
Thanks!
Dude. best Synology tips around. Loving on your site today MikeyT!
I know this has been a few years, but is this comment right?
“A $9.00 /year SSL cert from NameCheap is all you need.” doesn’t this just get you teh name and cert? doesn’t it need to be hosted somewhere (much more money) to get the cert? or can you get it without being hosted?
You can buy a domain name without having a web host or having the name “hosted” anywhere. The instructions above is all that’s needed. ;)
thanks, got it sorted. i did find though (after i bought a domain), that the free synology.me ddns address will work fine on it’s own with lets encrypt. i used both via remote access, and they are indistinguishable to me. unless there is something i don’t see yet.
Hi Mike,
In the firewall rules, which IP addresses do you allow for number 2? I only want to be able to access my synology nas from within my network. Are there any more tips you came up with since you last wrote this?
Thanks for the info.
Justin
Justin,
For the second rule, I am NOT allowing an IP address, but instead allowing certain ports to US only IP ranges.
-Michael