Installing DD-WRT on an ASUS RT-AC66U router
I recently upgraded my EnGenius ESR-750H wireless N router to an Asus RT-AC66U wireless AC router. The EnGenius router has been pretty good for me but basic and no support for other firmware. The Asus RT-AC66U not only has a number of added features and support for 802.11ac, it also doesn’t seem to be plagued with the port 32764 bug or the Linksys “TheMoon” virus that’s been going around on select Linksys models, but the Asus also has a number of firmware options that can be used with this router such as Merlin, Tomato, and DD-WRT.
I’ve used DD-WRT in the past with other routers and had great success and decided to go that route with my new AC66U router as well.
How to install DD-WRT on Asus RT-AC66U
To get started we need to download a few files first:
- The most recent .TRX file from DD-WRT: ftp://ftp.dd-wrt.com/others/eko/BrainSlayer-V24-preSP2/ (mirror), currently dd-wrt release r25648
- You also need a Telnet client if you don’t already have one. I’ll be using the one built into Windows 7.
Now lets get started…
- I like to start with nothing attached to the router except for the machine I’ll be using to update the router so disconnect all other connections including WAN. Then log into the router Admin Panel (usually 192.168.1.1)
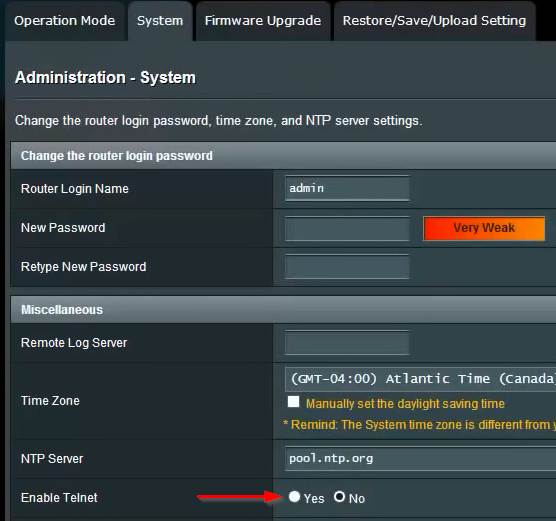
- Enable Telnet by going to Advanced Settings > Administration > System > Enable Telnet and click on “Apply“
- Open a command prompt, and type:
telnet 192.168.1.1Then enter your username and password for the router admin panel.
- Now clear NVRAM by typing:
mtd-erase -d nvram - Reboot the router now by typing:
reboot - Once the router has rebooted log back into the admin panel (default login is admin/admin) and navigate to: Administration > Firmware Upgrade > New Firmware File and click on Choose File and select the .TRX file you downloaded (for me dd-wrt-25648-Asus_RT-AC66U.trx) and click on “Upload“
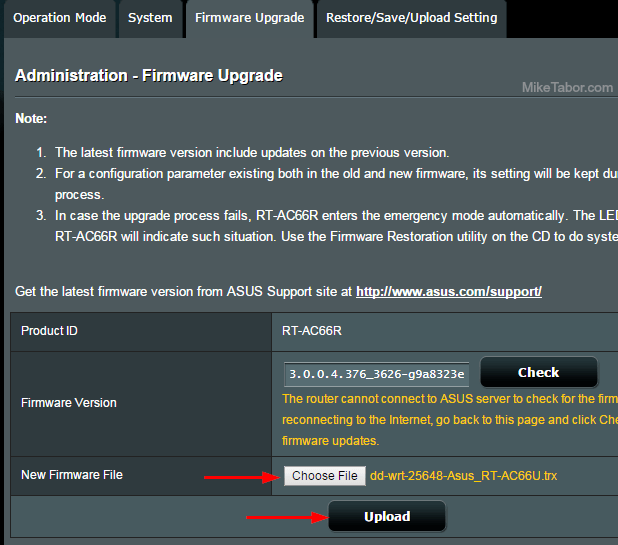 Note: This step can take several minutes. Once completed you should see the DD-WRT page.
 - Open a command prompt again and telnet into the router (192.168.1.1) but this time for the username type in root for the username for the password use the one you chose when setting up the initial DD-WRT page.
- Again clear NVRAM by typing:
erase nvram - Reboot the router now by typing:
reboot
At this point it’s just a matter of setting up the router to your liking, such as username/password, wireless networks, security settings, etc.
How to get Port Forwarding working on DD-WRT
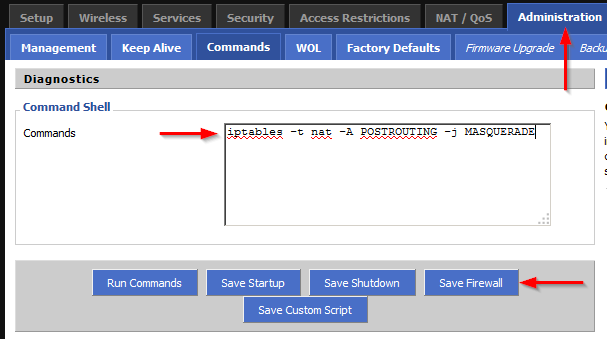
After upgrading my Asus RT-AC66U I noticed that for some reason port forwarding was not working. Apparently this is a known “bug” and is easily remedied by logging into the DD-WRT admin panel and navigating to: Administration > Commands then typing:
iptables -t nat -A POSTROUTING -j MASQUERADEand click on “Save Firewall“.
Immediately port forwarding started working and no other bugs have been found so far. Glad to be back on DD-WRT and the new Asus router seems to be performing just fine!
UPDATED: Updated instructions using the latest DD-WRT build as of 12/18/2014. Also removed parts detailing installing a KONG build as development for the builds have been merged into the standard DD-WRT image.
Why exactly are all these steps needed for?
On 2 RT-AC66R routers I had started from factory defaults and just did the .TRX file as in step 6, then performed a default reset. All seems to work fine, including the port forwarding.
Q1> Should I be looking for something not working without upgrading to a Kong build?
Q2> Also, it looks like the latest Kong builds don’t have a “HIGMEM” version anymore?
Found the answer to Q2 in the changelog at http://www.desipro.de/ddwrt/K3-AC/Changelog:
Build 23655 01. Mar 2014 +++++++++++++++++++++++++++++++++++++++++++++++++++++++++++++++++++++++++++++++++++++++++++++++++++
Note: all K3 supported models now use one build, no special highmem build for units with 256MB units required anymore.
Nick,
I’ve been using KONG builds for sometime now. His builds have always been extremely stable and usually included some extra tweaks and drivers. However KONG now contributes directly to DDWRT and there usually is very little different from his builds and the regular DD-WRT builds. I guess habits are hard to break and I just continued with that’s always worked in the past and still continues to work.
Steve Jenkins has a good blog post about the different builds, KONG included that’s worth checking out.
-Michael
Sounds good! Thanks, Michael. I’ll give it a shot as soon as I solve a new problem I ran into.
The last router worked just fine for about a week and yesterday the 2.4GHz stopped for no apparent reason.
The devices could see the SSID, they show good signal but there is no data (almost!). The SysInfo on the router shows RX at 1Mbps on all eth1 devices, with momentary spikes. A reboot makes it work for a couple of hours but it goes back to 1Mbps.
I googled and found a few other reports of similar problems. Don’t think it is the firmware; I suspect it is hardware failure (although the temperatures were around 58 degrees).
I will likely send it for exchange. Regards,
I have seen this problem on mine as well. I have found the only stable solution is the Merlin build. It will work great until a 4th device connects. Once the 4th device connects, I will have to reboot the router. However, with DD-WRT, I can’t even get that far :(
So, I’m still a bit unclear here with the comments on this blog post. Great post by the way.
Should I just be flashing Brainslayer’s latest .trx build? Or is is essential to flash Kong’s .bin afterwards?
I see the Kong’s is slightly newer. But those new features/tweaks will eventually make it to Brainslayer’s builds correct?
Negating the “extras” from Kong there is no reason that Brainslayer’s builds don’t function perfectly on their own, or do I have that wrong?
You are completely correct. If you want to go the most simple method the Brainslayer build is all you really actually need.
That said, I’m partial to the KONG builds myself as they usually include other fixes and/or features, as you already mentioned. For example to my knowledge the latest Brainslayer build (now currently r23838) doesn’t offer a fix for the OpenSSL “heartbleed” bug. The latest KONG build (currently 23885) does have a fix for the bug.
It’s entirely a personal preference. The Brainslayer is all you need and will suffice. The KONG builds typically offer a touch more… more bleeding edge if you will.
-Michael
Perfect. Thanks for the reply.
One more questions real quick.
I see that both Brainslayer and Kong have release new builds. Do I need to flash Brainslayer then Kong again or is it suffice to just flash the new Kong build?
I have always applied Brainslayer, then Kong when applying updates. The reason I do it this way is because flashing Brainslayer first gives me all the “official” fixes, features, etc then flashing KONG (assuming it’s a newer build) will then add any additional fixes, features etc.
Not to say you couldn’t just do the Kong build and be good. It’s just not the method I perform.
Ok. Sounds good.
Hey Michael,
I am currently considering this router to upgrade my home network. I was wondering if dd-wrt supports the concurrent dual band routing before buying this. If I buy this router I will be using your guide when flashing the router, it’s much appreciated and concise.
Kind regards,
Dan
Dan,
I run both a 2.4Ghz and 5Ghz network at the house with zero problems and have not heard of anyone else having issues either.
-Michael
Thanks you, very much appreciated.
After installing r23919, the cmd “mtd-erase -d nvram” did not work. After viewing this page http://www.dd-wrt.com/wiki/index.php/Hard_reset_or_30/30/30 I used “erase nvram” and it rebooted just fine. Great tutorial.
Tony, Thank you for the comment. I have tested on my router and confirmed the commend you listed does indeed work.
I’m curious though, did you upgrade from stock asus firmware before going to DD-WRT? I ask because I am not running Asus but wondering if the “mtd-erase -d nvram” command still works the first time (Step 4) or should I update that command also to “erase nvram”?
I was going from a brand new ASUS router stock firmware to DD-WRT. I believe that the first time “mtd” worked (I really don’t remember). I eventually went back to stock asus firmware from r23919. It was my first time messing with DD WRT and apparently r23919’s wireless features were garbage. I couldn’t select between 2.4Ghz and 5Ghz and it was missing basic wireless features. So I tried to downgrade to r23808??? using the DDWRT web updater and it kept saying “Update Failed”. I was starting to panic because regular stock ASUS firmware resulted in the same Update Failed message. I had to go to the ASUS website and download their official “router flasher program” and flash their latest firmware to get it back to stock. Bad experience with DD WRT.
The reason you could not see both the 2.4Ghz and 5Ghz radios after installing the first Brainslayer build (the .trx file) is because you did not install the Kong build afterward. I had the same exactly issue. The Brainslayer build (r23919 in your case) is not a hardware-specific version of DD-WRT. Kong’s build of dd-wrt has all the correct drivers for your AC66U router using the K3 kernel. You must install the Kong .bin build as shown in the tutorial up above in order to get full functionality of your router.
I tried that. I got the “Update Failed message” no matter what. I tried the lastest Kong, an eariler version of Brainslayer, and even back to stock ASUS. I could not get it to reflash. I also did the 30/30/30 each time, realizing that holding the reset button after turning on the router puts it in some kind of safe mode. So maybe thats what was screwing with the install of DD-WRT. The only reason I know about the safe mode is because of the ASUS official website and it’s own reflash tool.
Author Please edit the piece to include the info from Tony as its very pertinent and will not work without the correct command line
Sorry for the delay but I wanted to try the process on my router before updating the post. It’s been updated with the command now.
Hi Michael hope you see this today or tomorrow. I’ll be getting this exact router and flashing it as described above the question i have is. On the DD-WRT wiki it says to follow the 30-30-30 rule, i see in your tutorial you dont mention this at all, except you do clear the nvram.
So if i simply telnet in and run that command, do i not have to physically reset the router?
lancer001,
The 30-30-30 is done to clear the NVRAM in which case we are doing manually using the commands above. Running the commands manually is a more fool proof way in my opinion and we know for sure if it cleared the NVRAM or not, where as some routers won’t always clear using the 30-30-30. In fact the DD-WRT wiki also suggests using my steps above in the event it doesn’t clear, so I just skip the guest work and run the commands. (hard_30-30-30 wiki – http://www.dd-wrt.com/wiki/index.php/Hard_reset_or_30/30/30)
I have flashed the firmware on my RT-AC66U router from stock and several DD-WRT / KONG upgrades several times using the above method with no problems at all.
-Michael
Hi Michael thanks for the reply, I couldn’t find the AC66u so i got the N66U, followed all steps with the dd-wrt wiki and it just would not complete the flash. I had no issues flashing back to the Asus stock firmware twice, but ZERO luck in getting DD=WRT to work on it.
Gave up and bought the Zyxel USG 20W router instead, that had Vlan built in.
No idea if i was doing anything wrong and i dont think i was, so who knows.
Are these instructions true for an ASUS RT AC66 W??
Hello I did the command for the port forwarding but the ports still won’t open
Just updated from latest RT-AC58R Asus firmware to DD-WRT v24-sp2 (12/11/14) std – build 25628. The Asus erase nvram command has since changed to:
mtd-erase2 nvram
Imagine this is just a reflection of the underlying Linux kernel update since the instructions were first drafted. After that, with dd-wrt firmware the erase nvram works.
I’m not familiar with the “RT-AC58R” model but from my research the “mtd-erase2” is for the AC56/AC68 ARM-based routers and this could be the reason for the difference.
Sorry. Typo. Meant the Asus RT-AC68R. Retail version of the RT-AC68U.
I’m hoping to flash the latest stock Asus firmware to my router by this weekend and go through the steps from stock to DD-WRT and will update the post as needed. Thanks for the heads up!
Getting ready to flash my router (an RT-N66u) and mistakenly found your site via the wrong Google search for the rt-ac66u. Nevertheless, I did notice one thing you may want to change. In your step 7 you state to enable the telnet client within the DD-WRT interface. You do NOT need to do this and it’s probably not a good idea. Enabling that Telnet client via the DD-WRT interface is for remote access outside the LAN. You should be able to simply telnet into the DD-WRT interface if you plugged into one of the LAN ports on the back of the router. No need to enable that Telnet Management option via Administration–>Management–>Remote Access–>Telnet Management. By enabling telnet via Remote Access you are effectively opening your router up to others around the world to try and telnet into your router. Obviously not a good idea if you don’t have a really strong username and password and probably not a good idea anyway if you don’t plan on telnetting in on a regular basis outside your LAN. Been using DD-WRT extensively on various routers for several years and that’s how that feature “should” work….unfortunately, anyone with a little experience in DD-WRT knows that things don’t always work like they should. But I’d bet if you disable that option and try to telnet in via your LAN, you’ll get right in. Side note: Totally agree with you on the “erase nvram” command versus the 30-30-30 reset. What a pain when you have to do that.
MrFixIt,
Thanks for the heads up. I’ve been using DD-WRT for many years now on various different routers. Using Telnet is something I never mess with unless I’m doing installs/upgrades and I’ve always enabled this option before trying to telnet into the router.
The stock firmware has telnet disabled and won’t work unless it’s set to enabled, I was thinking the same would happen with DD-WRT but you are most certainly correct. Enabling “Telnet Management” under Administration > Management is certainly not needed as I’ve just tried myself and was able to get a response.
That said following while having remote telnet open isn’t really a huge concern – or should I say at least in this case because the very next thing we do is telnet into the box, run a “erase nvram” and reboot the router. The “erase nvram” wipes all settings… including the “Telnet Management” so once the router is back online the remote telnet is again disabled. In essence remote telnet is open for about 6 seconds.
Potential security issue or not, I have now learned it’s an un-needed step and have updated the post. Thanks again, love getting comments like this!
-Michael
Great Point Michael! I forgot you erased the nvram. At least this may save someone from finding your site and enabling telnet for some reason thinking they need to do so for access across the LAN. On another note, is the AC66U still running well for you after about a year?
It’s ironic you ask actually. I’ve had nothing but good luck with my current setup up until about 2-3 days ago. The router becomes completely unresponsive both on the network and when trying to access the admin panel. Restarting the modem is the only fix.
I admit I was a revision behind on my DD-WRT so have updated the router and restarted my Motorola modem and so far things seem to be back to normal.
Other than this hiccup things have been rock solid!
-Michael
Just got RT-AC66U router, flashed with guide and easy way.
Thanks
Glad I was able to help.
-Michael
Thanks for the updated guide.
I am curious, is DD-WRT on the RT-AC66U more secure than the most recent ASUS firmware for this device? I continually make sure it’s up-to-date, and have hardened it as much as I could. I just wonder though, would it simply be better to just install DD-WRT? Does that address some of the fundamental holes that these routers perplexingly have? Thank you for your input, I am genuinely in the dark about this.
I wouldn’t say DD-WRT is any more secure than the stock ASUS firmware. Both are quality firmware to be honest, ASUS is probably the best stock firmware I’ve seen in a long time and they are pretty good about keeping it updated. DD-WRT however does provide more features. Both are only as secure as you make it.
It’s the additional features and controls that DD-WRT offers that I enjoy and I’ve been using DD-WRT for many years now and just my go to firmware.
Doing all of the above for an RT AC66W will also flash my router wirh ddwrt?
Adriana,
If I’m not mistaken the RT-AC66W is the same thing as RT-AC66U but in a white case, whereas mine is black. I don’t see any reason why this would not work for you.
-Michael
Does anyone know if DD-WRT is compatible with the RT-AC66R? It is not listed as a compatible router but i cannot find any differences between U and R models? Trying to see if anyone else has attempted this.
Jacob,
The above steps will work just fine on the Asus RT-AC66R. How do I know? Because that’s the exact unit I have. They are both the same units more or less. The theory is the R is given to those units sold at Best Buy while the U is sold at other locations, supposedly so Best Buy wouldn’t have to price match other retailers.
I have no idea how true that is, but I can assure you this will work just fine. As I’ve currently have the “R” branded model and have compared it against a “U” branded model. Everything works.
-Michael
Hi Mike
Thank you for putting this guide together.
As I’m about to get DD-WRT on my new Asus RT-AC68U, I’ve a couple of questions.
Q1 – I’m assuming the steps are identical for the RT-AC68U too. Am I correct in that understanding ?
Q2 – Does the latest BRAINSLAYER BUILD: RT-AC68u 27413 (as posted on the DD-WRT hardware page contain a fix for the Open SSL “heartbleed” bug ?
Thanks for your time and response !
Royston,
I don’t believe BRAINSLAYER is doing his separate builds anymore and instead incorporating all of this work directly into the DD-WRT “official” releases.
I would stick with latest DD-WRT build, which at this point is 28598.
As for the upgrade process, yes the steps are going to be pretty much the same.
-Michael
Hi, this procedure didn’t work for me after upgrade stock firmware to latest version 3.0.0.4.380.3264.
i got this error “Firmware upgrade unsuccessful. This may result from incorrect image or error transmission. Please check the version of firmware any try again.”
also tried downgrade to older stock firmware, didn’t neither.
any idea?
Same problem for me, ‘Firmware upgrade unsuccessful’.
Hey there. I have found a working solution after hours of searching. Follow this guide to put your ASUS router into rescue mode, then upload the DD-WRT firmware using the Windows tool you installed.
https://www.asus.com/support/faq/1000814/
Also download the latest beta firmware from here. The 6/17/16 version has been working flawlessly for me so far.
ftp://ftp.dd-wrt.com/betas/
I was amazed this actually worked. It seems ASUS has locked down signature checks on their firmware blocking third party files. The same procedure may work for downgrading to an earlier stock firmware, but I haven’t tried since getting DD-WRT working today.
NOTE: Make sure your terminal machine is set with a static IP to avoid any disconnects. If the firmware fails to load for some reason you may end up with a bricked router.
Cheers!
Reposting from my disqus account:
Follow this guide to put your ASUS router into rescue mode, then upload the DD-WRT firmware using the Windows tool you installed.
https://www.asus.com/support/faq/1000814/
Also download the latest beta firmware from here. The 6/17/16 version has been working flawlessly for me so far.
ftp://ftp.dd-wrt.com/betas/
I was amazed this actually worked. It seems ASUS has locked down signature checks on their firmware blocking third party files. The same procedure may work for downgrading to an earlier stock firmware, but I haven’t tried since getting DD-WRT working today.
NOTE: Make sure your terminal machine is set with a static IP to avoid any disconnects. If the firmware fails to load for some reason you may end up with a bricked router.
Cheers!
LilZimi,
Yes loading third party firmware is going to be getting harder and harder soon as companies are working to comply with an FCC ruling that stops users from modifying the router radios – the easiest solution for most manufactures is to simply stop the ability to load third party firmware.
Here’s a recent arstechnica.com link: http://arstechnica.com/information-technology/2016/03/tp-link-blocks-open-source-router-firmware-to-comply-with-new-fcc-rule/ – it seems Asus is going the same route.
-Michael
6/18/16 – ASUS’s latest firmware no longer lets you flash custom firmware. This is what I did to bypass their restrictions.
Follow this guide to put your ASUS router into rescue mode, then upload the DD-WRT firmware using the Windows tool you installed.
https://www.asus.com/support/faq/1000814/
Also download the latest beta firmware from here. The 6/17/16 version has been working flawlessly for me so far.
ftp://ftp.dd-wrt.com/betas/
I was amazed this actually worked. It seems ASUS has locked down signature checks on their firmware blocking third party files. The same procedure may work for downgrading to an earlier stock firmware, but I haven’t tried since getting DD-WRT working today.
NOTE: Make sure your terminal machine is set with a static IP to avoid any disconnects. If the firmware fails to load for some reason you may end up with a bricked router.
Cheers!
Hi, I have this router with the last kong build but i have some firewall problems.
iptables -t nat -A POSTROUTING -j MASQUERADE
this row is all i need or there is something else to do?
I try some sites with port forwarding test and any test fails.
thanks for help.
Who is still reading this thread in 2021? Fascinating read. Brings back the spark on tinkering my routers. I used to do this stuff back when Linksys routers were still the favorites, cheap but powerful (provided you flash it with dd-wrt). But that was a while back. Once I moved to ASUS brand, I felt like I don’t have a need for 3rd party firmware. Pretty stable as it is. But now I feel like I have to flash them all, RT-AC66U, RT-AC68U and RT-AC86U. lol. Let the fun begin again. Thanks for posting.
This is a very great website and I read each and every blog of yours because they are very informative.