Secure your Synology NAS, install a SSL certificate
I’ve been using the default setup on my Synology DS412+ with HTTPS enabled for a while now but knew it really wasn’t all that secure without a proper SSL certificate and creating a self-signed certificated isn’t all the much better and can be easily forged. I decided it was about time I used a “real” certificate to better secure the NAS.
Prerequisites before starting
- You need to own a domain name, for example MikeTabor.com and be able to receive email from the domain name.
If you don’t already have a webhost for the domain, I’d suggest BlueHost.Note: Bluehost also makes it easy to Start your own blog! - You also need a DDNS service setup. In this case and for my use, I simply use the Synology DDNS service they offer for free.
- With those two setup, you will also want to add a CNAME DNS forward from your domain (or subdomain if you wish to go that route) to your DDNS service.
- Finally you’ll want to make sure Port Forwarding has been configured on your router.
Getting Started
For me I’ll be using a subdomain attached to my domain name for example: subdomain.miketabor.com. I also purchased the SSL certificate from NameCheap (Comodo PositiveSSL) for just $9.00 a year.
Note: I’ll be using a Synology DS412+ running DSM 5.0u1.
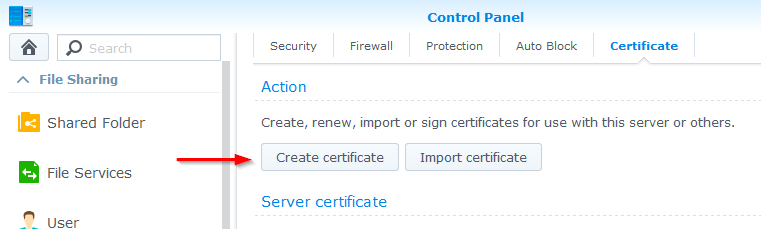
- Log into your Synology and navigate to Control Panel > Security > Certificate and click on “Create Certificate“.
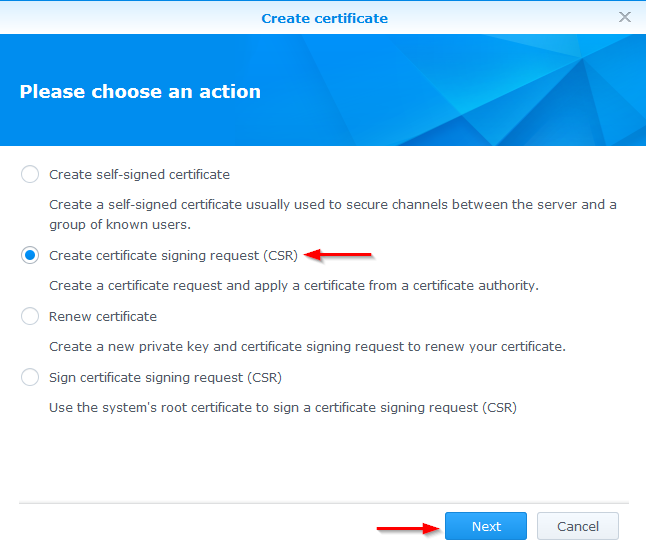
- Select “Create certificate signing request (CSR)” and click “Next“.
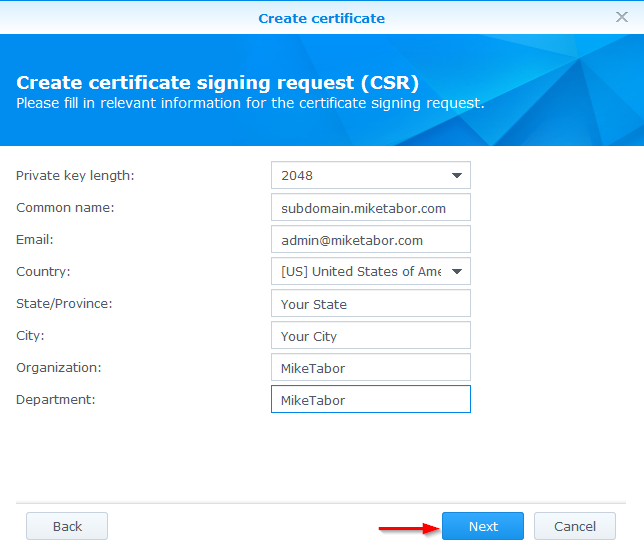
- Now fill out your request form with your information:
- Private Key Length: 2048 (as suggested per the NameCheap SSL)
- Common Name: Enter your domain name (in my case I’m using a subdomain so I enter subdomain.miketabor.com
- Email: Enter your email address. As will be shown soon, I noticed when I was going to confirm my email address I couldn’t use any email address from the domain via NameCheap as they used pre-selected email addresses. I simply created a forward on my webhosting control panel to forward all email from admin(at)miketabor.com to my main email address then removed the forward.
Once the form has been completely filled out click on “Next“.
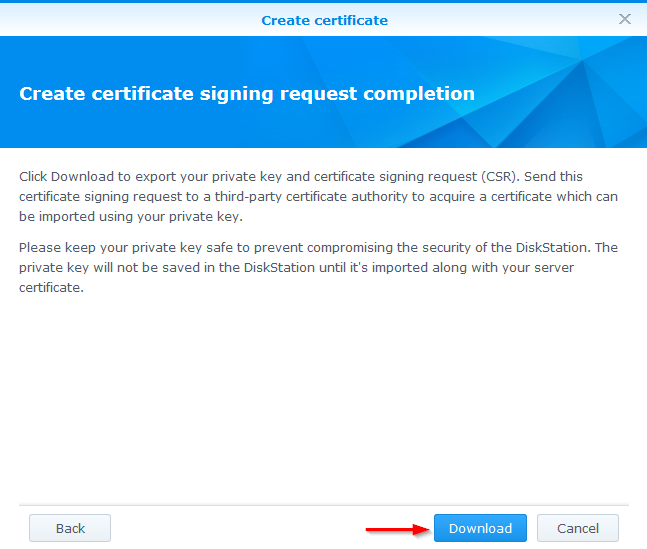
- Now click on “Download“. This will download a file called archive.zip which will contain two files: server.csr and server.key – SAVE these files!
Issue the SSL Certificate
If you haven’t already purchased your SSL, go ahead and do so. Once purchased (I’m assuming you also purchased from NameCheap) log into your NeamCheap control panel and click on “Issue” next to your newly purchased SSL cert.
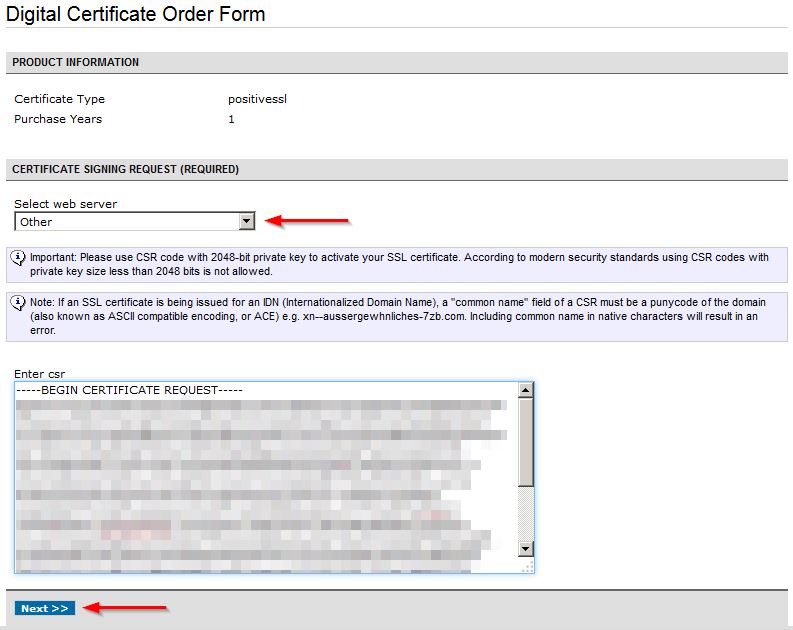
- In the Digital Certificate Order Form page select “Other” from the Select Web Server drop down menu. Then open the “server.csr” file (saved from above!) in notepad or notepad++ and copy and paste everything into the “Enter CSR” field.
- The next screen NameCheap will give you a list of email addresses which can be used to approve the certificate request. Select an email address and click “Next“.
Note: As mentioned above I don’t use any of these pre-selected email addresses so I simply created a forward to my main email address in my web hosting control panel for the time being.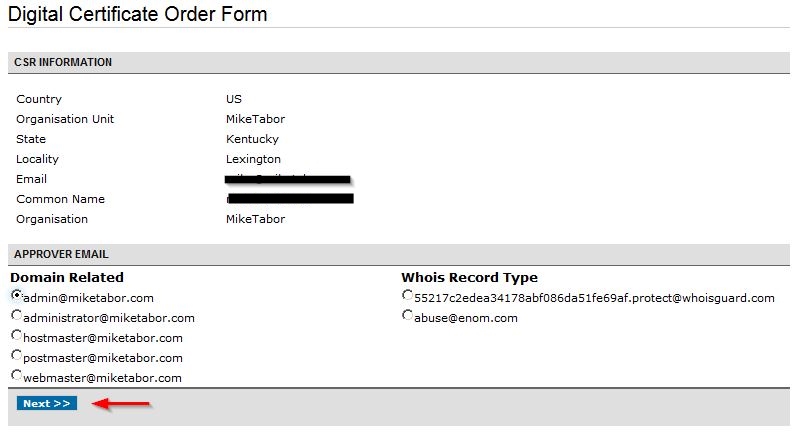
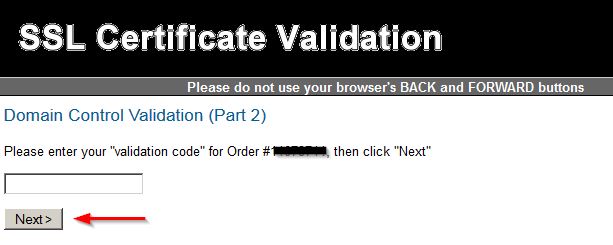
- In a few minutes you should receive an email from Comodo that contains a link and a validation code. Click on the link and enter the validation code and click “Next“.
- A few minutes after you confirm the validation code you’ll receive another email from Comodo with an ZIP file attachment, extract the file somewhere safe!
Import the SSL Certificate
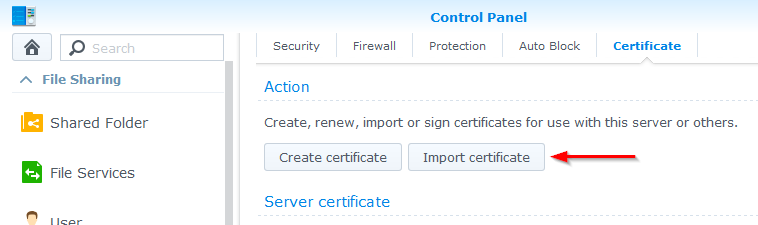
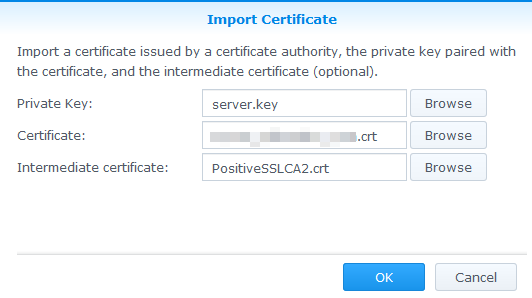
- Go back to your Synology and navigate to Control Panel > Security > Certificate and click on “Import Certificate“.
- Browse and import the following files for each field:
- Private Key: Server.key (saved from Getting Started, Step 4)
- Certificate: domain_com.crt (received from the Comodo .zip file in email)
- Intermediate certificate: PositiveSSLCA2.crt (also received from Comodo zip file)
Then click on “Next“.
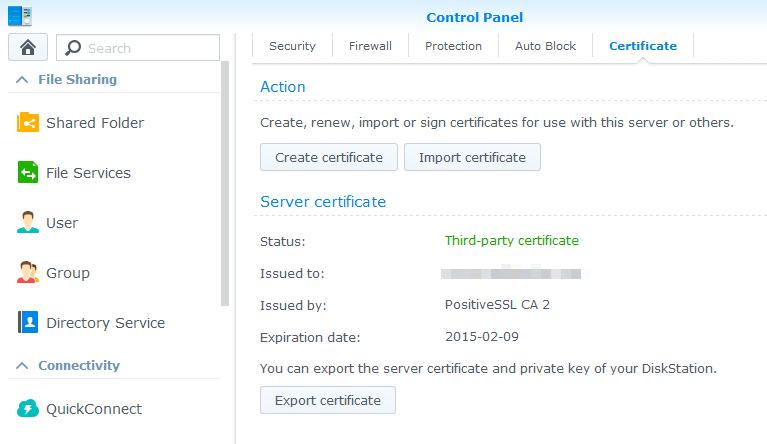
- Your Synology webserver will now restart which should only take a few seconds. Your Synology control panel certificates page will look like this:
Redirect HTTP requests to HTTPS
To finish up we’ll want to make sure that any HTTP request the Synology receives is redirected to HTTPS and thus ensuring each time you access your Synology DSM it’s being protected by the SSL certificate.
- Within the Synology DSM navigate to Control Panel > Network > DSM Settings.
- Place a check in the following check boxes: “Enable HTTPS connection” and “Automatically redirect HTTP connections to HTTPS…”
- Also worth enabling is “SPDY” which can make loading the page faster and “HSTS” which ensures browsers use the secured connection.
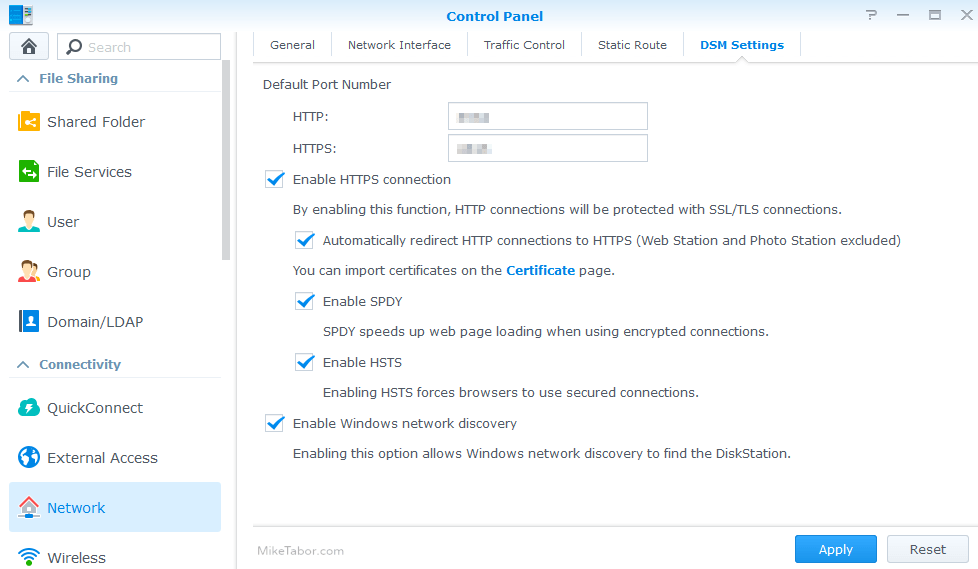
- Then click on “Apply”.
Note: This step is also a good time to change your port number if you wish (I’d recommend doing so as an added layer of security), just be sure to update your router port forwarding rules.
Safe and secure!
Now simply try to access your NAS using your domain/subdomain (example: subdomain.miketabor.com) and your connection is now secured and you can confirm by viewing the SSL cert in your browser.
That’s it! Below I’ve included some extra information based on the questions I’ve received in the comments and email.
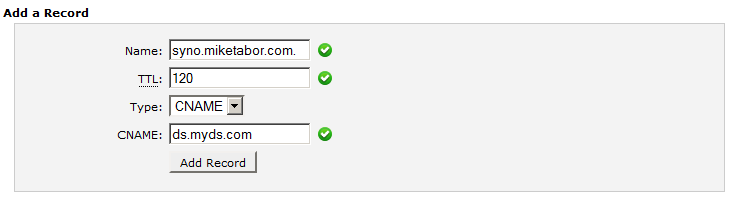
Adding a CNAME in cPanel
I’ve been asked several times how to add a CNAME to a web host. The process is going to vary from web host to web host as it all depends on what control panel your web host uses, if any. In this case I’ll show you how to add a CNAME using one of the most common control panels and that’s WHM/cPanel.
BlueHost is an incredibly easy web host that also uses cPanel which means the below steps will work perfectly. So if you don’t already have a webhost, check out BlueHost.
- Log into your cPanel and find the “Domains” box and then click on Advanced DNS Zone Editor.
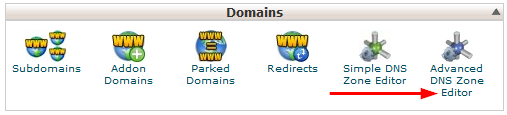
- Under “Add a Record” fill in each box, replacing my example text with your own information. Then click on “Add Record“.
Hi,
I stumbled across your site in the quest of setting up SSL on my Synology. I’ve purchased a domain name and SSL from name cheap. Its been applied to my Synology but it still doesn’t seem to be working. Where you have put in the common name subdomain.etc, should/can I put my Synolody ddns?
Currently the certificate is valid for the purchased domain name which I had entered in the commoon name.
Matt,
You won’t be able to use the Synology DDNS name as your common name as you will need to be able to confirm the domain via email and since you can’t get email from the Synology DDNS service this won’t work.
-Michael
Worked perfectly for me, thanks!
You’re most welcome!
Great tutorial. very helpful. One question however. I did everything you said, but im stuck at ” add a CNAME DNS forward from your domain (or subdomain if you wish to go that route) to your DDNS service.” I have a forward from my cpanel to my subdomain. ds.mydomain.com points to ds.myds.com (synology’s ddns). However after doing the cert and everything,and typing in “ds.mydomain.com” i get a melicious redirect attempt, then i get cert invalid errors because im at ds.myds.com. How do i update my cname dns to synology’s ddns?
T Vone,
I’m not 100% sure how you have setup your subdomain with a forward or redirect. However the steps I took to create the CNAME in cPanel was by going to Domains > Advanced DNS Zone Editor.
Then for the Name you would enter: ds.mydomain.com
TTL: 120
Type: CNAME
Address: ds.myds.com
Then click on Add Record. That should be the only steps you need to do within cPanel.
thanks for the awesome tutorial. I’ve followed all the steps and the certificate has been installed correctly on my diskstation.
the only problem is that every time I try to connect to my diskstation, i get the following error in Chrome:
SSL Error:
Unable to make a secure connection to the server. This may be a problem with the server or it may be requiring a client authentication certificate that you don’t have.
Error code: ERR_SSL_PROTOCOL_ERROR
++++
Is this an issue with my diskstation configuration or with the SSL certificate?
Not 100%, but you don’t happen to be using Google Chrome are you? Did a quick Google search for “Error code: ERR_SSL_PROTOCOL_ERROR” and seems to be a lot of results about an issue with Chrome. One link in particular: https://productforums.google.com/forum/#!topic/chrome/n7HrVnJQUZY
Hope this helps!
I am using Chrome but i’m only getting the error message when i’m trying to access the NAS. All other SSL-enabled websites work.
I think i haven’t installed the certificates properly because Comodo doesn’t recognize them as being installed. Unlike you, i never got an intermediate cert called “PositiveSSLCA2.crt”.
Thanks Michael for your great tutorial!! I also used namecheap for a positiveSSL-certificate. Somehow I still cant get it up and running completely. Chrome warns me im using an unsafe connection. And i have a CNAME-record in place but my forward is a dead end.
To reply to doublewiskey (and others having the same question): I also didn’t receive a PositiveSSLCA2.crt eventhough Comodo states that on there own website.
https://support.comodo.com/index.php?/Default/Knowledgebase/Article/View/620/1/which-is-root-which-is-intermediate
I found out my synology can only activate the certificate when using the ” COMODORSADomainValidationSecureServerCA.crt” as intermediate.
THis might help you. When I received my files from comodo there are 2 intermediate certificates, a root, and the one for the site. You have to merge together the 3 (root, and 2 intermediates) and add this to the synology. It has to be added in a specific order to the text file: see this
link:https://support.comodo.com/index.php?/Default/Knowledgebase/Article/View/643/17/
I first tried notepad and the synology complained that it wasn;t a valid certificate. I tried again with wordpad and it worked (I think I choose save as unicode text. Be sure it is named *.crt
after that the synology accepted it.
When I chose just the single file above, it was secure on my laptop and iphone–no security warnings. Yet on an android phone it gave a warning about the certificate. You can test your sites certificate here: https://www.sslshopper.com/
So, after I combined the files, I went back into the diskstation and choose. Import. I then redid the steps above.
BAM! No more errors on an android device.
Thanks for this post. Works perfectly selecting that crt file as intermediate.
Mike, thanks this is amazing. Can you please explain why I need to do this:
With those two setup, you will also want to add a CNAME DNS forward from your domain (or subdomain if you wish to go that route) to your DDNS service.
I am am new to this…
Thanks,
Gaetan
Gaetan,
You need to setup a CNAME so that when you type for example: https://synology.miketabor.com that it automagically takes you to your Synology box.
-Michael
And CNAME vs subdomain will achieve the same?
Gaetan,
A subdomain will essentially point to a folder on your webserver. The CNAME will allow you to direct that name to your Synology DDNS service and thus to your Synology box.
Mike, I am almost there. I was able to create and import the certificate. But I am unsure how DDNS goes along with my domain and this certificate, how it all fits together…
So I have a domain: domain.com
I made a subdomain: sub.domain.com
I also made a DDNS in Sybology named: name.synology.me
My sub.domain.com is pointing to https://name.synology.me:5001
It works except that it still says:
There is a problem with this website’s security
certificate.
The security
certificate presented by this website was issued for a different website’s
address.
Security certificate
problems may indicate an attempt to fool you or intercept any data you send to
the server.
Does my DDNS address have to match my domain name? I don’t see how I can do this…That’s the part that is confusing to me. A bit more detail would be greatly appreciated!
Thanks!
Gaetan
Gaetan,
You don’t need to create a sub-domain, just add a CNAME to your domain. If your host uses cPanel/WHM you can follow the same instructions I posted in an earlier commend to T Vone on 4/9.
It sounds like to me based on the message that you’ve setup a sub-domain (and not a CNAME) then created the sub-domain to forward to your DDNS name – for this purpose that won’t work.
Need to have 1. your own domain (which it sounds like you do) 2. your synology DDNS setup (also sounds like you do) 3. a CNAME setup with your domain host (this is important). All three needs to be in place before performing the rest of the guide.
Hope this helps!
-Michael
Wow Mike you are the king dude. This worked like a charm. Took me 3 months to get nothing going and when I found this tutorial it took me days and 4 posts to get it All working. Thanks a bunch my friend.
Gaetan
Very welcome, glad I could help.
Great tutorial! Thank you for putting this together. I tried and failed three times before trying to follow other tutorials on the Internet. This was by far, the best one. One small thing to know, Commodo will (now) send you two intermediate certificates. I just picked one and it worked. I am guessing either will work.
Edit: I have a question though – since you have the certificate issued for subdomain.miketabor.com which points to a DDNS (Synology) which presumbly points to your actual NAS box (ie 68.111.111.2 – made up), can’t anyone just go to 1) the DDNS like miketabor.myds.com or 2) the actual IP 68.111.111.2 and get the login page? Both of these will be serving up the dreaded ! not secure red lock icon.
Thanks, I’m glad it was able to help!
Dude, you are awesome I got stuck on this for ages, and following your instructions exactly it worked.
Thanks!
Hi, thanks for the guide. I do have a major question though that i’m not so sure about. I have a website which I use for my small business. This website I have includes my company info etc. it is a basic website. can I use my domain name against the SSL certificate? how would i point cname to my ddns name (for example my ddns name is for example trek1.dyndns.com). Would using my actual company website which i own against SSL and changing cname mess up my site. i,e, would visitors to my site be auto redirected to my synology login instead? is it better to purchase a brand new domain (no actual website published on the internet) and just use that instead for synology and follow your guide
Chris,
You don’t need to buy a new domain, unless you just want to. Using a CNAME you can use the same domain name as your company website, just as I have done here on MikeTabor.com – the root domain is used for the blog and I’ve added a CNAME (for example: synology.miketabor.com) which then redirects to my Synology box.
How you add a CNAME can be different and depends if you’re using a control panel or not, what OS, etc. I run cPanel/WHM on my own web server and thus I can only tell you how to create the CNAME using cPanel.
Adding CNAME in cPanel:
Login to cPanel and go to Domains > Advanced DNS Zone Editor.
Then for the Name you would enter: ds.mydomain.com
TTL: 120
Type: CNAME
Address: ds.myds.com (or trek1.dyndns.com using your example)
Then click on Add Record.
-Michael
Thanks a lot for the guide!…
I had the intention of adding the PositiveSSL logo to my DSM login screen, but hit a wall… any suggestions for that?
Luis,
You’re most welcome for the guide. Hope it helped! As for adding the PositiveSSL logo to the login screen I would say the easiest way to go about this would be to download (or create new) the login wallpaper you’re currently using and edit the wallpaper image to include the SSL logo.
The default Synology wallpapers are located here: /usr/syno/synoman/webman/resources/images/default_login_background and can be easily accessed using WinSCP. You’ll need to enable SSH on the Synology first.
As said here by others — A great Tutorial!!
I am thinking of buying a NAS. Looking ‘hard’ at Synology… I saw where there is this ‘ransomware’ issue. It does appear that getting a ‘real’ SSL certificate will allow the device to face the Internet in a very secure manner….
***Stumbled across this post while looking at what can be done to be ‘secure’ to the extent possible when facing the public Internet.
Than(x)!!
Maheim,
The most secure option is not making the admin management open to the public in the first place. But if you need or want to then I’d suggest taking all the security measures possible that you can.
Be sure to read my other blog post that further details how to secure the Synology NAS even further – https://miketabor.com/securing-synology-nas/
I also own a synology and want to get a SSL cert, but are stuck with the pre-selected e-mails. I also use a subdomain attach to the domain: subdomain.domian.com
What do you mean “I don’t use any of these pre-selected email addresses so I simply created a forward to my main email address in my web hosting control panel for the time being.”? how can I do this?
This would depend on your web host. On my server I use cPanel and you can do this by going to Mail > Forwarders. Another way you could do it would be to setup a “Default Address” so all email gets send to your primary email.
Hi Mike,
Good Tutorial. I have a DS412+ and installed a Third Party Cert and when i accesshttp://nas.mydomain.com, it gets redirected to https and the certificate works fine. However, when i try to access Photo Station, i have the following problems.
1) http://nas.mydomain.com/photo still goes over port 80 and doesnot get redirected to HTTPS
2) If i type https:// myself in the browser, then it shows a Synology certificate (I have synology DDNS enabled and nas.mydomain.com is a CNAME record formynas.synology.me.
What am trying to achieve is, if we visit http://nas.mydomain.com/photo, then it should redirect to HTTPS port of the photo station.
Any help / suggestions is appreciated.
sriramvt, glad this post has been able to help.
In regards to your question, I’d suggest opening the Control Panel and go to Network > DSM Settings and making sure that the “Enable HTTPS connection” is checked as well as the option to “Automatically redirect HTTP connects to HTTPS…” is also checked.
-Michael
Hi Michael,
Thanks for the quick response. I already have those settings enabled. This setting “Automatically redirect HTTP connects to HTTPS…” already says that Photo Station and Web Station is excluded.
A simple reboot of the NAS fixed the Item (2) from above. However, the item (1) is still outstanding. I searched on synology forum and found that many others are also facing the same issue. The solution provided in the below link is the closed that i have seen to what i want to achieve. Am yet to make that change and will keep you and the users here posted about the outcome.
http://forum.synology.com/enu/viewtopic.php?f=17&t=48526&hilit=ssl#p207396
Thanks again for the step by step article.
Thanks for the explanation! I got the last screen you got but I still have red mark on my “https” which is still unsecure! Could you please help me? Thank You John
Hello, I’m very new to this. I don’t understand where did you use your DDNS service from synology. When you create DDNS in synology, it is like example.synology.me.. I don’t see you used this getting your SSL! Could you explain it please? Thanks
Hey Ben! You need to setup a CNAME on your own domain pointing to the Synology DDNS name. You’ll then buy the SSL cert for your own domain.
-Michael
Hi Michael, thanks for this useful post. There’s just one thing that I’m not clear on; I’ve set up a CNAME DNS forward from my domain, and installed my cert and it’s all working well. However, I only get the secure connection and and padlock symbol if I log into my NAS using my own domain, (for example myds.mydomain.com). If I log in using the regular Synology DDNS (for example myds.synology.me then I get the certificate warning on my browser. Is this normal, and I should only log using my own domain from now on, or have I done something wrong and I should really be getting the secure connection whichever address I type in?
Tom,
When you purchased the SSL you purchased it for “myds.MYDOMAIN.com” and thus that cert is only good for that domain. So you only getting the padlock when using MYDOMAIN.com vs SYNOLOGY.me is completely expected.
From here forward just log into your Synology using myds.mydomain.com and you’ll be good to go. Enjoy!
-Michael
That’s great, I’m all set then! Thanks very much for your help. Keep up the good work!
Hi Michael.Probably you can help me.
I have ordered a rapidssl cert and try to install the cert now.
If I only chose the privat key and the certificate.crt file I can import the
certificate.
When I want to import the rapidssl intermediate.crt file, a error message
appear.
(Failed to verify the server and intermediate certificates. Please try again)
Rapidssl say’s the following for installation.
Intermediate CA certificate
—————————————————–
You need the Intermediate CA Certificate for your specific web server. You
can download this certificate on your webserver as per the instructions
mentioned in the URL.
https://knowledge.rapidssl.com/support/ssl-certificate-support/index?page=content&id=AR1549
With only the certificates.crt and private key installed, I receive a cert
warning with firefox.
In Internet Explorer it seems to work.
I need a working solution in firefox too.
Have you any suggestions?
Markus,
I used a PositiveSSL from NameCheap when I set up my SSL and didn’t have any issues, though I can’t think that a RapidSSL would be any different.
That said make sure your certificate files are in the UTF-8 format and that you have —–BEGIN CERTIFICATE REQUEST—– (at the top) and the —–END CERTIFICATE REQUEST—– (at the bottom) in the file.
Other than that you should be able to follow the steps as noted in the “Import SSL Certificate” heading and should be good to go. I use Firefox almost entirely and haven’t had any issues with this setup.
Thanks for your help. My colleague has downloaded the certficates today again and removed a space in the key file and now it works. It seems that it was a format problem within the files.
Great! Glad that worked out.
I am running into this issue:
The certificate is not trusted
in all web browsers. You may need to install an Intermediate/chain
certificate to link it to a trusted root certificate.Learn more about
this error. You can fix this by following Comodo’s Certificate
Installation Instructions for your server platform (use these
instructions for InstantSSL). Pay attention to the parts about
Intermediate certificates.
I contacted the support team at Namecheap and they told me
“CA
bundle is not full, please ask your host to reinstall adding ca bundle”
The Name cheap support then sent me a ca bundle txt file.
Now
it seems I need to have my host issue a static IP address for the
domain and install the SSL I bought through Namecheap. Does this make
sense? I thought installing the SSL on my Synology took care of this??
Okay I have the issue finally resolved. I did not have the Intermediate certificate portion filled out correctly on my Synology NAS. Great tutorial!
Thanks!!!!! This article helped me a lot!!! :)
Welcome! Glad it helped.
Excellent article, finally one that put the thorny question of how to install a third party cert into a Synology server in plain English!
Cert from Namecheap installed and working most of the time but like others it still throws up errors in some browsers. Even in Firefox on two Windows PC’s it works fine on one and throws a security warning on the other. Very strange. On Firefox in Linux it always presents a warning, on Android the same but in Windows Phone it works perfectly.
I followed the Comodo instructions on making a bundle out of the three certs sent to me and installing them as the intermediate cert in an effort to get round the warnings but no joy. Still the same.
Doing a little research leads me to the conclusion that because the cert is only validated by an email to the domain owner and not in any other way there is no way of getting rid of these warnings other than going for a much more expensive certificate that includes more intensive validation than just an email.
Still, the main reason for installing it was to get UC browser on my Windows Phone actually past the certificate warning page and that has succeeded. Before I couldn’t even get to the login.
Is your cert still working fine in all browsers? If not I would be interested in your take on this. Is it a validation problem and if so is there some way we can get past that?
Many thanks anyway.
Jerry,
I primarily use Firefox and have not had any issues with SSL cert errors. I also use Chrome on my phone (though rarely login from my phone) and haven’t had any issues as well.
-Michael
I seem to have got a little further on now. Still getting errors in some browsers depending on their age but in reality my DS 214+ won’t be getting that many logins from unknown browsers anyway. Kept going simply to satisfy my own curiosity!
I used the instructions on this page as per the usage of cat in the Terminal within Linux Mint 17 to join the intermediate certs together in the right order. The instructions are under Step 5.
http://www.devside.net/wamp-server/installing-comodo-positivessl-certificate-bundled-with-root-and-intermediate-ca-certificates-on-apache
Most browser security errors have now disappeared. Again many thanks for your article, without it I would still have been scratching my head as to why this was so hard to do!
So clear. So helpful. Thanks. The filenames of the certificates have changed a little now … in particular the intermediate certificate is different.
Kudos MikeTabor, worked like a charm.
Thank you sir, glad to be of some assistance!
-Michael
Thanks for posting this. It works perfectly except I noticed I cannot SSH into the local IP. For example, I used to be able to use Putty to SSH into servername:22. Now, I have to use server.domain.com. Even then, I am unable to login with my admin/root password. I assume this has something to do with the cert installed. Any ideas?
I’m looking forward to the follow up article when you renew your certificate. I had installed the same certificate (Comodo PositiveSSL), purchased from NameCheap, and installed on my DS212J back in November, 2013. It worked great until it came time to renew this past month. Even though I purchased the same certificate as last year, it’s no longer recognized as trusted by many apps and browsers (including Synology’s own Android apps). It’s a shame as it appears it’s really just an attempt by NameCheap or Comodo to force us into spending big bucks on a cert for my personal home server.
Hi- It sounds like everyone else is getting this- but I am a little lost. I know how to get the certificate and install/apply it (I’m pretty sure). However I do not understand how my system is protected if me or anyone can type “mydomain.com” from the internet and have secure access to the NAS. What am I missing?
Kirk,
An SSL certificate provides an encrypted and secure environment in order to access your NAS remotely. This “remote” access is assumed not every network you connect from is your network and thus unsure of it’s security and integrity and thus the benefit of an SSL certificate. Thus securing your credentials and actions from the network you might be connecting from along with any other network along the way.
All that said, if you do NOT want / need remote access to the management of your NAS then by far the most secure NAS is one that is NOT accessible from the internet and thus an SSL cert is not needed.
-Michael
Thanks for the reply. I want remote access, I want security, however when I travel how is my laptop for instance identified as a member of the certified group computers permitted to access the NAS – if all I have to do is type in the url?
Kirk,
A SSL cert will not prevent computers from connecting to your NAS. It will only provide security for the connection between the remote computer and the NAS. If you want to restrict access to certain IP’s or geo-locations you could probably setup a firewall rule either on the NAS itself, see this post for some synology firewall rules, or depending on what firewall you’re using at the home/office you could setup rules there too.
-Michael
Thanks Michael, so if I am understanding this correctly, “the information” being communicated between the remote computer and the NAS is secured/encrypted by the SSL certificate; and the information cannot be understood by a third party that may surreptitiously intercept it. Now that makes sense.
I can set this ssl up on the domain at my host- should I do this as well- or do I need to do this as well?
Kirk,
Just the above instructions is all that’s needed to protect the NAS with an SSL cert.
-Michael
Hye Mike Tabor, is there any way to receive the ssl certificate validation on my gmail address because i don’t have a web server therefore no approved address? Or can i install the certificate on my NAS without having to go through that step?
No. You need to have your own domain and to be able to receive email from said domain name in order for the above instructions to work properly.
-Michael
Ok. Thanks for your response
Hi Mike
I have to say that once again manual that you made help me solve IT puzzle. It’s nice to see that it’s possible to find information in the internet that are clearly presented and correct.
I have one comment though. You could expand this walk through with one scenario as I did – when you don’t have your own domain and you don’t want to purchase one.
I used subdomain of synology domain that I registerd DDNS on.
It’s possible to buy SSL certyficate for that subdomain but to do that few things have to be done first:
1. Create account called admin on a synology
2. Configure and launch Mail Server and Mail Station on synology.
3. Make sure that admin@yoursynologysubdomain… receives emails.
4. Create SSL certyfikate (according to your instruction) and request confirmation email to be delivered to this email.
After that you can import certificate to Synology.
Take care
Marek,
Interesting. Have you tried this yourself and know it to work? I was under the impression that only the root domain could be verified and not a sub-domain. If this works that’s certainly one way to save a few bucks for someone who doesn’t already have their own domain name.
Thanks for sharing!
-Michael
Yes, I tested it on myself. And it works like a charm.
I only had problem when I was asked to choose email address to which verification email would be send.
The one that I entered while registering certificate was not on that list.
I had to choose from:
admin@mysynologysubdoman….
webhost@mysynologysubdoman….
etc.
I didn’t have mailserver and mailstation configured at that point.
But after I made it to work, the rest worked ok.
Mike,
Thanks! This worked like a charm.
Glad to have helped.
-Michael
Hi Mike,
Great tutorial, quite straightforward. I wish you could make more on Synology. However, it mainly works for people who have configured their synology already, which was not my case so I struggled a lot to get where I am now.
Basically I finished the entire procedure using a certificate from StartSSL 1 issued to my domain: syno.mydomain.com
Then I’m not sure what to do with the CNAME procedure
First I tried a permanent redirection from syno.mydomain.com to https://syno.myDS.me:11111 (11111 being DSM https port) which works but there is no SSL certificate “”This server could not prove that it is syno.myDS.me; its security certificate is from syno.mydomain.com”
Then I tried to create a CNAME record from syno.mydomain.com to syno.myDS.me with default TTL but when I type my domain I get a 403 error.
If I type https://syno.myDS.me:11111 I get the same certificate message above.
Could you please let me know what I’ve done wrong?
Thanks in advance
Sorry you struggled getting to this point. If there is something I could do to make the above directions more clear or write additional Synology based content you’d like to see please by all means let me know.
As regards to your question, adding a CNAME will vary from host to host and what control panel they may or may not use. On one of my own web servers I use cPanel and you can following the below instructions on how to add a CNAME.
Login to cPanel and go to Domains > Advanced DNS Zone Editor.
Then for the Name you would enter: syno.mydomain.com
TTL: 120
Type: CNAME
Address: syno.myDS.com
Then click on Add Record.
No need to add port numbers or the like when creating the CNAME. If your host is not running cPanel you should be able to contact them and ask them to do this for you or find instructions on how to for your control panel.
-Michael
Hi Michael,
Thank you a lot for your help, I appreciate the fast reply.
My problem was the TTL port which was setup by default at 14400. Now that I changed it to 120, it works, cheers.
Two questions though:
– to access the nas now, I need to type: https://syno.mydomain.com:11111
Is there a way I can just type syno.mydomain.com and the https and port come automatically?
– I’m using owncloud but I can’t access it via: https://syno.mydomain.com:11111/owncloud (server not found). But the local address still works http://192.178.0.10/owncloud, any idea please? I tried accessing it outside my network, same thing.
The TTL problem is something which is for example not indicated in your tutorial even though it may seem obvious.
Furthermore, as a noob the main problems I had were:
– “you need a DDNS service”
Ok, I go to DDNS I click add, choose a myDS because I like the name, but not sure what’s the difference, then I click ok but I get a network error. After digging for quite a bit, my problem was that no DNS server was configured in General, Network (I put google’s one thanks to someone on a forum). In the meantime I played around for hours with router configuration, advanced, the firewall…
– Then for the https, it’s in two places Network DSM settings & Web services. As a noob, i only activated web services https so it was not getting through. Then I found DSM settings, also changed the ports thanks to another blog, but my router was not allowing this port. Again I lost quite a bit trying to setup port forwarding until I decide to enable upnp.
– The SSL certificate creation was not as smooth as you using StartSSL but that’s a different story.
– At the end, I wanted to use synology’s firewall to block ports I was not using, but it created problems, so I didn’t touch it.
I hope you see the kind of stupid mistake we can make. Yet I’m usually quite good with computers, but I got very much confuse with the way things are organised in the synology and the whole permission system which is driving me nuts. Now I got my way around on some things, and the interface now looks pretty organised to me, but somehow it took me quite a while to assimilate things.
Bottom line is: thanks a lot. Even though I need to fix my owncloud issue, I’m glad to see a green locker when I connect to my synology remotely.
Great Tutorial, and I do hope to see more of it soon.
seiferflo,
There is no “TTL port”. TTL is the “Time To Live” value for your CNAME DNS record. This hasn’t anything to do with what port your Synology NAS is listening on. The “default” 14400 is in seconds or in other words 4 hours and thus 11111 is just over 3 hours long. Adjusting it to 120 as I mention means the CNAME DNS record will refresh every 2 minutes. Since I don’t have a static IP address at my home, and I’m going to guess most others don’t either, I set this to a low value so in the case my home IP address changes, the Synology (myDS) DDNS will then update and in turn my DNS on my web server (the one with the CNAME) will also update quickly. The port number you have your DSM set to listen on has no bearing on the CNAME TTL value.
I don’t use Owncloud so I won’t be much help in that area, though it sounds like you need to try accessing it via https://syno.myDS.me/owncloud instead of using your own domain name. Otherwise it could be a port issue on your router.
I think your comment about how the steps was different using another SSL cert type (StartSSL) goes back to being a prime example as to why it’s hard for me to list detailed instructions about adding a CNAME. Just as there are different ways to get an SSL cert and the process will be different holds true to how to add a CNAME to your domain name. Not everyone uses the same certs or web hosts. There’s always more than one way to do this. That said the process I laid out is the process I used and the services I used (NameCheap over a free SSL).
I’m glad you found this at least somewhat helpful and I will certainly work to make the process better as I can. I do like the idea about configuring the Synology out of the box and will work on a write up like that. Thanks!
-Michael
Hi Michael, thanks again for your quick feedback.
– Regarding TTL, I’m not sure why changing the value made it work. I probably did something else in the meantime. Thanks for the info though
– My problem with Owncloud is now fixed after hours of permissions via putty, ssh & co. Again tough time when you never played with that before and I didn’t expect to actually have to use it.
– I understand your point on SSL certificates.
– If you need any help to make an article for syno out of the box, I’ll be happy to be your advocate devil. I now documented all the steps I did with screenshots to make sure I can do it again in case I have to reset the nas.
Thanks again for your help.
Flo
Hi Mike,
Great article…
Can you please suggest a reliable provider from where I can buy a domain for myself who also supports DDNS update. I believe not all providers support DDNS.
Cheers
Matt,
You should be able to also use NameCheap to register the domain. By the looks of their FAQ https://www.namecheap.com/support/knowledgebase/category.aspx/11/dynamic-dns they do support DDNS.
-Michael
Thanks Michael,
Double confirming, all I need is a domain to my name and comodo digital certificate and follow the steps you’ve mentioned in the above article, isn’t?
Regards
Matt
Matt,
Yes, so long as you have the domain name and the DDNS setup and working and able to receive email from the domain (to confirm SSL) you’ll just need the SSL and you’ll be good to go.
-Michael
Thanks once again Michael,
Bravo… I’ve successfully managed to setup SSL on my synology NAS.
I have not followed exactly everything mention here and also, found few things that I would like to share.
1. Bought the domain from godaddy.
2. I registered with namescheap and hosted the domain there by changing godaddy nameserver to namescheap’s.
3. Bought the a class 1 free certificate from StartSSL.
4. Synology did not support namescheap ddns, used DDNS Updater on the NAS
5. Only after i bought the domain (.uk and .co.uk), I found that these domain details cannot be set private (ie private registration). But, on the positivie side, it can be done free with NOMINET. (only applies to .uk and .co.uk)
Regards
Matt
Hi Mike, thanks for writing the guide.
I have a doubt in regards of which SSL provider to use.
For example, if I go to SSL.com I find that they offer certificates for less than USD 5 per year!
https://www.ssls.com/comodo-ssl-certificates/positivessl.html?years=5
So whats the catch? Am I missing something?
Thanks for your help with this.
Surferride
Surferride,
There is no catch. I use NameCheap for all of my domain name registerations and go with what has worked for me for years. The price you listed is if you purchased a 5 year SSL cert. You can save money with NameCheap too with a 5 year cert which brings the price down to $7.95 /year but still comes out about $14 more than the other cert you found.
Again I’ve not used the other site so I really can’t comment on their support or process. Good luck!
-Michael
Hi Michael, thanks for your comments.
I found out that SSLS.COM is a company from Namecheap too. So I am NOW following your guide to get this done. I already purchased a 5 year cert for less than USD 25.
Not bad :) Thanks again
thanks for the guide! It has been helpful/perfect!
You’re very welcome Colin.
-Michael
one thing you might want to mention though is how to combine multiple intermediate certificates (into a PEM file). I followed it the same way as you mentioned, and everything worked, but when I ran the test here https://www.ssllabs.com/ssltest/ it said that one of the intermediate certs was an “additional download” (which isn’t preferred). Some googling and it was figured out that you can copy-paste the text from the two intermediate certs and save them into notepad/save-as *.PEM, choose that when selecting intermediate cert in the synology screen, and now when I run the test, everything is happy.
I originally uploaded only COMODORSADomainValidationSecureServerCA.crt, but COMODORSAAddTrustCA.crt was an additional download. This was also provided in the .zip I received from Comodo. Synology doesn’t allow the upload of separate intermediate certs though, so they need to be combined into a PEM file.
Not sure if you had to go through any of this, but just wanted to mention it! Thanks!
Colin,
Thank you for the added detail, much appreciated!
-Michael
Michael,
Like so many others I found your site after many, many hours of searching. And when I found that I
am using the exact unit you have (DS412+) it was excited! I followed you instructions (Namecheap and all) but I did need the help from all the comments and your responses to them. I am close but when I go to my site, ds.domain.com, it takes me to my router login! And no https, just http://www.domain.synology.me/ui/…..
Would this be a router issue/setting? You should get a commission from Namecheap and Synology!
Also, if I understand correctly, ssl will only secure the transmission of data. Would setting up a VPN
to access my NAS be more secure. I seem to recall when I tried setting up OpenVPN that I needed a certificate which I now have.
Thank you for your time and knowledge, Kevin
Kevin,
First try going to https://subdomain.domain.com:5001 (5001 is the default DSM https port) if that doesn’t work then I’m willing to bet the router port forwarding hasn’t been configured and if that’s the case you’ll need to do that as well.
Another setting worth enabling on the Synology is to redirect all HTTP requests to HTTPS. (Control Panel > Network > DSM Settings)
As for the VPN, if you don’t need remote management access to your NAS and only want access to the files located on it. A VPN would be more secure as the access is further restricted (no management access). It really all depends on your needs/wants on which way you go.
-Michael
Michael, thank you for the quick reply. I do have 5000-5001 forwarded and have redirected to HTTPS. I may have forgot the port the first time. Now I am getting “connection is not private” {NET::ERR_CERT_COMMON_NAME_INVALID} From Chrome and “CONNECTION UNTRUSTED FROM” Firefox.
As for VPN, my goal is remote access (read/write) for my daughter at school. Her laptop only has a 256 SSD and I figured this would be safer than an external that could be stolen. I want the same for my phone.
I rebooted the 412 as well. still the same response.
Thank you,
Kevin
Fantastic guide – goDaddy told me I couldn’t do it but it worked a treat – thank you so much for the walkthrough.
Glad to have helped Sanjay!
-Michael
Hi Mike,
Just wanted to say thank you for this guide. I always forget the steps involved, and this was very helpful.
Keep up the good work,
Eugene
Eugene, you are most welcome.
Mike, Thanks for the guide… I think I have everything all set. I do have a couple general question, though.
1. I only get the ssl connection when i access the diskstation ‘homepage’. whenever I try to access additional ports on the diskstation (audiostation, etc) it gives me the ssl error. Is this the way it’s supposed to be?
2. Since I mainly just access files from diskstation and don’t generally do management stuff online, would i better better served using vpn, instead of the ssl?
-Eric
Eric,
I don’t use Audiostation so I really don’t know but it from the apps I do use all of them do have an option to support SSL somewhere in the settings or login options.
As for VPN vs Management with SSL – if all you need is access to some files then most certainly VPN will be more secure as it’s that much less that will be available for possible exploit. The more you can lock down the NAS the better.
-Michael
When using my computer, I have a remote ssl connection to diskstation. Some synocommunity apps open another window on my computer and never loads. If I’m connected to diskstation without ssl, these synocommunty apps will load (unsecure). Any idea on how to get the additional ports/pages to load with ssl?
Hello, i see in the namecheap website it says that a dedicated IP is required… any comments, i do not have a dedicated… i do have a domain dns with Dyn that point to my synology…
If you follow the steps above it will work just fine.
Mike… thanks for that now famous tutorial. Reading all the posts here, I’m dumb about CNAME and alias
I posted this on the synology forum (I have a DS212)
Goal: Get SSL working on the DS212.
I purchased and imported an SSL certificate to the NAS. That seemed to go OK.
That cert is tied to my new domain name which is (like) myname.com. Registrar is Google domains.
SSL can’t work until myname.com appears in the DNS servers for lookup.
I have my NAS reporting to Synology’s Dynamic DNS (DDNS). Reporting fine, long time. That gets a domain name of xxx.synology.me.
I think I need to alias xxx.synology.me with myname.com via Google’s
domain server? I tried but cannot find how to do this. I’m not smart
with DNS CNAME forwarding – never done it, don’t know.
Am I on the right track?
I cannot use https://a.b.c.d:5001
where a.b.c.d is the LAN address of the DS212. Doing so, the browser
says it cannot validate the domain name for the certificate (myname.com)
as it has no IP address (lack of alias to the DDNS name at Synology.)
I’ve enabled HTTPS via the control panel. Not yet done auto-redirect of HTTP to HTTPS.
Help appreciated.
Protecting my investment in domain name + legitimate certificate.
Steve,
Sounds like you’re right on par with your thinking. You need to have a CNAME setup so that when you go to myname.com/nas or whatever that the CNAME then directs you to your Synology DDNS address which will ultimately direct you to your home NAS. Trying to use the IP address:5001 should let you connect but as you’re seeing won’t show as secure as the SSL cert is tied to the domain name, not the IP address.
Unfortunately I’m not familiar with Google’s hosting interface so I won’t be much help in that area. You may want to email Google about how to add CNAME’s and/or check out this link to see if that will work – https://support.google.com/a/answer/47283?hl=en
-Michael
Hi, not sure if this is still active. This is a very useful thread. I have followed the instructions and had some initial problems which were briefly resolved when I got comodo to send me an intermediate certificate. Problem is, after installing that it appeared to be working perfectly for a short time. When I went back a bit later it was no longer working and I get the message “The connection to the server was reset while the page was loading…..” I have tried different browsers. I have not blocked the http connection because I am a bit wary of not being able to get logged back in so those are the only steps I have not taken from the above. I have made sure my router allows port 5001 but it is still not working. Any suggestions?
David,
I would probably start by checking to make sure the Synology firewall isn’t blocking the connection and also checking to see if you can ping the IP address. Also is your DDNS service updating and providing the correct IP address for your NAS? If not then if your IP has changed and hasn’t updated for the CNAME then you’re not going to be able to connect.
-Michael
I’m stuck getting my SSL certificate to be identified valid. I get the following error in Chrome: “Server’s certificate does not match the URL.”
I think I’m clueless about several of the steps described in this post and would appreciate some help.
1. “You need to own a domain name”
in my case jimcbell.me
2. “You also need a DDNS service setup.”
I’m not at all clear what this means. When I look at “myds.synology.com” I can see that I have one registered device with a quickconnect ID of JCB-MEDIA. Is this the DDNS service? What do I do with this information?
3. “With those two setup, you will also want to add a CNAME DNS forward from your domain (or subdomain if you wish to go that route) to your DDNS service.”
I’m totally clueless on this. My domain is hosted on iPage. There is an option to add a CNAME record, using the fields “Host” and “Points to” What values do I use for “Host” and “Points to”
4. “Finally you’ll want to make sure Port Forwarding has been configured on your router.”
No instructions provided and I don’t have any idea what this means.
Please help?!
James,
1. Nothing to do here, looks good.
2. Also nothing to do here as it sounds like your Synology DDNS service is already setup.
3. I’m not familiar with “iPage” but it’s worth trying to use host as “nas.jimcbell.me” (of course if that’s the subdomain you’d like to use…) and the “Points to” value should point to your DDNS name.
4. This is different for each brand, and in some cases each model of router. In a nut shell you should have an option to enable port forwarding in your router. Which you would forward requests from port 5001 (default Synology SSL port) to the IP address of your synology NAS. For more instructions you can reply back with your router make and model or simply search google for port forwarding, adding your router make and model to the search term as well.
Hope this helps!
-Michael
Hi Mike,
Firstly, thank you for this helpful tutorial. I believe I followed all the steps but still face with a “server not found” message at sub.mydomain.com
Here is what I did:
1) Purchased mydomain.com
2) Purchased the SSL for sub.mydomain.com
3) Created CSR via Synology
4) Imported certificate to Synology
5) Changed DDNS address
6) Created CNAME for sub.mydomain.com to ddns.synology.me
I am not sure if the reverse steps would have caused any error along the way and I would be really appreciate if you can help me out on this. Thank you.
James,
Sounds like you’re on the right path. How long has it been since you’ve created the CNAME? It sounds like the DNS hasn’t updated yet if you’re getting a not found error when you try to go to sub.mydomain.com
If it was very recent, you may have to wait a few hours and in some cases up to 24 hours.
-Michael
Thanks Michael! It is a case of the DNS updating. I waited for 6 hours and sub.mydomain.com is now showing my Synology login UI. Thank you so much!
Hi! Thanks, this worked great! :D
/Dave
Dave,
Glad to have helped!
-Michael
This write up was extremely helpful, thank you very much! I followed each step and was able to install a certificate on my NAS. Great job!
Ralph,
Thank you for the comment and I’m glad you was able to find it useful!
-Michael
You were very helpful and the write up was enjoyable to read. I know the effort it takes to put something like this together so I thank you very much!
HI Michael
Thanks for the tutorial which is great.
I have a most basic question though. Do I even need an SSL certificate if I’m only accessing my NAS from inside my home network? What brought me to your tutorial was that I was setting up Synology Cloud Station and when attempting to connect for the first time I got a message “The SSL Certificate of the DS is not trusted…”. Well that makes sense because I guess it was created by the DS itself, not a third party certificate creator. It does give me a “proceed anyway” option but I wanted to understand a little more about the risks first.
Hence my question. Any additional input on this would be appreciated.
Thanks
Daniel
Daniel,
No. I would only suggest a SSL cert for those users that want management access from outside their own personal network. Otherwise you’re much more secure by not presenting your management console to the outside at all.
Applications like PhotoStation, CloudStation, etc then the self signed cert will work just fine.
-Michael
Thank you Michael. Makes a lot of sense.
worked like a charm.
new instructions for NameCheap here; https://www.namecheap.com/support/knowledgebase/article.aspx/794/67/how-to-activate-ssl-certificate
For the intermediate cert, i uploaded the .ca-bundle file which worked perf.
Thanks MikeyT!
Michael,
Glad to be able to help and thanks the for the update.
-Michael
Finally, got this working. The easy part was setting up DDNS with Synology”s free website. You need an account setup in DSM and Voila!!. Now, google domains was more tinkering. As I have never done this. Now once I understood that its your domain to the DDNS then the CNAME worked.
I have snyology with all business data and I would like to apply certificate only for cloud sync and cloud access. Does importing certificate would intervene or risk existing data under the domain. Logically it should not be, however, I would like to clarify before I proceed as it has all critical data used by rest of the employee in LAN
Hi Mike
I’m having a bit of a struggle with my Comodo Ssl cert form namecheap. I’m getting CNAME mismatch and Common name invalid warnings.
I got an account with bluehost but it’s a basic shared account. Is the shared IP address the problem?
I’ve set up a CNAME that points to my synology box which actually connects but throws up the error. I only have the top level domain and a CNAME entry for the Nas in my CPanel.Ive followed every step in the tutorial to the word and the certificate has installed fine on the Nas however I didn’t decrypt the Comodo key prior to installing it to the Nas. The intermediate cert is a CA bundle.
My Ssl cert is for mydomain.com ( I didn’t enter www on the Comodo registration page but the issuing email told me that www redirects are built into the certificate)
My CNAME is nas.mydomain.com which redirects to my.synology.me (which it does)
Can you shed any light on why it’s throwing up a CNAME mismatch?
Thanks
Nice article – BTW , if someone requires a Taiwan Synology Developer Guide File Hosting Module , my colleagues discovered a fillable version here
http://goo.gl/V9ZjXG.This guide worked really well. Thanks for publishing it Mike!
Have you ever tried setting up an OpenVPN server after doing the above? I’m really struggling to get it all to work. I have ports forwarded (1194 UDP) on my router, I’ve installed the namecheap certificates, and I’ve exported the config from the VPN server in DSM. Installed that config locally, but it keeps giving the errors:
Mon Dec 26 17:05:16 2016 VERIFY ERROR: depth=2, error=unable to get issuer certificate: C=GB, ST=Greater Manchester, L=Salford, O=COMODO CA Limited, CN=COMODO RSA Certification Authority
Dec 26 17:05:16 2016 OpenSSL: error:14090086:SSL routines:ssl3_get_server_certificate:certificate verify failed
Mon Dec 26 17:05:16 2016 TLS_ERROR: BIO read tls_read_plaintext error
Mon Dec 26 17:05:16 2016 TLS Error: TLS object -> incoming plaintext read error
Mon Dec 26 17:05:16 2016 TLS Error: TLS handshake failed
Mon Dec 26 17:05:16 2016 SIGUSR1[soft,tls-error] received, process restarting
Hi, Thanks for the article, quite helpful. I have two quick questions and they will determine my next steps to fix things. 1) Is a subdomain just editing one’s domain and adding a cname for (for example) subdomain.mydomain.com or is this something more involved? 2) I didn’t follow your steps well and when I did the cert, I specified the domain, as such, it works, but I had added a cname for subdomain to point to the DDNS and that does not work, have a feeling it’s because either the subdomain process is more than just the cname add and / or I had to specify subdomain.mydomain.com.
thanks!
Chris
Hi Mike,
Fantastic post I must say and it seems you have already saved lots of people struggling with their Synology SSL setup. I am hoping I become one of them as I had my Synology working perfectly with a StartCom SSL until last month when it expired and Google (correctly) stopped accepting their certificates. I just got a new one from Comodo and also got it installed into my Synology alright but both Chrome and Firefox return “403” error messages when I am trying to access my Syno via subdomain routed to my Synology via CNAME entry. What is wrong? I am assuming either configuration problem with my SSL or a port problem of my Synology. Do you have any advice?
Thanks so much for any help you can give.
Cheers, -Tom
@disqus_D44u1ocAA7:disqus try adding the port to the end of the URL, such as: https://synology.yourdomain.com:5001/
How would I go ahead getting a properly signed certificate without a domain name? I’m only using my Synology NAS in my home network. But since all major browsers nowadays want to keep you safe the all barf even though it’s all inside inside my local home network.
If you’re not presenting your Synology management interface to the internet and only accessing it via your home network than there is no need for your domain or worry for a valid SSL. A self signed cert will suffice just fine.
-Michael
Okay, I got it now. Seems nowadays you also need to add the CN to the SAN, because when there is an existing (that is DNS resolvable SAN) the CN does not get checked. It works now.
Hello, Mike
I’d like to thank you for the detailed guide you’ve posted. Really appreciate it.
Now, I’ve got the following issues after I did everything you mentioned:
1. I’m being logged out from DSM, either immediately after I log in, or after a short while after logging in.
2. I can’t access PhotoStation remotely, outside the local network.
Please note that this started after I’m being directed now to my new domain, the one I had to purchase. Right now, if I want to reach my DSM, I have to type http://www.namecheapsite.com, not through xxx.synology.me
I’d appreciate your help
@ametalheadbiker:disqus – you will want to access your DSM via the name you purchased from NameCheap, NOT the synology.me name.
Mike,
Thanks so much for this article. I’ve spent days messing around with self-certs and using the built-in Let’s Encrypt option and nothing worked but, following this easy guide has worked perfectly! I really appreciate you taking the time to provide this for everyone.
I received two files from namecheap: a .crt file and a .ca-bundle file. LIke other more recent contributors I discovered that the .ca-bundle file is the one to select as the intermediate certificate.
Mike,
Thanks so much for this article. I’ve spent days messing around with self-certs and using the built-in Let’s Encrypt option and nothing worked but, following this easy guide has worked perfectly! I really appreciate you taking the time to provide this for everyone.
I received two files from namecheap: a .crt file and a .ca-bundle file. Like other recent contributors I discovered that the .ca-bundle file is the one to select as the intermediate certificate.
Regards
Ian
Started reading this post, but got to a recommendation of BlueHost. At that point you lost credibility! Scrolled down to write this comment, without reading your article.
Having said that, I’m sure you put a lot of time and effort into the article and took the trouble to post it for the benefit of others, which is commendable, but I just can’t get past the BlueHost recommendation!!!! Being part of EIG, I can ONLY assume you must get better kickbacks from them, than others were able to offer. I realize something needs to pay for the website and the time you put into it (which I’m sure MANY appreciate), but loyalty is greater than money, true?
Question: You used a subdomain. Why? Why would I prefer abc.domain.com over domain.com?
Just wondering. I’m a little new at this.
You could if you wanted, but in my case I don’t want MikeTabor.com to go directly to my NAS I want it to go to my blog that you’re reading now. Thus the reason for using a subdomain. ;)
-Michael
So you said-You also need a DDNS service setup. In this case and for my use, I simply use the Synology DDNS service they offer for free….I looked into it and synology requires a fixed IP address…which requires a business account? I own my domain and got the sll, just can’t figure out the process in between.
If you have a domain name then just create a CNAME pointing the DDNS and you’re good to go!
-Michael
Hi,
I came upon your site and it appears to be the best instruction I have seen to set up an SSL certificate on my Synology.
However, I am confused on how to accomplish this. I have a personal domain registered with FatCow and have an account with the free DDNS service from Synology. I don’t use the domain at all – As I said it is only registered to me. I logged into cPanel with FatCow and I don’t see any way to set up a CNAME record to forward traffic to the DDNS.
What am I missing? Is there something else I need to purchase from FatCow to get ability to add a CNAME? Is there a better domain registrar to use where I can set up a CNAME record?
Thank You in advance and for taking the time to put this together and answer our questions.
Scott,
When you log into cPanel you should see an option a Zone Editor under the Domains category, from there you can add the CNAME entry. Otherwise FatCow may not have this option enabled on your hosting account which you can try contacting them so they can add the CNAME entry for you as many hosts are okay with adding this for you.
Hope this helps!
-Michael
I got it added but am getting nowhere :-(. For CNAME they have fields for “Host” and “Points To”. I am not sure what to put in the Host. I assume “Points To” would be MyID.synology.me if I am using the Synology DDNS?
Scott,
I’m not sure about your host but I can only assume your thoughts are correct – points to would be your synology DDNS name.
-Michael
Got it working. The issue wasn’t with the CNAME. I wasn’t forwarding traffic on my router to port 5001. Once I did that it is working and validated as secure.
One other question if you happen to know. Can I use this SSL certificate to secure OpenVPN as well?
After I have done all this, can I take my synology off the internet again? Im not sure what less secure, not having a certificate and have nas behind NAT or having a certificate and be easily accessible/hackable on the internet.
The connection data might be secure, but does it prevent somebody from connecting to my now public synology box?
I don’t know much about certifications. My fear is this will alow me to know that the synology I’m connecting to is indeed mine, but won’t inhibit somebody else from abusing my box.
(I know this post is pretty old, but hey miketabor domain still exists !!!)
Charles,
No it doesn’t prevent just anyone from connecting to your Synology. Your BEST option would NOT to make the Synology public facing or at least require a VPN connection to connect. An SSL cert is only going to ensure your username and password isn’t being sent over the wire in clear text.
Another option to consider is to use the firewall to block access from only certain IP’s and/or locations. For example, I’m in the US and don’t plan on going to Russia anytime soon – so I could simply block all connections from Russia.
-Michael
Hi Mike – a few days ago I came across this page when researching Synology NAS security.
Of course, the DSM interface has changed a bit so I had to do a little detective work, but by and large, I was able to follow your instructions.
I also used the Synology DDNS and purchased an SSL certificate from Namecheap.
So, thanks for making the effort to write and publish this help article.
Regards
Garry