Secure Public WiFi using Synology VPN Server
Public WiFi is something many of use enjoy while we’re at the coffee shop, hotels, airports, libraries and so on, but one thing everyone should or needs to know is that public WiFi is NOT secure. In fact it’s so easy for people to eavesdrop and hack a public WiFi that even a 7 year old girl can do it, in under 11 minutes!
The solution would be to use a VPN which will encrypt your traffic between you and the VPN server. So even if someone is attempting to hack the public WiFi, your traffic becomes useless to them and thus your emails, chats, web browsing and file transfers are now secure and out of other peoples sight.
There are plenty of VPN services available such as NordVPN (which I also use), but you can also setup your own VPN server on your Synology NAS.
How to setup a Synology VPN server on a Synology NAS
Before we get started installing the Synology VPN Server you will want to make sure you already have DDNS configured on your Synology NAS and familiar with how to do port forwarding on your home router.
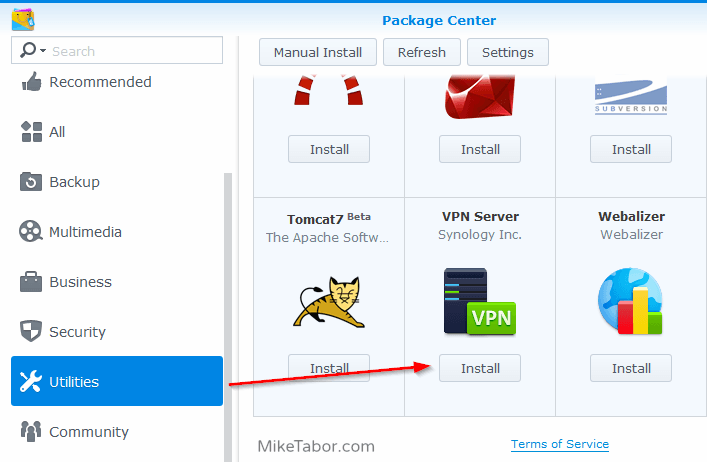
- Log into your Synology NAS then open the Package Center and install the Synology VPN Server under Utilities.
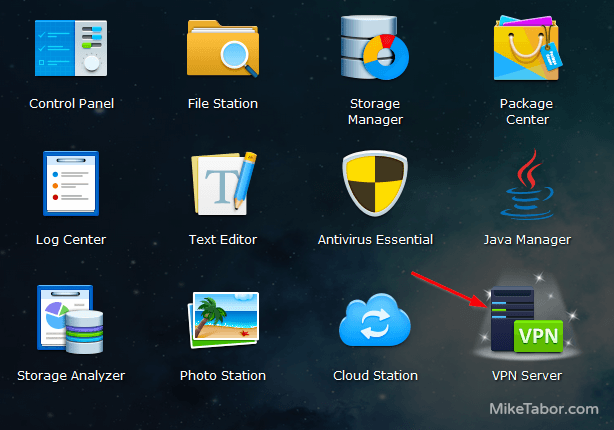
- After the package has been installed, open the VPN Server app.
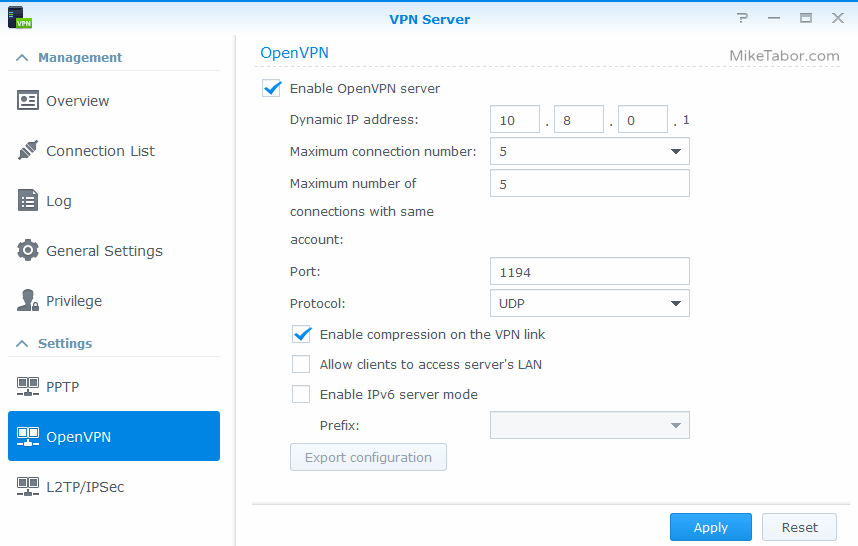
- The Synology VPN server can be configured to use PPTP, OpenVPN, and L2TP/IPSec. I went with OpenVPN due to being considered very secure, fast, and there is an OpenVPN client available for all my devices (Windows and Android. If you’re a MAC user, there is also a MAC client).
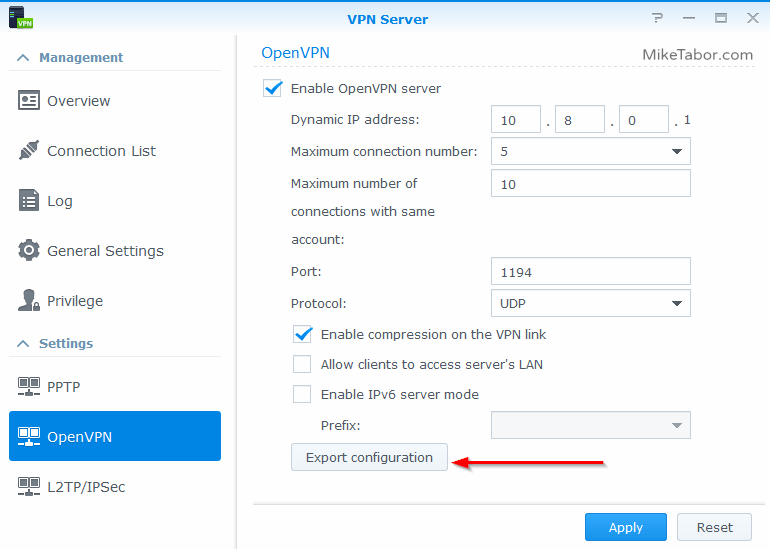
That said, on the left side click on “OpenVPN” and then check “Enable OpenVPN server” on the right side, then click Apply.
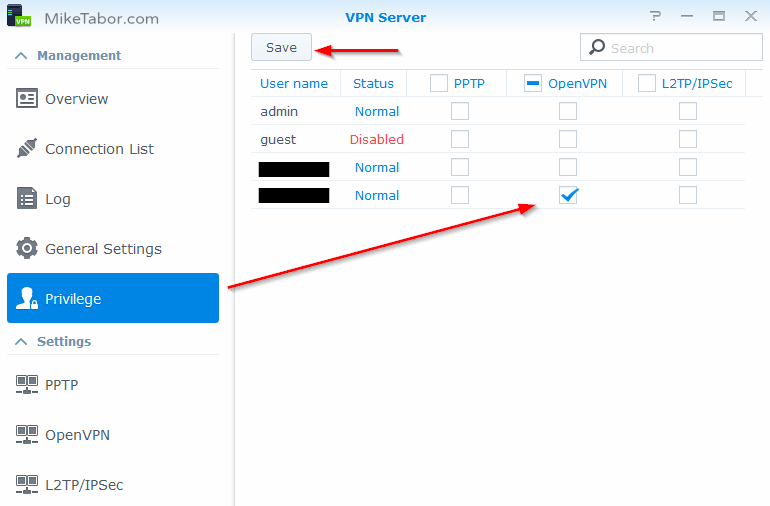
- The default setting is to allow every user VPN access. I would suggest changing the privilege to only the user(s) you want to be able to connect to the VPN. In this case click on Privilege, then uncheck all the check boxes expect the OpenVPN box for the user(s) you want to have access, then click on Save.
- Finally, on the left side click on “OpenVPN” and then click on “Export configuration” and save the openvpn.zip file, such as to your desktop as we’ll be using this soon.
At this point the Synology VPN server is running and user(s) have been granted access to log into the Synology VPN. There are still a few more steps needed to be completed before we are completely finished. Such as open the port on the Synology firewall (you ARE running the firewall aren’t you?) as well as setup the OpenVPN configuration files.
How to open the Synology firewall to allow VPN connections
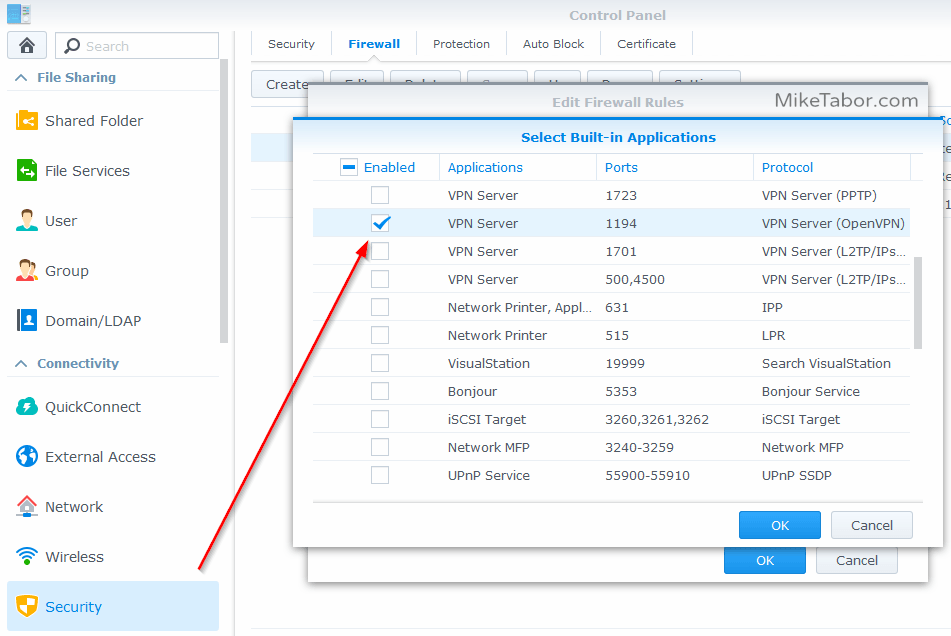
- Go to Control Panel > Security > click on the Firewall tab. Then create a firewall rule to allow the VPN Server (OpenVPN) access.
How to configure the OpenVPN configuration files
- Before we get started editing config files we need to first export the Synology certificate. You’ll want to do this regardless if it’s a self-signed cert or a paid SSL certificate.
So open Control Panel > Security > and click on the Certificate tab and click on “Export certificate” and save the file.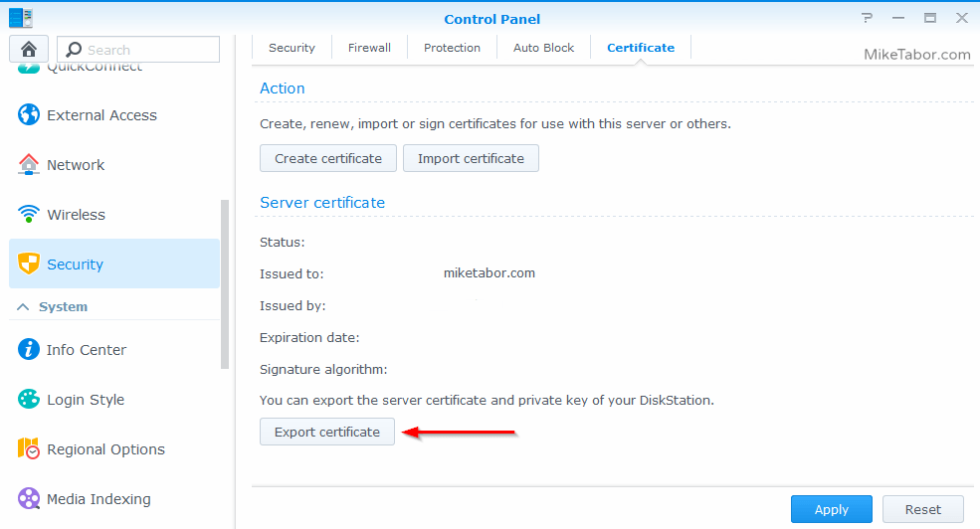
- Now extract the openvpn.ovpn file from openvpn.zip as well as the files from archive.zip somewhere on your computer.
- Now open the openvpn.ovpn file with an editor, such as NotePad++ and edit line 4, replacing YOUR_SERVER_IP with your Synology DDNS or (other DDNS) name, add a # in front of “ca ca.crt” to comment out the line as we’ll be embedding the cert into our openvpn.ovpn file.
- Now open the file ca.crt with an editor and copy the key inside the <ca> section in openvpn.ovpn, do the same for the server.crt but copy the key inside <cert> section and server.key into the <key> section.
- The end result of your openvpn.ovpn file should look something like this:
dev tun
tls-client

remote username.synology.me 1194

# The "float" tells OpenVPN to accept authenticated packets from any address,
# not only the address which was specified in the --remote option.
# This is useful when you are connecting to a peer which holds a dynamic address
# such as a dial-in user or DHCP client.
# (Please refer to the manual of OpenVPN for more information.)

#float

# If redirect-gateway is enabled, the client will redirect it's
# default network gateway through the VPN.
# It means the VPN connection will firstly connect to the VPN Server
# and then to the internet.
# (Please refer to the manual of OpenVPN for more information.)

#redirect-gateway

# dhcp-option DNS: To set primary domain name server address.
# Repeat this option to set secondary DNS server addresses.

#dhcp-option DNS DNS_IP_ADDRESS

pull

# If you want to connect by Server's IPv6 address, you should use
# "proto udp6" in UDP mode or "proto tcp6-client" in TCP mode
proto udp

script-security 2

# ca ca.crt

comp-lzo

reneg-sec 0

auth-user-pass

<ca>
-----BEGIN CERTIFICATE-----
Copy content of ca.crt here
-----END CERTIFICATE-----
</ca>

<cert>
-----BEGIN CERTIFICATE-----
Copy content of server.crt here
-----END CERTIFICATE-----
</cert>

<key>
-----BEGIN RSA PRIVATE KEY-----
Copy content of server.key here
-----END RSA PRIVATE KEY-----
</key>

The only things left to do if you haven’t already done so is to configure your router to forward the port 1194 (default OpenVPN port) to your Synology NAS.
You’ll also need to place the newly edited openvpn.ovpn file in your C:\Program Files\OpenVPN\config\ directory if you’re a Windows user – once you’ve installed the OpenVPN client, or on your SD Card if you’re going to use the VPN on your Android phone.
Now when you connect to your VPN server all your traffic will be encrypted which greatly protects you from evil doers and will make it look like you are actually home surfing the internet and not at the coffee shop.
If you are wanting a bit more security and anonymity I would certainly suggest checking out NordVPN. I use them a lot as well and NordVPN has servers located all over the world, which is also great to access geo-restricted content. You can also use coupon code 70off to save 70%! ;)

Thanks for the guide. It almost worked like a charm except for one (apparent) error that made it all not work. In your guide you say to copy the ca.key contents into the section but I found this failed to work and I had to in fact copy the contents of server.key to this section. After this change, all good.
hermit,
Thanks for catching that error. I’ve corrected the post above.
-Michael
Hi Mike,
Firstly thank you for taking the time to write these excellent tutorials for Synology Nas users.
I’ve been a bit blasé regarding security on my DS713+ but have taken steps to secure it however I’m a bit overwhelmed by the extra steps in tightening down remote access to my box.
Basically what I need to do is administer my box remotely via my phone either by my mobile carrier or work WiFi ( whichever is available).
I have closed all unnecessary ports, disabled the default admin account, enabled 2 step verification etc and set rigid permissions for the remote user account however networking is not my strong point. It must be said however that I can network with other human beings and have managed once to successfully have a conversation with 3 people at the same time :-).
Seriously though, I grasp the idea of having a valid ssl certificate, domain name etc but do I need a VPN as well?
If so, would I be better running the VPN at router level ( Asus Rt-ac68u)?
I have 4 other users who use the Nas at home on LAN and 6 connected clients via NFS which all have Internet access ( raspberry pi’s and Odroid C2’s) so that’s a total of 10 devices that connect to the DS713+ in one way or another.
Any ideas or suggestions would be greatly appreciated.
Bonty
Bonty,
You are going to be far more secure by not opening the management up to the internet and instead use the VPN to access your files. With the VPN server you can create an account for all of your users as well.
-Michael
Hi. I am getting this error on my iOS:
OpenVPN error: PolarSSL: error parsing cert certificate : X509 – The CRT/CRL/CSR format is invalid, e.g. different type expected.
I’ve followed your guide on setting up SSL using NameCheap. Don’t see an issue there.
I am receiving the following message:
to enable openvpn service please import the corresponding intermediate certificate first
I am trying to understand what a Synology VPN server does for me. Excuse my ignorance on the matter.
If I am at home on the LAN side of my Synology router, does it encrypt my connection to the internet? If so, how is it decrypted on the other end? For instance, will it protect me from snoopers trying to get my bank account information when I am banking online from home?
Does it provide additional security if connect into my home Synology router or NAS from work to access files there?
Does it provide the same features that I would get from something like NORDvpn (such as those listed below)
• Bypass region-specific restrictions on web content (the dreaded This video is not available in your country message on YouTube, for example.)
• Watch country-specific programming on Hulu and Netflix.
• Hide your true location.
• Protect personal information when using sketchy public WiFi.
• Torrent in privacy
Thanks for your help.
Iggy,
This is to secure your connection when on public wifi, such as the examples listed in the first paragraph. This will do nothing for your home LAN connection.
-Michael
Hello,
Excellent tutorial! I have one question, once all the configuration is done and the client (i.e. mobile phone) is connected to the VPN server, does it route/encrypt ALL traffic or will it do it only when you are trying to reach a resource located in your Synology LAN?
Jaime,
This will encrypt all your traffic through the VPN server running on the NAS. You won’t be able to access your NAS directly unless you check “Allow clients to access sever’s LAN”.
-Michael
Mike,
Will you update this post now that Synology has VPN Plus Server? Seems like this wont work with VPN Plus Server
@Joshua, the Synology VPN Plus Server is an application for the Synology Router. This post is referring to the VPN server offered within the Synology NAS.
I’ll see if I can get my hands on a Synology Router and create a post for it.
I have setup the VPN server on my Synology NAS according to your guideline. However, I’m still not able to see the local drive even though the OpenVPN has shown that I’m connected to the VPN. Other than that, I didn’t see my internet IP has changed to the IP that my NAS was connected to.
I need you guidance on solving it