VMware P2V Permission to perform this operation was denied fix

Just the other day we had a Windows Server 2008 R2 Standard physical server that needed to be P2V’ed, and after trying to use VMware Converter Standalone 6.1.1 we ran into the error message “Permission to perform this operation was denied” after entering the source machine details.

vmware p2v permission denied

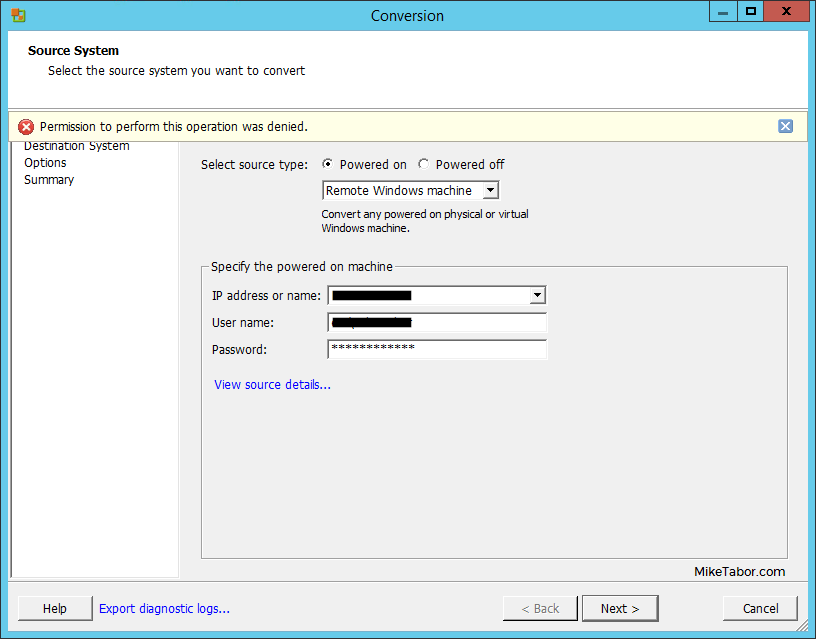
Even after trying to start VMware Converter as “Run as administrator” the error persisted. Below is the workaround we performed to quickly allow us to P2V the physical server.

Workaround for Permission to perform this operation was denied

  1. Log into the server you’re trying to convert to a virtual machine.
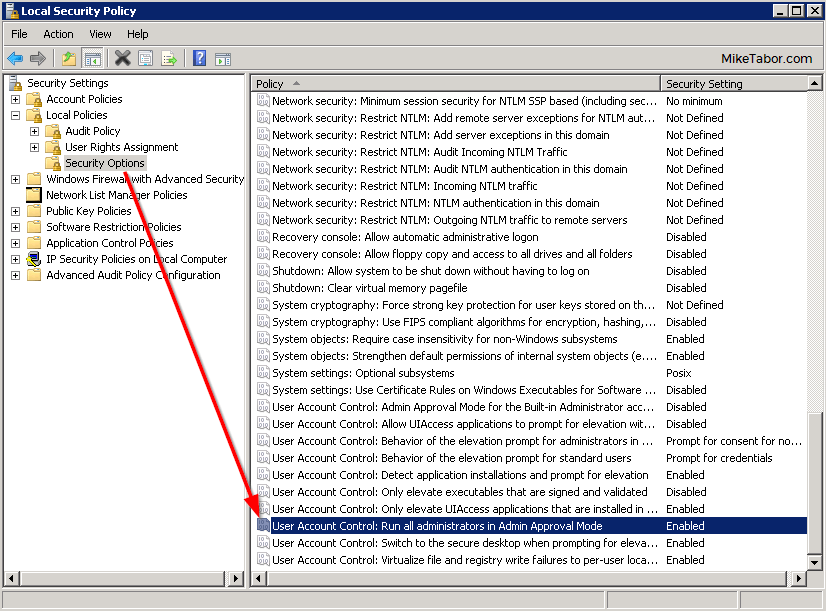
  2. Open Local Security Policy (open run dialog and type secpol.msc).
  3. Go to: Local Policies > Security Options.
  4. Change “User Access Control: Run all Administrators in Admin Approval Mode” from Enabled to Disabled.
    local security policy disabled p2v
  5. Restart the server to make the changes take effect.
  6. You should now be able perform the P2V without issue.

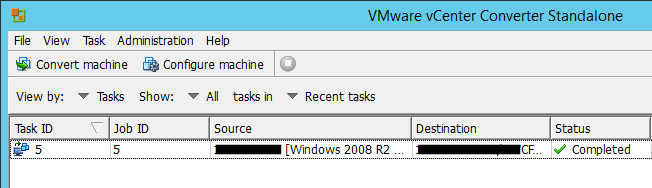
After making the above change we was able to successfully P2V the server without any further issues:
VMware P2V completed

Once you confirm the P2V is successful I would recommend changing User Access Control: Run all Administrators in Admin Approval Mode back to Enabled from Disabled.
local security policy enabled p2v

If you have another workaround please share in the comments!

Similar Posts

  • VMware Workstation 8.0.4 released

    VMware has just released it’s forth minor update for VMware Workstation 8, bringing it up to 8.0.4. The looks to contain mostly a few bug and security fixes.

    General Issues

    • Linux guests running the Linux kernel version 2.6.34 or later could not be pinged from the host via an IPv6 address.
    • On rare occasions, Linux guests would suddenly fail to Autofit or enter Unity.
    • Unity mode would exit if the title bar of an application contained certain non UTF-8 encoded extended ASCII characters.
    • On Windows hosts, the VMware Workstation user interface sometimes became unresponsive when minimized from full-screen mode if the suggestion balloon was being displayed.
    • On Windows hosts, the user interface sometimes became unresponsive if the application was rendered on an extended display that was abruptly disconnected.

    Read More “VMware Workstation 8.0.4 released”

  • My VMware View Windows 7 Optimization Guide

    These are the few steps I do when creating a new "Golden" image. Luckily I don’t have to do these steps all the time as I’ll create the "Golden" image when there is a new upgrade such as when we went from View 4.6 to View 5.0.1. I like to have a new fresh machine using new virtual hardware from the start. You could certainly just upgrade the virtual hardware on the "Golden" image, I just prefer to start clean.

    At any rate, here’s my list. Hopefully someone might find it somewhat useful and maybe even others can improve upon it.

    Preparing a new virtual machine

    1. Create New Virtual Machine – FILE > NEW > VIRTUAL MACHINE (CTRL+N)
    2. Under Configuration select CUSTOM.
    3. Select a Name, Folder, Host, Cluster, and Storage.
    4. Under Guest Operating System select Windows and then Windows 7 32bit under the Version drop down.
    5. Select which Network (VLAN) and under Adapter select VMXNET 3.
    6. Configure disk size to 30GB THIN provisioned.

    Read More “My VMware View Windows 7 Optimization Guide”

  • Installing VMware vCenter Server Appliance 6.5

    VMware has announced that VMware vSphere 6.5 has gone general available this week. Now installing VMware vCenter Server Appliance 6.5 (VCSA) is even easier as the requirement for the client integration plugin has been removed and now the VCSA appliance is delivered via an ISO image with an installation wizard that’s been broken up into two stages.

    The VCSA 6.5 ISO offers two types of installation methods, CLI and GUI install – both availalbe for Windows, Mac and Linux machines. In this guide I’ll walk through the steps of installing VCSA 6.5 using the Windows GUI install.

    Read More “Installing VMware vCenter Server Appliance 6.5”

  • VMware Horizon View 5.3 has been announced

    Horizon View 5.2 is receiving an update to 5.3! Doesn’t sound like much, but in that tiny dot number increase VMware has in fact brought a number improvements and features to Horizon View.

    In a nut shell, some features Horizon View 5.3 brings is the ability to connect to a virtual desktop from any HTML5 capable web browser (yes, even Chromebook!), ability to bring full workstation class user experience with 3D graphics, deploy Windows Server 2008 as a desktop, as well as completely rewritten the Windows client with support for Windows 8.1 and a new iOS7 client too.

    In more detail, Horizon View 5.3 brings…

    Read More “VMware Horizon View 5.3 has been announced”

  • Upgrade ESXi host to ESXi 5.5 using VMware Update Manager 5.5

    A while back I wrote about how to upgrade to ESXi 5.5 via command line which works great when you only have a few hosts as each host has to download the ISO from the web each time. This time I’ll show you step by step how to upgrade your ESXi 5.1 host to ESXi 5.5 using VMware Update Manager 5.5 (aka VUM).

    For this post I’m going to assume you have already upgraded your vCenter and VUM to versions 5.5 as well as the VUM plugin installed. So lets begin!

    Upgrade ESXi host to 5.5 using VMware Update Manager (VUM)

    1. Open the vSphere client and click on Update Manager
      VMware Update Manager icon

    Read More “Upgrade ESXi host to ESXi 5.5 using VMware Update Manager 5.5”

  • How to convert VMDK to OVF file format

    Here is a quick and easy way to convert a VMDK to OVF file format using the OVF Tool from VMware.

    1. First download and install the VMware OVF Tool for your operating system.
    2. Open a command prompt as Administrator and navigate to the OVF Tool install directory:
      
      cd C:\Program Files\VMware\VMware OVF Tool
      

      vmdk to ovf command prompt

    3. Next, type in the following command to convert VMDK to OVF:
      
      ovftool.exe \virtualmachine.vmx \virtualmachine.ovf
      

      convert vmdk to ovf command

    After a few minutes time you should you should see a “Transfer Completed, Completed successfully” message and your VMDK to OVF file conversion is complete and ready for use.
    convert vmdk to ovf complete

Leave a Reply to Mike Tabor Cancel reply

Your email address will not be published. Required fields are marked *

12 Comments

  1. Quick thanks and to let folks finding this article know this tip still works (as of 25 Feb 2021) … at least it worked for me …

    – Windows 10 Pro / SP1 (1803) (host to be P2V’d)
    – VMware Workstation 16 Pro (running on host to be P2V’d)
    – VMware vCenter Converter Standalone Client 6.2