How to perform Instant File Recovery using NAKIVO Backup

NAKIVO Backup has been a great addition in my home lab and just a few months ago I wrote about my first impressions of NAKIVO Backup. Now I have a few posts lined up to highlight some individual features of NAKIVO Backup, starting with Instant File Recovery.

If you haven’t already guessed it, Instant File Recovery allows you to recover files or folders directly from a previous backup job. This is a great alternative to performing a full restore of a VM when all you might need is a single or even a couple of files and/or folders.

Performing a NAKIVO Instant File Recovery

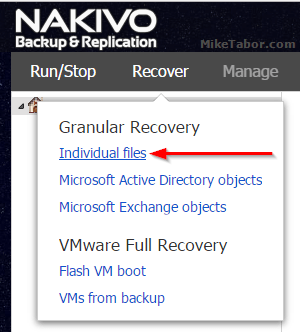
  1. Log into your NAKIVO Dashboard and go to Recover > Individual files.
    nakivo instant file recovery individual files
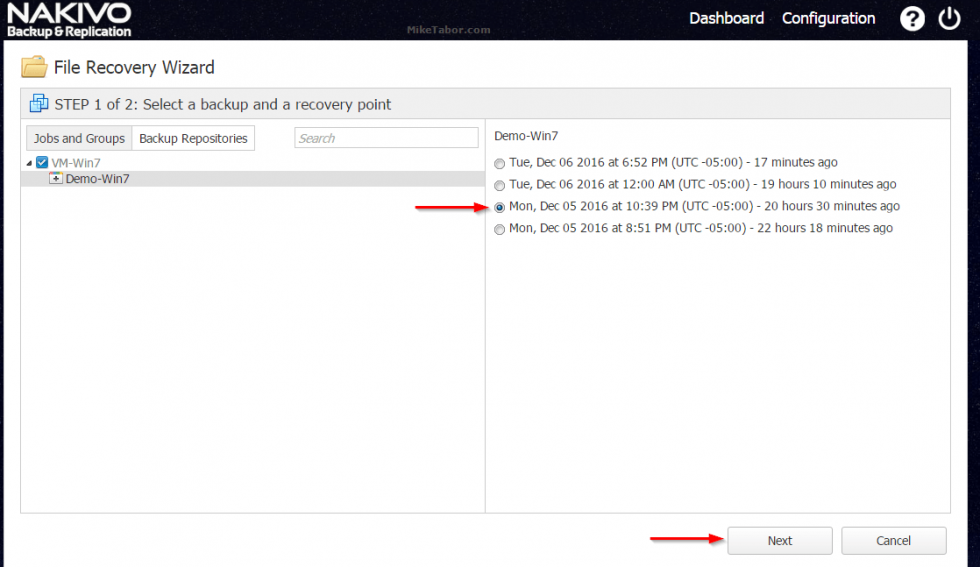
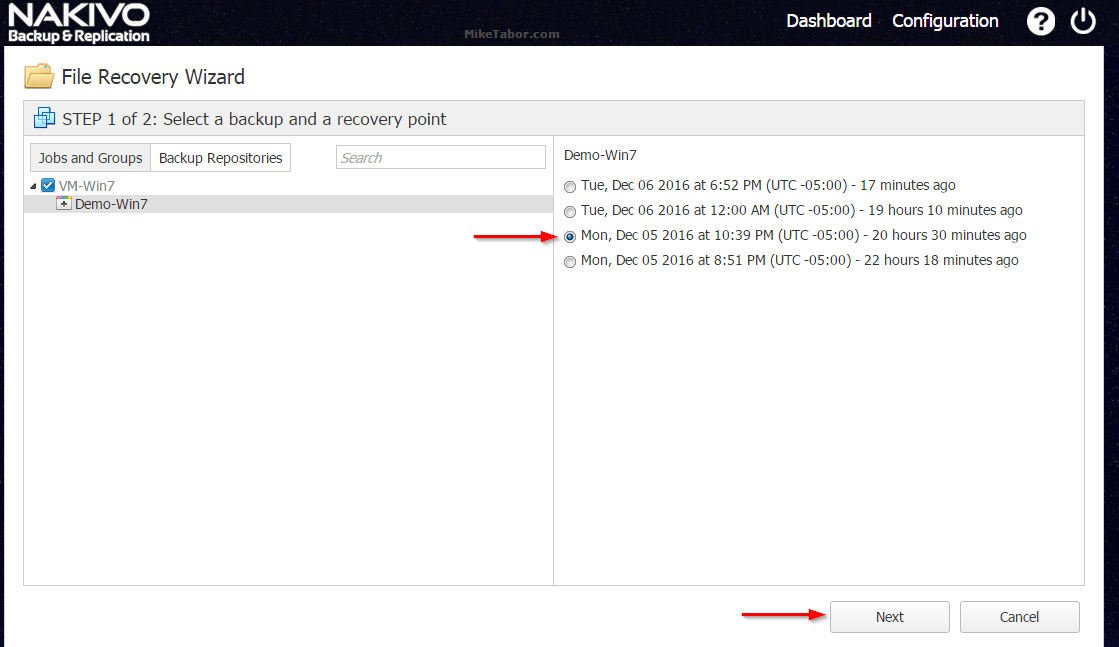
  2. Next select the Backup Job & VM you want to recover from and then select which Recovery Point you want to restore from and click Next.
    nakivo instant recovery select recovery point
  3. Now drill down to the location of the file or folder you would like to restore. In this case I have several files located on the Desktop and I chose to restore the “Important Document.txt” file.

    Simply click on Download Selected… to download the selected file or folder which will download it directly to your local computer as a .ZIP file. Alternatively, you can have it emailed to someone by clicking on “Foward Selected…
    nakivo instant file recovery select file restore

That’s all there is to it! Now simply do as you need with the downloaded file or folder.

NAKIVO Instant File Recovery Requirements

It’s also worth mentioning, there are a few requirements to make note of, which you can read here.

Most notably would that while NAKIVO Backup supports all VM file systems, if a Transporter is installed on Windows then only NTFS & FAT32 are supported. If the Transporter is installed on Linux then NFTS, FAT32, EXT3, EXT4, & XFS file systems are supported.

Similar Posts

  • My VMware ESXi Home Lab Upgrade

    Although the focus in my career right now is certainly more cloud focused in Amazon Web Services and Azure, I still use my home lab a lot.

    For the last 5+ years my home lab had consisted of using 3x Intel NUC’s (i5 DC53427HYE), a Synology NAS for shared storage and an HP ProCurve switch. This setup served me well for most of those years. It has allowed me to get many of the certifications I have, progress in my career and have fun as well.

    At the start of this year I decided it was time to give the home lab an overhaul. At first I looked at the newest generation of Intel NUC’s but really wasn’t looking forward to dropping over $1,300 on just partial compute (I’d still need to be RAM for each of the 3 NUC’s). I also wanted something that just worked, no more fooling around with network adapter drivers or doing this tweak or that tweak.

    I also no longer needed to be concerned about something that had a tiny footprint. I also questioned if I really needed multiple physical ESXi hosts. My home lab isn’t running anything mission critical and if I really wanted I could always build additional nested VMware ESXi hosts on one powerful machine if I needed.

    So in the end, the below is what I settled on. Replacing all of my compute, most of my networking and adding more storage!

    Read More “My VMware ESXi Home Lab Upgrade”

  • Increase incremental backup speed by enabling CBT

    In a recent VMware environment I was working in, we noticed that our incremental backups was taking a long time (like up to 7-8 hours) to complete. After digging around it was found that VMware actually has a feature built-in since version 4 called Change Block Tracking (CBT). CBT will track any blocks that were changed since the last backup and tag them and stores the information in a -CTK file. The obvious benefit is that now the third party software only backs up the changed block and not the entire VM each time, reducing the amount of data being backed thus speeding up backups and even lowers the CPU utilization on the VM host.

    CBT is disabled by default though there are some backup tools that will enable it automatically or you can enable it manually which can easily be done following these steps:

    Read More “Increase incremental backup speed by enabling CBT”

  • How to schedule CrashPlan on Synology NAS

    CrashPlan Backup

    This is a continuation of the previous article, how to install CrashPlan on Synology NAS, by default CrashPlan is always running after the install which prevents your Synology NAS from entering sleep mode.

    Below are the steps to schedule when CrashPlan runs in order to allow the NAS to go into sleep mode, thus conserving energy while still being backed up.

    Read More “How to schedule CrashPlan on Synology NAS”

  • Altaro VM Backup 7.6 in review

    Altaro VM Backup

    Since it’s release date last month, I’ve been running Altaro VM Backup 7.6 in my home lab and one thing is for sure – Altaro VM Backup has certainly come a long way since the last time I did a Altaro VM Backup review.

    Altaro is an easy to use, policy driven backup solution that is affordable for the small and medium sized businesses. VM Backup supports both Hyper-V and VMware environments and with the release of Altaro VM Backup 7.6 comes several new features that we’ll look at below.

    Read More “Altaro VM Backup 7.6 in review”

  • VMware ESXi 5 home lab upgrade

    In the past I’ve been using a single server to run my VMware ESXi home lab. it was slow, old, big and loud. I’ve been meaning to upgrade my home lab for a while and just never got around to it, until now! When looking for new hardware I wanted the servers to be as compact as possible, quiet, and low energy usage as possible while still having some horsepower.

    I debated on going the whitebox solution as I build all my own desktops anyway, I also looked at several other solutions such as the HP ML310e server, Shuttle XH61V barebones machine, but ultimately decided to go with two Intel NUC i5’s.

    Intel NUC i5 and 16GB ram

    Intel NUC i5 DC53427HYE Features:

    • Uses very little energy
    • Completely quiet
    • Supports up to 16GB RAM
    • A dual core CPU that scores nearly 3,600 in PassMark benchmarking
    • Includes vPro which allows me to easily run both NUC’s headless
    • Extremely small, nearly 4 1/2″ inch square footprint

    Read More “VMware ESXi 5 home lab upgrade”

  • How to install Backblaze on Synology NAS

    In case you’ve missed it, Crashplan announced yesterday that they are no longer offering a family backup plan but instead focusing on business plans. Immediately people started asking me on twitter for alternatives.

    Well one option would be to upgrade to the more expensive Crashplan business plan or another option would be to check out Backblaze!

    In this post I’ll be showing you just how easy it is to use Backblaze on your Synology Diskstation NAS – all with native Synology apps. No need to worry about upgrades breaking your backups or 3rd party solutions!

    Read More “How to install Backblaze on Synology NAS”

Leave a Reply

Your email address will not be published. Required fields are marked *