Install a Let’s Encrypt SSL certificate on a Synology NAS
A while ago I wrote an guide on how to install a SSL from Namecheap onto your Synology. Soon after Let’s Encrypt support was added to Synology, I started getting requests for a guide.
The benefits of Let’s Encrypt certificates are that they are automated, short lifetimes (90 days) and that they are completely FREE!
Below is a quick guide on how to install Let’s Encrypt SSL on a Synology NAS!
Prerequisites before starting
- A domain name of your own, such as MikeTabor.com. If you don’t already own one I recommend using NameSilo or Namecheap to register one.
- DDNS service configured. I’ll be using the Synology DDNS service as it’s free and I already use it.
- Create a CNAME DNS record with your registrar (NameSilo or Namecheap) to forward requests to your DDNS service.
- Enable port forwarding of from your router for port 80 to your NAS.
How to install a Let’s Encrypt SSL on a Synology NAS
For this guide I’ll be using my Synology DS1815+ running DSM 6.1.5-15254 Update 1 with 16GB RAM.
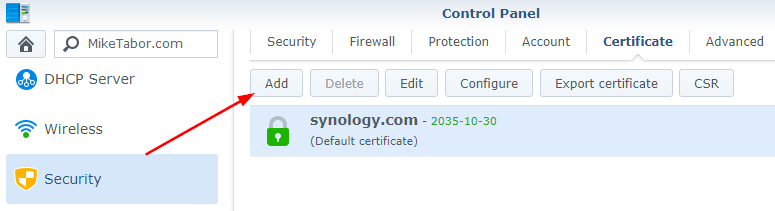
- First log into your DSM and navigate to: Control panel > Security > Certificate and click on Add
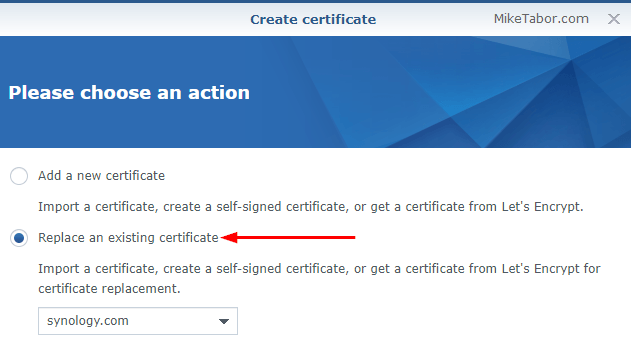
- Then select “Replace an existing certificate” to replace your existing or self-signed certificate.
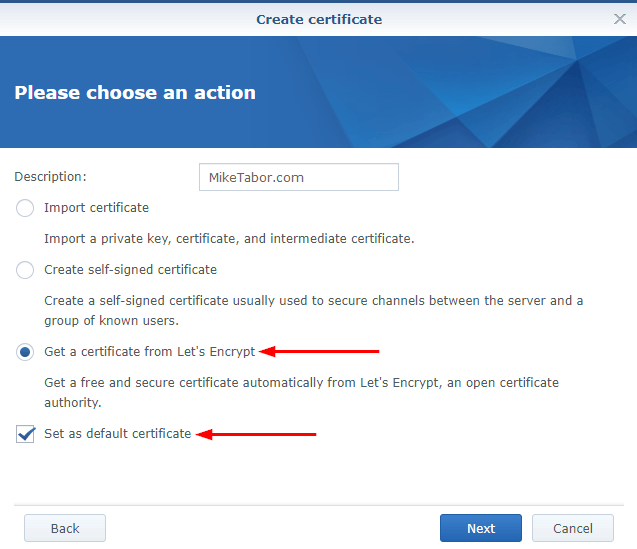
- Now select “Get a certificate from Let’s Encrypt” and check “Set as default certificate”
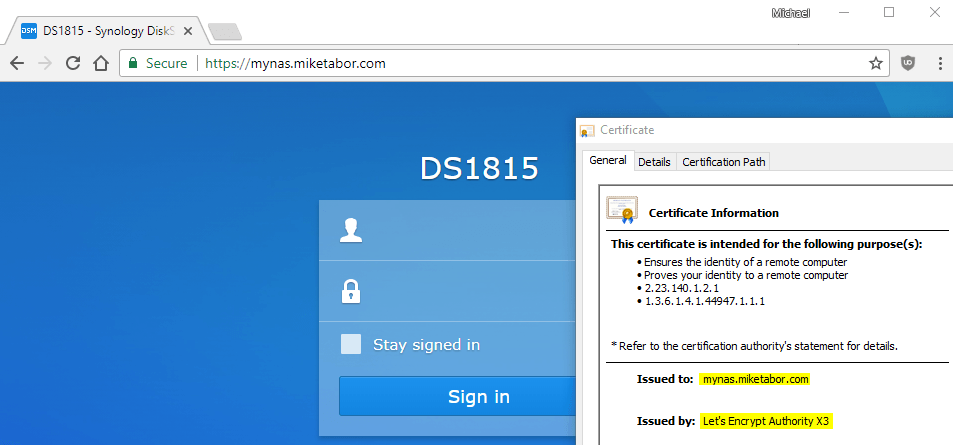
- Finally, enter a Domain Name and email address and click on Apply.
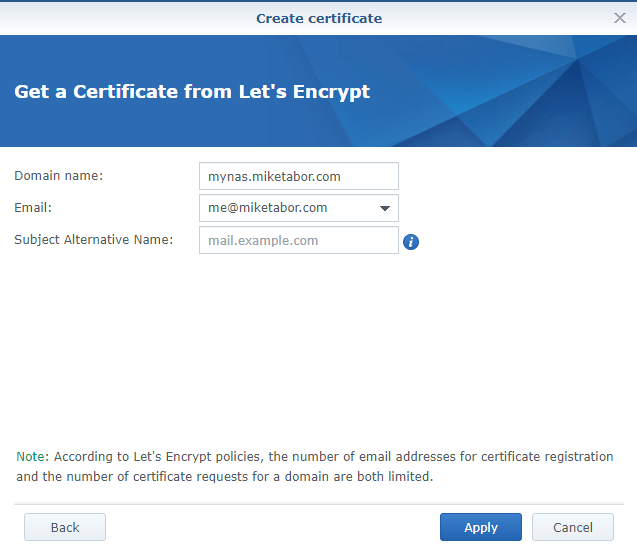
At this point your Synology NAS will receive the Let’s Encrypt SSL and restart it’s web services automatically and you’ll then be able to access your NAS via the domain name.
Every 90 days your Synology will automatically renew the Let’s Encrypt SSL cert for you.
Mike, I used your original guide for setting up my certificate years ago (thank you) and have just switched to the Let’s Encrypt version as it’s free. However, I am struggling to get the certificate to show as valid when I go to the website synology.mydomain.com (or for that matter the internal IP address from a browser). I seem to recall installing the certificate on my PC as a trusted certificate last time, but this time it the certificate is in a .PEM format and I cannot install it. Any tips?
Jeff, in neither guide are you required to install a certificate on your local machine. If this is/was the case for you then it was likely installed wrong.
If you follow the prerequisites and steps above you will be able to use a Let’s Encrypt SSL on your Synology for free.
Great article, almost perfect. For my DS216Play, I had to forward a port other than 80. Every time I went to the domain name I setup it looked like it was trying to connect to a port and was telling me it couldn’t load the page (address went from me.mydomain.com to me.mydomain.com:9999). Once I forwarded port 9999 (not the real port number), I was able to connect via web browser, setup DS Audio using https://me.mydomain.com, everything worked perfectly. Thanks!
Same here. Acme.sh script created several .pem files
cert.pem
chain.pem
fullchain.pem
privkey.pem
Synology certificate import says they are invalid.
Hi. Thanks for the write-up. I guess I’m just overwhelmed with this.
I just simply want to set up an SSL for my NAS. Don’t need any extra bells/whistles, hosting space or anything like that. Don’t want to have to spend money just to get some SSL set up for my NAS.
There must be a simple scenario for someone like me.
Synology Certificate with Quickconnect not really covering it?
I followed the guide and it did add the certificate. All lights green, issued by lets encrypt etc.
I have also a synology 2600ac router, where i port forwarded 80,443 to the nas prior to setting it up.
So, why doesn’t it work then???
I still have “not secure” label in chrome browser where it says certificate invalid. Makes no sense to me.
In control panel > security > certificate there is only my own set as default.
A quick question:
I use webstation and wondered if I could use this for the three sites I host on my synology nas?
I have created virtual hosts on webstation and pointed the CNAME DNS records to my nas.I can view all three sites but of course they all have the “not secure” indicator shown in the browser.
Thanks in anticipation
Gary
Hey Question – Do I need to keep port 80 forwarded to the NAS forever? I have a proxy server I’d like to have it go to instead, but I changed port 80 to go to the NAS temporarily so it could verify the certificate. When it renews the cert, does it check port 80 every time?
I already have my own personal domain but wanted to keep it separate from connecting to my NAS, so set one up free with no-ip as there is a service on my router.
I am also new at setting up NAS drives and configuring them for internet access but the one thing I went round and round in circles was the SSL cert issued from Let’s encrypt always came back not trusted or even failed to connect.
The one key method that succeeded from me was to login to the synology via my browser using https://mydomain.ddns.net:1234 (I also have 2FA setup) I then ran the add a Let’s Encrypt certificate again and hey presto, a trusted certificate was issued. Previously, I was trying the same operation logged in under the local LAN ip address without success. Up to this point I had read numerous articles from various people and could not understand why such a simple operation should fail each time. I even followed your method but it still failed. Anyhow, it’s solved now.
Mike, great article. Can you please go into more detail about the CNAME record and what specifically will need to be done to get it to work in this context?
Let’s say that I have a Google Domain, e.g. xyz.com . How should I capture this in the Google Domains page as a CNAME entry? Also, would I need to capture an A record?
Thanks!
Praveen,
An A record is not needed. I don’t use Google Domains so I’m not certain of it’s exact process of adding a CNAME, but this link should be able to help you – https://support.google.com/a/answer/47283?hl=en
-Michael
Hello! I love the clarity of your guide and it is frequently cited all over the nets. I am curious about whether it’s possible to get this to work when using Synology’s DDNS (e.g. thing.synology.me) as the domain name in Let’s Encrypt, rather than using a separate DNS + CNAME. I’ve not been able to get the latter to work but got a Let’s Encrypt certificate issued this way and have set it to the default for all services. However, when I visit DSM in my browser, it’s still pulling the (invalid) certificate from synology.com and throwing up warnings. What would you suggest?
Kelly,
If you want to use a Lets Encrypt cert you must use your own domain.
-Michael
Mike
I own my domain honeysett.net
Setpu cname mynas.honeysett.net -> sysnology address fronting address
Can ping
C:\Users\buf19>ping mynas.honeysett.net
Pinging itchyman.synology.me [203.217.52.203] with 32 bytes of data:
Reply from 203.217.52.203: bytes=32 time<1ms TTL=63
Reply from 203.217.52.203: bytes=32 time<1ms TTL=63
Reply from 203.217.52.203: bytes=32 time=1ms TTL=63
Reply from 203.217.52.203: bytes=32 time=1ms TTL=63
Ping statistics for 203.217.52.203:
Packets: Sent = 4, Received = 4, Lost = 0 (0% loss),
Approximate round trip times in milli-seconds:
Minimum = 0ms, Maximum = 1ms, Average = 0ms
Failed to connect to encrypt domain name invalid
What if you have more than 1 NAS on your home network? I’d like it to be automated, but I only have 1 public IP and multiple SynologyNAS’s .
Same here.
Did you find a solution ?
Also is there a way to do not let port 80 opened which is not safe ?
How can I create a CNAME DNS record with NameSilo? Thanks!
Filipe,
From the domain you’re wanting to add a CNAME record to, go to Advanced DNS > Add new record > CNAME.
-Michael
Mike,
Thanks for posting this; I previously used a Let’s Encrypt certificate manually created and installed but they did away with that a few years ago, and I’m now trying to figure out how to follow your guide to get SSL working again. I do have a Namecheap domain name, and I know how to access the certificates page in the settings on my Synology. I can log into NameCheap and set the CNAME record (Under “Host” I leave it at www, and under “Value” I enter my hostname.myds.me, though I don’t know for sure that’s correct?) but even with that, when I try to get a Let’s Encrypt certificate through that domain name, it fails with the error “Failed to connect to Let’s Encrypt. Please make sure the domain name is valid.” The domain name is definitely in my control, but I don’t have it hosted on a webhost anywhere, I just want to use it to get a signed certificate so SSL and HTTPS work correctly on my NAS. What am I doing wrong?
As a quick update: I do have CNAME configured correctly; entering my purchased domain name does take me to the WebStation landing page for my NAS. Despite that, I still can’t get a Let’s Encrypt certificate for my domain name. I can get a Let’s Encrypt hostname.myds.me, but that certificate doesn’t appear to work for HTTPS or SSL.
This is working for me but it’s kind of strange. WHen I log in at mydomain.synology.me it shows https enabled. When I log in with my personal domain nas.myname.com it shows as insecure.
Nick,
The cert is only going to work for one domain.
-Michael
After Following the Guide, when doing the final step it worked restarted the webserver. But when I go to the outside IP (while not on the same network) it says site can’t be reached took to long to respond. Both http:// and https:// version do not load. External and Internal Port are set to 80 but if I go to another app via http://mynas.mydomain.com:9090 it loads.
Any ideas would be great, thanks!