Power off an unresponsive VM using ESXTOP

Just recently we have some hardware issues in our primary datacenter and during that time had a few VM’s that became unresponsive and needed to get them back online. The VM’s had stopped responding to the normal vSphere commands to reboot, shutdown or even restart. I didn’t want to power cycle the entire ESXi host and instead just power off an unresponsive VM.

Here is a quick and easy way to do just that using ESXTOP.

How to kill an unresponsive VM using ESXTOP

  1. SSH into the host that the virtual machine is currently running on using PuTTy or your choice of client.
  2. Type: esxtop to start ESXTOP.
  3. Press c to enter the CPU view of ESXTOP.
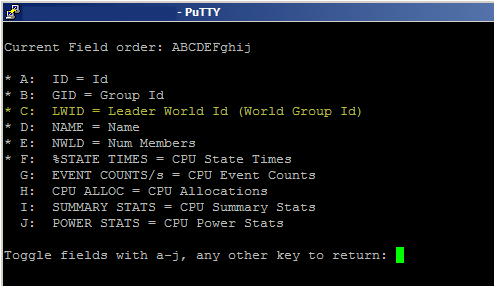
    Note: It may be helpful to press shift and V so that only VM’s are shown.
  4. Press f to change what display fields are shown and press c to show the LWID field, then press ENTER to go back to the CPU view.
    SSH add LWID field
  5. Finally, press k to open the “kill” prompt and enter the LWID of the VM you would like to power off and press ENTER.
    Using ESXTOP to kill VM using LWID

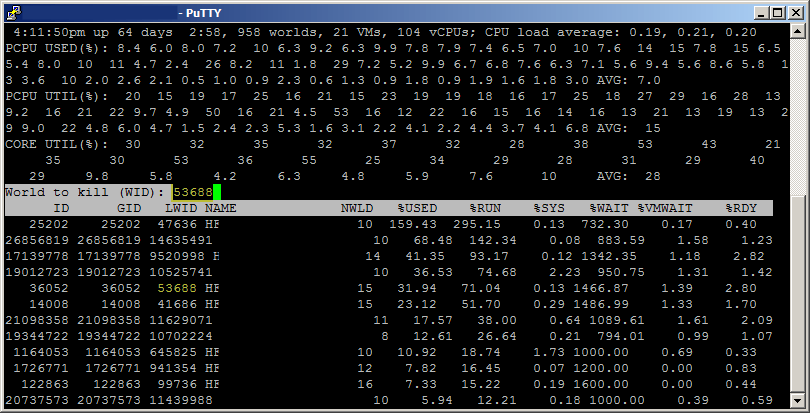
At this point the VM should be powered off. Keep in mind this will perform a hard power off, similar to yanking the power from a physical box so you really only want to do this if the VM is not responding to any other commands in order to gracefully power it off.

How to kill a VM using vSphere CLI

You can get the same result as above, powering off a VM, and not needing to use ESXTOP at all.

  1. SSH into the host where the unresponsive VM is located and type the following:
    vim-cmd vmsvc/getallvms
  2. Take note of world ID of the VM and then use the following command to issue a shutdown by typing, making sure to replace (vmid) with the world ID:
    vim-cmd vmsvc/power.off (vmid)
  3. If you find the VM still won’t power off you can kill the PID for the VM. Use lsof to find the pid that has the vmx (config file) open and then use kill to terminate it.
    lsof /vmfs/volumes/datastore/vmname/vmname.vmx
    kill -9 (pid)

Thanks goes to /u/Acaila on Reddit for pointing out this other method!

Similar Posts

  • How to upgrade vCenter server appliance

    Prior to VMware vCenter Server Appliance 6.x, upgrading or patching vCSA was as simple as a few button clicks in the appliance UI. Gone are those days, as VMware has replaced the appliance UI with a DCUI and the web based install wizard during setup.

    The good news is, upgrading or patching the vCSA 6.x is still pretty simple via the command line!

    Read More “How to upgrade vCenter server appliance”

  • My VMware ESXi Home Lab Upgrade

    Although the focus in my career right now is certainly more cloud focused in Amazon Web Services and Azure, I still use my home lab a lot.

    For the last 5+ years my home lab had consisted of using 3x Intel NUC’s (i5 DC53427HYE), a Synology NAS for shared storage and an HP ProCurve switch. This setup served me well for most of those years. It has allowed me to get many of the certifications I have, progress in my career and have fun as well.

    At the start of this year I decided it was time to give the home lab an overhaul. At first I looked at the newest generation of Intel NUC’s but really wasn’t looking forward to dropping over $1,300 on just partial compute (I’d still need to be RAM for each of the 3 NUC’s). I also wanted something that just worked, no more fooling around with network adapter drivers or doing this tweak or that tweak.

    I also no longer needed to be concerned about something that had a tiny footprint. I also questioned if I really needed multiple physical ESXi hosts. My home lab isn’t running anything mission critical and if I really wanted I could always build additional nested VMware ESXi hosts on one powerful machine if I needed.

    So in the end, the below is what I settled on. Replacing all of my compute, most of my networking and adding more storage!

    Read More “My VMware ESXi Home Lab Upgrade”

  • Upgrade ESXi host to ESXi 5.5 using VMware Update Manager 5.5

    A while back I wrote about how to upgrade to ESXi 5.5 via command line which works great when you only have a few hosts as each host has to download the ISO from the web each time. This time I’ll show you step by step how to upgrade your ESXi 5.1 host to ESXi 5.5 using VMware Update Manager 5.5 (aka VUM).

    For this post I’m going to assume you have already upgraded your vCenter and VUM to versions 5.5 as well as the VUM plugin installed. So lets begin!

    Upgrade ESXi host to 5.5 using VMware Update Manager (VUM)

    1. Open the vSphere client and click on Update Manager
      VMware Update Manager icon

    Read More “Upgrade ESXi host to ESXi 5.5 using VMware Update Manager 5.5”

  • How to convert VMDK to OVF file format

    Here is a quick and easy way to convert a VMDK to OVF file format using the OVF Tool from VMware.

    1. First download and install the VMware OVF Tool for your operating system.
    2. Open a command prompt as Administrator and navigate to the OVF Tool install directory:
      
      cd C:\Program Files\VMware\VMware OVF Tool
      

      vmdk to ovf command prompt

    3. Next, type in the following command to convert VMDK to OVF:
      
      ovftool.exe \virtualmachine.vmx \virtualmachine.ovf
      

      convert vmdk to ovf command

    After a few minutes time you should you should see a “Transfer Completed, Completed successfully” message and your VMDK to OVF file conversion is complete and ready for use.
    convert vmdk to ovf complete

  • VMware vCenter 5.0 Update 1a released

    VMware vCenter 5.0 Update 1a has just been released and is the first major update since version 5.0.

    The main improvements being:

    • vCenter Server 5.0 Update 1a introduces support for the following vCenter Databases
      • Oracle 11g Enterprise Edition, Standard Edition, Standard ONE Edition Release 2 [11.2.0.3] – 64 bit
      • Oracle 11g Enterprise Edition, Standard Edition, Standard ONE Edition Release 2 [11.2.0.3] – 32 bit
    • vCenter Server Appliance Database Support: The DB2 express embedded database provided with the vCenter Server Appliance has been replaced with VMware vPostgres database. This decreases the appliance footprint and reduces the time to deploy vCenter Server further.

    Read More “VMware vCenter 5.0 Update 1a released”

  • Installing VMware vCenter Server Appliance 6.5

    VMware has announced that VMware vSphere 6.5 has gone general available this week. Now installing VMware vCenter Server Appliance 6.5 (VCSA) is even easier as the requirement for the client integration plugin has been removed and now the VCSA appliance is delivered via an ISO image with an installation wizard that’s been broken up into two stages.

    The VCSA 6.5 ISO offers two types of installation methods, CLI and GUI install – both availalbe for Windows, Mac and Linux machines. In this guide I’ll walk through the steps of installing VCSA 6.5 using the Windows GUI install.

    Read More “Installing VMware vCenter Server Appliance 6.5”

Leave a Reply to Warren Massey Cancel reply

Your email address will not be published. Required fields are marked *

One Comment

  1. This is a nice post, I thought I would add that Ghost PIDs & WIDs exist. If you run either of the commands listed in this post and the result is “PID or WID not found.” Double check the PID/WID and if it is correct, a reboot of the ESXi host is the only fix.

    We only encounter this in our Horizon View Cluster and it happens for customers on ESXi 5.x and ESXi 6.x running View 5.x or 6.x.