How to run Crashplan in Docker on Synology NAS
I am a huge fan of CrashPlan and have been using it for years on my Synology NAS using this install guide I wrote up some time ago.
Admittedly the process in the old guide wasn’t always roses. Crashplan would push out an update and that update would, at times, break the Synology Crashplan client from PC Load Letter and backups would stop running for a couple days – maybe a week. Patters being the awesome guy he is, usually updated his Synology Crashplan package quickly and all was good again.
Then last year in DSM 5.2, Synology added support for Docker which opened up the possibility to run all sorts of software in a virtual container running on your Synology NAS. One such software being Crashplan and below I’m going to show how I now have Crashplan running in Docker on my Synology DS1815+ NAS!
Getting started with Crashplan in Docker
Before we start there are a few things I’m going to assume you’ve already done, if not do them now.
- You have a Crashplan account with the desktop client already installed, if not click here to sign up now.
- You are using a supported Synology NAS that can run Docker and already have the package installed. If not already installed go to: Package Center > Utilities > Docker and click Install.
Now lets get started!
How to install Crashplan in Docker on Synology NAS
For this guide I’m using my Synology DS1815+ NAS running DSM 6.0-7321 Update 3.
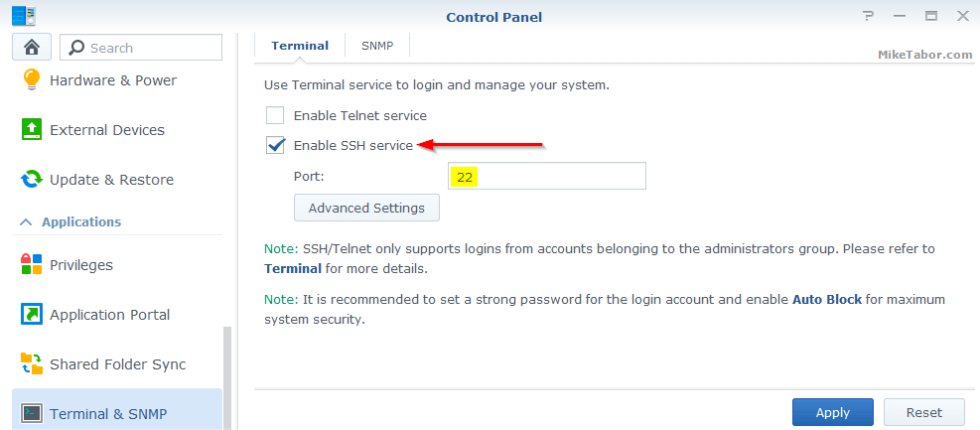
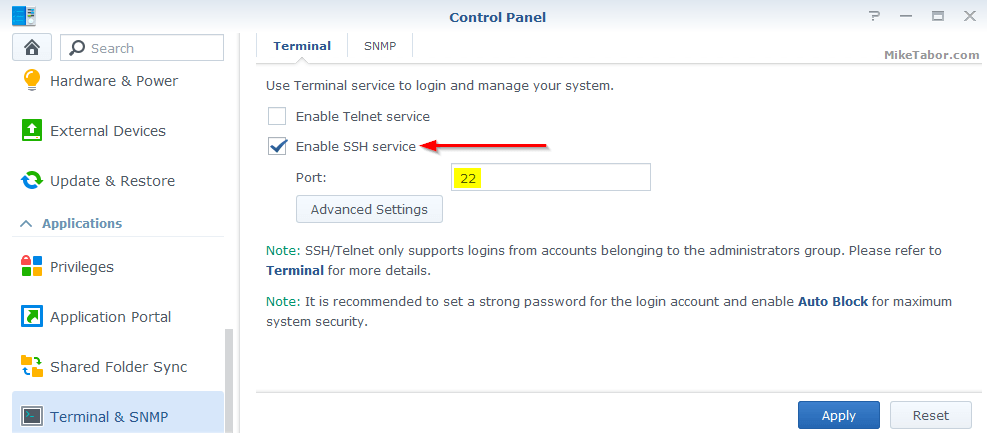
- Enable SSH on your Synology, this is only temporarily, by going to: Control Panel > Terminal & SNMP > and checking “Enable SSH service“, then clicking Apply. Be sure to make note of the SSH port number, default is 22.
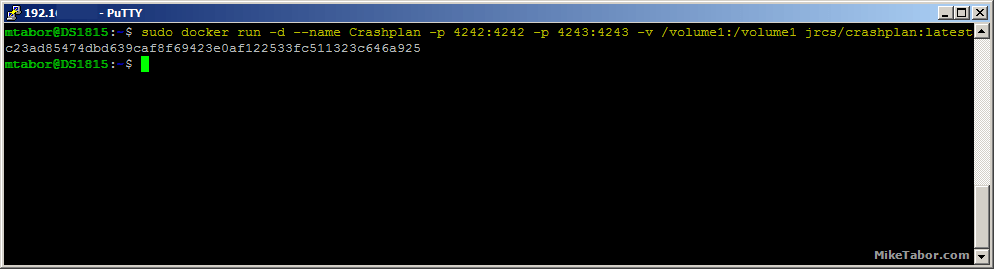
- Now SSH into your Synology using PuTTy or other terminal of your choice, using an account that has admin access.
- We first need to pull, or download, a Crashplan Docker container from the Docker Hub by typing the following command:
sudo docker pull jrcs/crashplan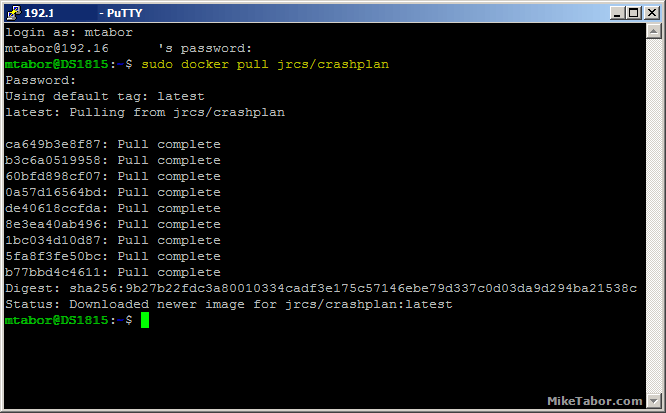
Depending on your internet connection this might take a minute or two. - Once that is finished type the following command to run the Crashplan container:
sudo docker run -d --name Crashplan -p 4242:4242 -p 4243:4243 -v /volume1:/volume1 jrcs/crashplan:latest
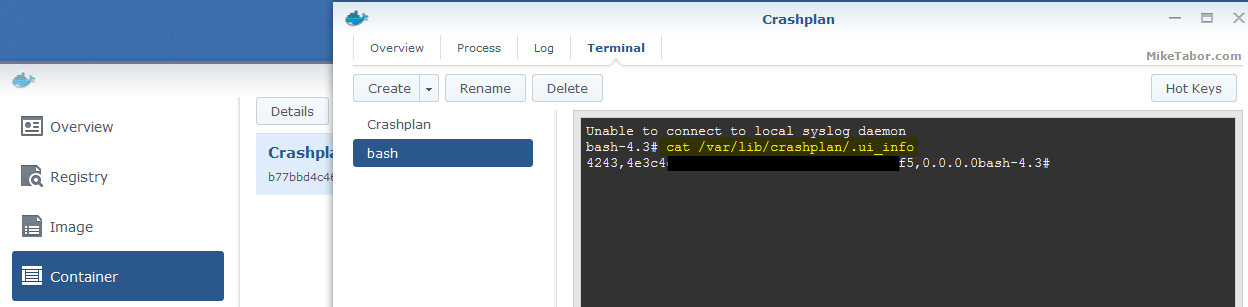
Note: If you have more volumes to backup simply add more -v as needed, like -v /volume2:/volume2 – etc. - Go back to the Synology interface and go to: Docker > Container > Crashplan > Details > Terminal > Create > Bash and type the following:
cat /var/lib/crashplan/.ui_info
- Next, go to Docker > Container > Crashplan and STOP the container. Once stopped click on Edit then check “Enable auto restart” then OK and START the Crashplan container again.
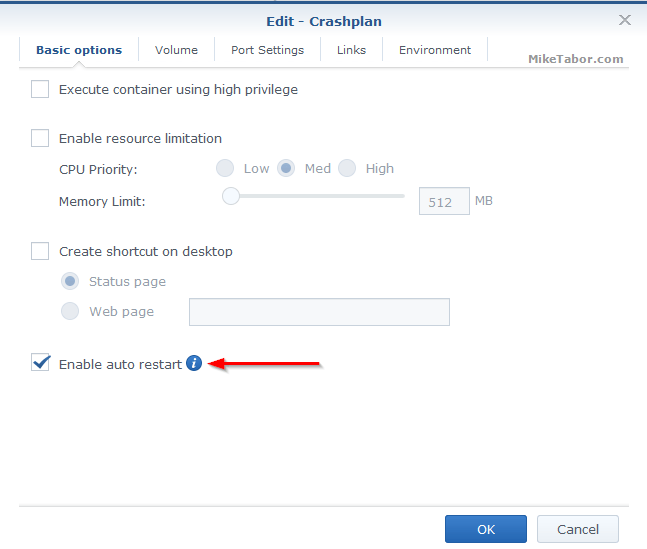 This is so that when the NAS gets restarted (think DSM upgrades) that Crashplan will auto start.
 - Now lets edit the .ui_info file located on your computer at C:\ProgramData\CrashPlan, replacing everything that might already be listed with the output from the step above. Also edit the 0.0.0.0 to the IP address of your Synology NAS. Then Save the .ui_info file, after saving it set the properties to Read-Only.
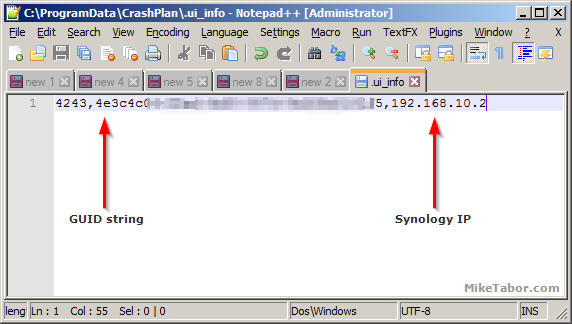
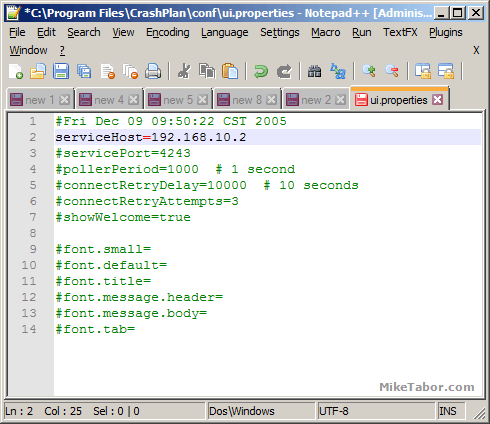
NOTE: File location for MAC users: /Library/Application Support/CrashPlan/.ui_info - Finally, edit the ui.properties file located at: C:\Program Files\CrashPlan\conf and edit the second line “serviceHost” so that it points to the IP address of your Synology NAS and be sure to remove the # at the beginning.
That’s it!
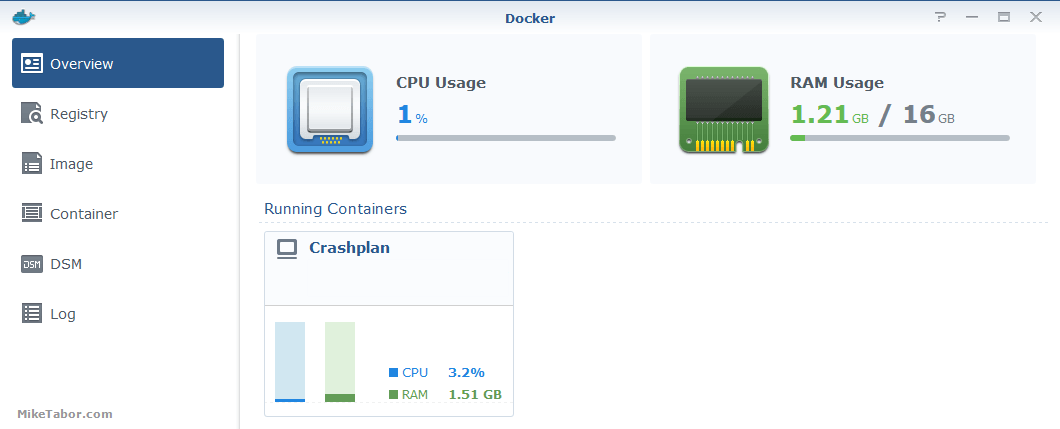
Crashplan is now running in Docker on your Synology NAS and the desktop client configured and ready for you to open it and select what folder and/or files you want Crashplan to backup.
If you’re wanting to learn more about Docker, I’d recommend taking a look at a course by Nigel Poulton called Docker and Containers: The Big Picture.
Enjoy and I hope this works as well for you as it has for me!

Good Idea! Any particular reason for creating the docker container using SSH and not the Synology GUI?
Thanks for the comment. The reason for using SSH and not the GUI was due to the inability of me selecting the entire volume. In the GUI I was only limited to selecting individual folders to backup and not the entire volume as I was able to using command line in SSH.
But it is still unable to see any files or directories in the volume.
Hi Mike, I just tried your tutorial. I have to say, if it works its much easier than Patters solution. Running DSM6 on a 1512+. Followed the directions but in the Crashplan app on my Mac (El Cap) volume1 has nothing in it. No files. Zero MB. Any ideas what may be wrong? Thanks!
I’m seeing the same issue. Any ideas yet?
I went into docker/container — stop crashplan — then edit. Volumes/Add Folder… I think it was that. Afterwards you can add all the folders and they will show up on your crashplan app. Just re-sync to start uploading. I’m going slow, folder by folder… Hope this helps
I had this same issue, and the solution I have is adding each folder manually (docker/container -> stop crash plan -> then edit. Volumes/Add Folder), but make sure you create the mount point to what it originally was… e.g. add folder/share “music” and then mount it as “/volume1/music” and when CrashPlan syncs after you adopt it, it’ll detect it and all will be well. This way will avoid having to re-upload everything again.
What helped me was adding a slash to the volume when executing the docker run command:
[…] /volume1/:/volume1[…]
Thank you! This worked for me as well.
Is there any way to get *all* of /volume1, rather than having to redo each and every mount point? I’m worried about forgetting to add to the docker instance if I create a new share on /volume1.
Thank you for the write-up! I’ve only had my Synology 1515+ for about 3 months and so still somewhat new to DSM and using Docker. I have been moving apps that were installed on the Synology to Docker and CrashPlan was the last of them which I wasn’t sure how I was going to do it and there wasn’t any other write-up specifically for Docker on Synology that I could find. On my 1515+ though, I wasn’t able to select the whole volume1 similar to what others have reported so I had to mount my main folders individually which is no big deal since I only have 5.
How is this better than the “native” installation from Patters? It will not break with every new update? Why not?
With Docker you run the application in a container. The container contains everything that crashplan needs to run. It’s not synology specific anymore, you just need docker. You could even run the container on mac or windows if you wanted to. So synology updates no longer have an effect on the crashplan application, as long as it supports docker.
And… “Official CrashPlan support [for Synology] ain’t never gonna happen”
https://forum.synology.com/enu/viewtopic.php?t=118668
Is there a way to migrate my settings from patter’s version? I rather not have to redo all my backup sets and deal with a backup adoption, which has the potential of forcing me to re-upload everything again, which can take years!
There shouldn’t be any settings from patters to docker to worry about. In the crashplan client on your desktop you would just tell it to migrate to the new setup thus allowing you to pick up where you left off and not having to re-sync everything.
Do you use backup sets? I only have a single volume to backup but I have it broken down into many backup sets to reduce memory usage. I believe the backup set data is in crashplan/conf/my.service.xml. Do you think I can just copy that file over?
According to crashplan, adopting a backup should also bring over backup sets. I’m going to test this with a new account before I try this with my main account.
thanks! this is working great on my ds1515+
Glad to have helped!
I can get the Crashplan UI connected but not for long then I get a message that it was disconnected from the back engine. Whats fix for that?
Any answer as to why this is better than the package?
Also, UI apparently can’t follow the volume1 mapping. I can’t afford to try and re-map and re-upload everything due to the backup sizes.
Would it be possible to create a container for CrashPlanPROe?
Many thanks in advance
I would love this too.
I just installed the container on DSM 6 and got this warning:
…
Status: Downloaded newer image for jrcs/crashplan:latest
docker.io/jrcs/crashplan: this image was pulled from a legacy registry. Important: This registry version will not be supported in future versions of docker.
—-
So, what’s the plan?
I got the same message.
I installed crash plan successfully but I can’t get the desktop client to connect to it. I’ve edited the .ui_info file and the ui.properties file with the appropriate info with no success with getting a connection. Ideas?
I made the mistake of just SSHing to the Synology and got the wrong /var/lib/crashplan/.ui_info file in the host filesystem. You have to use the bash terminal in the package application to get to the container’s local filesystem’s copy — they are not the same thing.
Ah. That could be it. The problem I now face is there is no bash terminal within the package application. When I go to container>crashplan>details>terminal>create there is no bash option.
Yes I got the same. Got round this by using SSH to my NAS then using:
sudo docker exec -it Crashplan /bin/sh
where Crashplan is the name of your Docker container to get to the command prompt of the container in order to run the cat command.
Tried this and I still can’t get a connection from the desktop.
That is correct, SSH won’t return the correct info. Use Bash.
Works for me using SSH or bash. SSHing to NAS then either:
sudo docker exec -it Crashplan /bin/sh
or
sudo docker exec -it Crashplan /bin/bash
From either I can then run:
cat /var/lib/crashplan/.ui_info ; echo
To return the NAS client GUID
It can’t seem to apply the upgrade:
[05.11.16 06:51:15.812 WARN 0055_DwldMgr .service.upgrade.DownloadManager] DOWN
LOAD:: Unable to download patch. url=https://download.crashplan.com/installs/lin
ux/upgrade/crashplan/1435813200470_317.jar, FileTransferException [srcPath=/linu
x/upgrade/crashplan/1435813200470_317.jar, errors=[MESSAGE_ERROR]]; DownloadMana
ger[patchDir = upgrade, patchFiles = [1435813200470 (2015-07-02T05:00:00:470+000
0)], patchProblem = false], FileTransferException [srcPath=/linux/upgrade/crashp
lan/1435813200470_317.jar, errors=[MESSAGE_ERROR]]
STACKTRACE:: FileTransferException [srcPath=/linux/upgrade/crashplan/14358132004
70_317.jar, errors=[MESSAGE_ERROR]]
at com.backup42.common.filetransfer.FileTransfer.transferFile(FileTransf
er.java:320)
at com.backup42.common.filetransfer.FileTransfer.execute(FileTransfer.ja
va:161)
at com.backup42.common.filetransfer.FileTransferService.transfer(FileTra
nsferService.java:327)
at com.backup42.common.filetransfer.FileTransferService.transfer(FileTra
nsferService.java:305)
at com.backup42.service.CPService.downloadByMessaging(CPService.java:379
6)
at com.backup42.service.upgrade.DownloadManager.downloadPatch(DownloadMa
nager.java:242)
at com.backup42.service.upgrade.DownloadManager.downloadPatches(Download
Manager.java:186)
at com.backup42.service.upgrade.DownloadManager.doWork(DownloadManager.j
ava:133)
at com.code42.utils.AWorker.run(AWorker.java:148)
at java.lang.Thread.run(Unknown Source)
[05.11.16 06:51:15.813 WARN 0055_DwldMgr 42.service.history.HistoryLogger] HIST
ORY:: Download of upgrade failed – version 1435813200470, connection lost.
[05.11.16 06:51:15.819 WARN 0055_DwldMgr 42.service.history.HistoryLogger] HISTORY:: Unable to apply upgrade(s), retrying in one hour
crashplan is working good, but if i restart CP it needs every time to do time synchronizing of the backup, somebody know howto fix it?
synchronizing backup progress*
Same for me. Is this normal for the docker install?
TY great Job! I hope that this will definitively avoid the problems at each crashplan forced update. NB: Java can be de-installed too.
Elwood
Thanks Elwood. Yup Java can also be removed from your Synology.
NB2: to avoid to resync the former CP backup, you can select “adopt this new computer” at client Start-up page
Hi. I tried this and although everything installed and setup fine, the backups are VERY slow. I thing I was only getting 85 kbps up.
Hello Michael,
First of all thank you for the tutorial , greatly appreciated.
Quoting Brooklyn70: “I went into docker/container — stop crashplan — then edit. Volumes/Add Folder… I think it was that. Afterwards you can add all the folders and they will show up on your crashplan app. Just re-sync to start uploading. I’m going slow, folder by folder… Hope this helps” .
Any other solution to backup volume1 directly without adding sub folders ? I am looking to backup @appstore folders and can’t access this one with this method.
I was able to re-create the volume mapping in the GUI. I have one share (share1) that I was backing up, so I changed the container config to mount /share1 as mount path /volume1/share1. Crashplan thinks it’s the original location.
This almost worked for me, except my LAN clients could NOT see my CrashPlan server. It was reporting it’s internal IP as 0.0.0.0. Everything worked fine for clients outside of my NAT.
Yeah for me the container has an IP of 172.17.0.2, so my internal backups are trying to reach that address, unsuccessfully of course. Not sure how this could be fixed, because according to a crashplan doc this internal IP is read-only, obtained from the OS.
Ok, I “fixed” it in a hokey way. I added a virtual IP, 172.17.0.2, to the WAN port on my firewall, and added a NAT port-forward to my internal NAS address for port 4242. Now my client can reach 172.17.0.2 (an IP on the WAN interface) and the traffic gets reflected back into my NAS.
Agreed with hokey… I’m not even sure if that is legit to use a private IP on the public internet. I think I’ll hold off on this docker solution until this problem gets worked out with a better solution…
That IP certainly wont be reachable from the Internet, but shouldn’t cause any harm.
I fixed it by running the container using a host network connection, now the CrashPlan is using the Synology’s IP address.
Can you tell us how you configured this? I cannot add the container to the host network connection, only the bridge.
I’d like to see synology change this, but for now you either have to set it to use the host network when first creating the container, or if you don’t want to start over, open a terminal and edit the container config file – /var/packages/Docker/etc/name-of-package.config (of course replace “name-of-package” with whatever your container is named) change “use_host_network”:false to “use_host_network”:true
Sorry, *nix noob here. How do you change the command sudo docker run -d –name Crashplan -p 4242:4242 -p 4243:4243 -v /volume1:/volume1 jrcs/crashplan:latest to use Host mode and not Bridge mode?
I tried adding –network=host to the end, but the container still shows in ..>bridge
muddled through the –help files and ended with this:
sudo docker run -d –net=host –name Crashplan -p 4242:4242 -p 4243:4243 -v /volume1:/volume1 jrcs/crashplan:latest
which worked.
Mine had an IP of 172.17.0.2 so I tried this and now it has an IP of 0.0.0.0, which isn’t really better.
Did you ever solve this? I’m seeing the same issue.
After creating the crashplan container, how do I add another root volume (eg: /volume2:/volume2)? The gui doesn’t let me mount at the volumeX level, which is important so I can recreate the exact same folder path as seen by the non-dockered crashplan app.
I ended up just deleting the crashplan container and recreating it with the correct volumes attached. Do you think there is any issue if I mount the volumes as readonly? I should only be reading data from them for the backup.
Running docker on my ds1812 seems a bit slow as it takes about 5 minutes after crashplan starts before it creates the .ui_info file. When running a backup, I see that a java process is using most of my cpu. So is the crashplan app in the container still the java version? I suppose the big question is what will happen when it upgrades to the non-java version? Anyway to force the upgrade now?
@WoodiE55 Thanks for this great tutorial. One quick question though. By doing this method, will crashplan running on docker update itself when a new update is available or do we have to fiddle with it again (like we did with pcloadletters?)
@WoodiE55:disqus Thanks for this great tutorial. One quick question though. By doing this method, will crashplan running on docker update itself when a new version is available or do we have to fiddle with it again (like we did with pcloadletters?)
i need to backup @appstore folder but cant select it using gui? help
I can’t seem to get the desktop app to connect. The splash screen of crashplan just sits there. I followed the above instructions, but just can’t get the app to connect. As anyone else experienced this?
I experienced the same but it was due to not inputting my server IP address on the .ui_info file. I didn’t replace the 0.0.0.0 with my server IP.
In my case, I accidentally didn’t copy the last character of the GUID, leading to the same behavior.
Thank you for the tutorial. Docker and Crashplan appear to be installed fine on my Synology DS412+ with DSM 6.0. However, I cannot connect a client.
A little background – For a couple years I could connect using the PC Load Letter version but around May 7 or 8, 2016 it stopped working when it updated to v 4.7. From there I could get 4.6 running (PC Load Letter’s version) but have yet to connect via the client, running in Windows 10.
This led me to the Docker version. After uninstalling PC Load Letter CrashPlan and Java, I now have Docker installed with CrashPlan per this tutorial. However, I still cannot connect via a client. I tried another Windows 10 machine and my Mac, with no dice. In Windows 10 I tried CrashPlan 4.3, 4.41, 4.5, and 4.6. I’m convinced I have the key and IP address correct.
During troubleshooting I discovered the following in the log.0 on the Log tab in Docker. It appears over and over with the port following the “remote-172.17.0.1” IP different for each instance.
[05.15.16 17:17:34.073 WARN 504701853538 saging.security.SecurityProvider] SP:: GeneralSecurityException: finalizeExchange, remote client likely has an invalid PbK. Closing session. Session[id=742534504701853538, closed=false, isAcceptor=true, remoteIdentity=ENDPOINT, completedAuth=false, lat=2016-05-15T17:17:34:017, lrt=2016-05-15T17:17:34:017, lwt=2016-05-15T17:17:34:011, #pending=0, enqueued=false, local=172.17.0.2:4242, remote=172.17.0.1:59910, usingProtoHeaders=true, usingEncryptedHeaders=false, LAN], javax.crypto.BadPaddingException: Decryption error
My guess is this may be the source of the problem. Does someone have an idea of what this means and how to solve?
Thank you in advance!
Hi. Thanx for this tutorial. I got it up and runnin’! Can I close the CP client on my desktop, or is it needed for the Synology Docker installation? Grtz Bert
Bert, you’re most welcome. Glad to be of some help. Yes you can close the crashplan client on your desktop. It’s not needed for the backups to work.
Like many of us I got fed up with the classic PC Load Letter version constantly breaking after upgrades. And when I found this Docker possibility I was hooked. I got things up eventually (giving permissions for file system, adopting previous backup config in Crashplan client, etc) and things started looking nice and shiny. After the client run the Synchronize part however I got stuck with the message “Waiting for backup” :( Any hint anyone?
How about CrashPlan PRO – anyone know of a docker package which supports CrashPlan PRO?
In the Docker registry, you can search for “crashplanpro” and there are 2 to choose from. One is out of date (v4.4), but rungeict/crashplanpro is version 4.6. I’m just having problems connecting the client to it.
I tried using rungeict/crashplanpro in a new container, but I also couldn’t get connected via the client to it.
I tried the client on a different computer (client version 4.7) and it worked perfectly. While the server is running 4.6, I had to upgrade the client to 4.7 on the original computer and it connects now too. I adopted the settings from the old CrashPlanPro instance and it has been verifying the information for a few hours. Success!
Good reminder, upgrading the local instance to 4.7 allowed me to connect. The docker image for CrashPlanPRO also appears to have upgraded to 4.7 on its own as well. So far so good.
Fantastic post !! But I also have 2 USB drives connected to my NAS – how can I add them through Docker so that I can use them in Crashplan?
Did you figure this out?
Thanks for this tutorial; really helpful. I was able to install Crashplan on my NAS via docker, remote GUI loads up and I see the files and folders I want to backup. However, CP seems to have issues with the Internet connection, it can’t connect to the CP Central server and it can’t show my other computers (to adopt my previous backup). Also, on the network tab, the CP internal IP address is shown as 0.0.0.0:4242 (while the external is correct). If I connect to the shell of the docker container, I can ping to the Internet.
Any suggestions? Thanks.
Thanks for the walk through. One suggestion, however: include “-v /etc/localtime:/etc/localtime:ro” in the command used to run the container. This synchronizes the host time zone with the container time zone and saves headaches if you’re trying to set run schedules.
Is it possible to fix the time after the fact? My crashplan clock is now 5 hours ahead of the current time?
Thanks
Hi my synology DS1515+ keeps giving me a ip of 172.17.0.3 were as my home network is 192.168.1.??? how can i stop the NAS/Docker giving me that default 172.17.0.??? ip to all my containers i install?
Thank you Mike for posting this. This is such a huge help to me and many others. I really appreciate it.
Mike, thanks for this. Got CrashPlan running nicely inside Docker. I am having an odd issue where CrashPlan sees the /@docker folder as ~140TB. Not sure why. I can exclude the @docker folder in CrashPlan but I’d rather have CrashPlan backup the whole volume directly. Do you have any thoughts?
Looking forward to this. Two quick follow ups
1/ Sadly just mounting /volume1 doesn’t appear to work on the latest DSM, it doesn’t actually mount any of the directories there so you end up with a 1 file, 0 byte backup (I actually clobbered my old backup with these instructions!) Instead I had to go through the Docker UI and manually add every volume there (though of course you could do this on command line) and now it is picking them up.
2/ Any idea on how to increase the memory limit for Docker? One nice thing about the old process (perhaps the only nice thing) was that it was easy to bump up the memory usage as I have lots of RAM on my NAS…
I’ve been able to install Crashplan into docker and connect via the client on my laptop, but it keeps calculating the size of the back up, and never finishes. For example, I open the client on my desktop, it connects and shows the folders I’ve added to volume1/ and goes through the process of counting the number of files and size of back up, after getting through the first few folders, the client closes on my laptop. When I reopen it starts back over again. Please help.
Great post, got it up and running using the additions in the comments about adding the folder through the GUI. The only problem I have is that CrashPlan is unable to watch the file system in real-time. So any changes to the backup set will go undetected untill the next full backup scan. Patters version did support this.
Has anyone been able to get “Watch file system in real-time” to work?
the synology docker/crashplan setup works great. However, I am having an issue with /Libriary/Application Support/CrashPlan/.ui_info file on my mac changing. Any suggestions?
Does anyone have the issue of Crashplan stopping every now and then.? Mine worked fine after setting this up for almost a couple of weeks after which it started crashing. It works fine for a while after restarting it and later stops again. Where do i check for error logs etc?
Mike…this is all well and good except there appears to be no persistance for the container. Crashplan will not restart after the first start of the container.
@davetenberge:disqus You should change file properties to read only after edit.
@sriramvt:disqus Mine has entered a reboot loop as well, crashing each 5 minutes…
The size of my backup needs the memory hack for Crashplan to operate properly. Crashplan is also unable to monitor file changes in my backup set in real-time, probably due to the amount of files. I just don’t get why Patters package could get this to work properly.
Same with me – ~2TB backup image with many, many files. Any suggestions on how to expand memory here to keep it from crashing?
Kix, try this to expand the java heap size:
1. Open the CrashPlan client.
2. In the upper right corner, double click on the CrashPlan logo.
3. Type the following command in the window that opens:
java mx 2048, restart
4. Open the CrashPlan app again and you should have to re-sign in.
At that point CrashPlan should be configured to use a 2GB java heap size.
-Michael
Great set of instructions. However, I am having an issue on one Synology, perhaps after a Docker update. Latest version of Docker and DSM but when I try and start my container, it says Docker API has failed. The log shows “error starting userland proxy: listen tcp 0.0.0.0:4243: bind: address already in use”. I attempted deleting the container, full restart and new creation but still no joy. Any ideas? No other packages are installed or running.
I’m new to Synology (1815+). What is different about this vs. just adding the network volume through the Crashplan on my always on Desktop? I have autofs setup on my iMac (that again is on all of the time), so that the volumes are always present. I selected those in Crashplan, and all the data on my NAS is backed up to Crashplan.
What is different about this approach?
Patrick,
If you’re mounting all your volumes to your Mac computer and okay with leaving it always on then having crashplan installed on it and doing the backups is just fine. Having Crashplan on the Synology allows you to not be dependent on one computer always being online or having to mount every volume on a computer.
-Michael
Thanks, makes sense. If I would follow the approach in your article, does that give Crash Plan a direct connection essentially from the NAS? The reason I ask is because I moved my data to my NAS and followed my approach, and it is taking forever to index the files. A direct connection to the computer on a USB 3.0 drive took 8 hours, through the NAS it is in its second day with another 3 days projected left. This is 4.5 TB, so I don’t expect it to be blazing fast. However, my setup with the NAS seems much slower.
Hey all,
I have the docker up and running and a client connecting. I am trying to adopt a previous backup of 3TB and am obviously going to need to set memory to 3GB or larger. Linux and docker are not my strong suits but i can get around in SSH etc. I could use some help in finding and altering the files necessary to up the memory size from default.
Thanks for any help you can provide!
James
I started with DSM 6.0.2-8451 on my DS1512+. Unfortunately, I took the instructions to remove the PC Load Letter install too far. I removed Crash Plan as well.
The problem is in the 2-8451 update, Crash Plan is not longer in the Package Center. So the “sudo docker pull jrcs/crashplan” doesn’t work. The result is a little surprising. I will attack below…
——
After password is accepted…
admin@DiskStation:~$ sudo docker pull jrcs/crashplan
We trust you have received the usual lecture from the local System
Administrator. It usually boils down to these three things:
#1) Respect the privacy of others.
#2) Think before you type.
#3) With great power comes great responsibility.
Password:
——-
Thanks for any help!
Mike thank you for your awesome post. I finally have a reliable crashplan solution and it is finally uploading at a reasonable speed(OK it could be faster)
I now have a new challenge. I have 2 syonolgy 2415 and 1813 they are both configured with the docker crashplan. I can see them from my windows 10 desktop. however they can not see each other.
From my limited investigations and skills I think it may be related to the IP which are given to the docker 172.x.x.x . Any suggestions on how to fix this. Once the initial 6TB backup is done I will move it to my brothers house
I was wondering if anyone had tried the gfjardim/crashplan that includes the client. Would this not be an easier install/setup/management?
I know it’s 6 months late to reply.. :)… But I am, and it seems to be working fine.
Fixed an issue and thought I’d share here in case anyone else runs into it. The docker image update from 4.7 to 4.8 broke Crashplan. There’s a reddit thread with a fix at https://www.reddit.com/r/synology/comments/550806/best_crashplan_docker_image/d87beo9. The docker image has now been updated to fix it going forward. https://github.com/JrCs/docker-crashplan/commit/84f377b44f5bf07d1ca2ce409f3731ad635696a1
I also got fed up with the upgrade always failing with the pcloadletter. Docker Crashplan It now installed and seems to work. I only have one big issue. Docker dont seems to have access/permission to many of the sub directories or files in the volume1 drive. It can see the drive and some part of it. What is required to make sure the docker crashplan can see all files on the volume1 volume? Any tips on how to fix using the Synology gui or command line/script would be appreciated.
BR Jan
I’m finding that I can’t have friends backup to my NAS now, as well as getting some odd output and having Crashplan tell me I have 0 files backed up.
Perhaps I am missing something. Step 5,
Go back to the Synology interface and go to: Docker > Container > Crashplan > Details > Terminal > Create > Bash and type the following:
cat /var/lib/crashplan/.ui_info
Nothing happens…selectiong “Create” by itself generates no change on the screen. Using “Launch with Command” give me a prompt but”bash” nor any other linux command generate an output.
What am I missing….
Docker is being assigned a non-routed 172.x.x.x address…how do I modify the settings so it gets a 192.x.x.x address, along side of the other servers on my network so it is accessible from a workstation….
If the docker image was setup correctly you should be able to telnet to 192.x.x.x 4243, there’s a NAT going on from your Docker Server (Synology) to your docker image (Crashplan). If you want the 172.x.x.x to be routable from your LAN, you can add a static route on your main home router to the 172.x.x.x network.
Something like this: 172.17.0.0 255.255.0.0 gateway synologyIP Metric 0
Then you should be able to ping your 172.x.x.x assigned IP from your home computer or other computers on your 192.X LAN. You should also be able to telnet to 172.X 4243 ip from your home LAN. It’s really not needed but in case you absolutely need to or you got other docker images outside of Crashplan that you want to route to, it can come in handy.
so close. I adopted the backups previously executed by the PC LoadLetter headless method…by my ‘homes’ data is no missing after adopting previous backup. Also, when I attempt to modify the directories archived….the /homes share is empty, it does not show any use directories.
So near…yet so far. I’d pay serious money if Sinology and Crashplan would partner and fix this.
Thanks for the instructions. I am a bit new to Crashplan, but wanted to set it up so I can help my in-laws backup their PC to my local NAS. However, I would like to also setup Crashplan to backup my PC to the NAS. When I install Crashplan locally based on these instructions, I cannot seem to select the files on the PC where I installed the client that I want to backup to the NAS. Or is that not the point of this setup?
Craig,
Yes the point of this setup is to run Crashplan on the Synology device itself making managing all your devices easier while also costing less as a single PC subscription with Crashplan is all that’s needed.
So using this solution as detailed above, you’d want to then set your computers to backup to the NAS. So it’d look something like this COMPUTER –> NAS –> CrashPlan.
I thought that CrashPlan was smart enough not to backup other CrashPlan data files to prevent this scenario. It’s still good to backup to your NAS, but don’t think that your COMPUTER in the above diagram is automatically backing up to CrashPlan cloud.
How do I access the .identity file on the NAS since it is not pointing to my current backup and creates a new backup instead. I can’t seem to find it when I SSH into the NAS.
Thanks for this tutorial!
For those of us who are a bit slow, can you elaborate on what is happening? What exactly is running on the Synology, and what is running on the computer? Is the computer just providing the CrashPlan GUI?
Is it possible to have CrashPlan backing up the desktop (a Mac in my case) AND the Synology?
Your tutorial has us changing the settings on the Mac so that it’s pointing to the Synology. Is that a “Set it and forget it” type of thing? Can I switch the settings back to the way they were before and keep both backing up?
@bryanomalley:disqus You are correct, the copy of CrashPlan installed on the computer just provides a GUI interface to configure what you backup and how. Actually once you do that you never need the GUI again as the CrashPlan service is running on the Synology in the Docker container.
Is there a way to confirm it is running properly without access to the gui? I got it all setup and working and accesed through the gui. Adopted the previous backup and it was synchronizing. I am now not able to get the gui to connect. On the crashplan website it says it is connected “>1 min” but I created a test folder which has not yet registered.
Just a few points for those with mac and basic knowledge of unix (like me):
* You may list all files (even .*) in finder by executing these two commands in terminal:
1) “defaults write com.apple.finder AppleShowAllFiles YES”
2) “killall Finder”
which kills and restarts finder with new priviliges
* You set file privileges with command “chmod”, suitable in this case “chmod 666 .ui_info” to able writing, and then back to “chmod 644 .ui_info”.
* Depending on version and how the client was installed you might find ui.properties named ui_USERNAME.properties, and in the folder above /conf. In my case I had to add “serviceHost=x.x.x.x” myself.
Hi,
I know this is late, but I just started with a Sinology NAS and am trying to install. I can follow the directions, I have it installed in Docker and it is running.
I can not find the .ui_info file on my computer. I am running a Mac. I can find the .ui_properties file and I have made that change.
Any help would be appreciated.
Thanks!
First, you need to allow Finder to show hidden files. Google this topic or try this link: http://ianlunn.co.uk/articles/quickly-showhide-hidden-files-mac-os-x-mavericks/
Then, navigate to
/Library/Application Support/CrashPlan/
to find the ui_USERNAME.properties file.
I am hoping someone here can solve this for me as I need to get this running. I follow the steps get it running and all is good. If crashplan has to restart for any reason (computer restart, program crash, etc.) I get unable to connect to the backup engine. I went and tried recreating the entire container all over and everything was good. Did the command to increases the memory and get the unable to connect error again. I went back into docker again and did “cat /var/lib/crashplan/.ui_info” to see what happens. now instead of the ip at the end being 0.0.0.0 it is 127.0.0.1.
Thanks in advance
Did you set the .ui_info to read only on the client?
Yes, I did set it to read only. Tried to redo the container several times. The same things happens after a while after each time. There was answer about setting the container to use the host network, but I have not had a chance to try it yet.
I have the issue that Crashplan only binds to tcp/6 port 4242 and not to the tcp/4 port. Seems like a common issue under Docker that has been fixed in the core, yet keeps popping up. Any ideas how to fix for this particular image?
Great Article thanks -a real life saver. One issue that has occurred after using this solution for several months.
When initially starting the container I mapped the root volume (as in step 4) however I only wanted to back up certain folders therefore I mapped the folders I needed from within the docker UI on the Synology. Last night for some reason that I cannot fathom the docker container dropped the additional mounted folders from it config. This resulted in the the backup engine reporting these folders as “missing” the end result was that the backup engine thought that the files had been deleted and thus deleted the files from crashplan!
I have remapped the folders and will start the back up again but it is frustrating none the less – any ideas how to make the mapping of the folders persistent?
I set this up a couple months ago and it was running successfully until a couple weeks ago. The process is running (the docker container) and I can connect to it via docker, but I can’t get a headless client to connect and the backups aren’t running. Code42 says that Docker is not a supported platform so they can’t help me. They said that there is nothing unusual in the log files.
Has anyone else seen this problem?
It started working again. Not exactly sure why. I can see that the Synology DSM File Station was updated a couple days ago and at about the same time that the Crashplan in Docker stopped working it was updated also. So perhaps Synology put out a dud update. Phew that it has been restored.
Like Brooke – My headless client stopped working a few weeks ago too. I’ve tried everything I can think of. Including – reinstalling CrashPlan on my PC, redoing the config on client PC, reverting back to ver. 4.8.0 on my client PC (current version is 4.8.2), verifying my NAS configuration in Docker, reinstalling the container in Docker.
Watching the terminal in Docker I can see my client attempting to connect when I use 4.8.0 client, but it doesn’t ever actually complete. Eventually the client on the PC times out and asks to retry.
Any thoughts?? This was working SO AWESOMELY before!
Yay! It started working again for me too.
I tried this approach and got an error on Step 4 indicating the port has already been allocated. (Error response from daemon: driver failed programming external connectivity on endpoint Crashplan (…)): Bind for 0.0.0.0:4242 failed: port is already allocated.)
Docker setup was easy and very simple to do, thanks for that. However I have an issue with the client as it is showing that the files are missing. I tried to fix it without any luck. Thanks.
Thanks so much for these instructions! I’m curious: did you encounter the issue where /volume1 was empty when mounted in the container? I’m kind of new to docker and have no idea how to troubleshoot. Used your exact instructions…
Thanks for this article. I successfully migrated to the Crashplan container on my DS712+ w 4GB RAM. I will warn everyone I had a awful time getting it to work with a 2.3TB NAS backup. Be sure you read up how to adopt from a previous backup. Be sure to adjust your max heap size also. Then it worked fine.
However, once I adopted the previous backup, I am unable to backup the @appstore folder. Ii does does not appear on the list when you Add folders. Any help would be appreciated.
Thank you so much, I just switched over from pcloadletter, which apparently hadn’t worked on my Diskstation for over a year.
Hi,
just moved from the pcloadletter crashplan installation to the docker based one. Was tired of the updates breaking crashplan all the time.
The docker is running and the windows client connects BUT it is not showing the existing NAS backup in the client also the serial is not in the client anymore. when I want to enter my serial it says it would delete the old 4 TB backup.
Is there a trick to assign my exiting backup to the docker instance ? i dont want to send 4 TB over the net if I dont have too. Im on a comcast 1 TB/month plan…
thanks in advance,
Christian
HI, The time zone offset in in Docker>Container>Details>Log is wrong.
I set this to -e TZ=America/Los_Angeles yet it shows 20:24 while it is 1:24 pm here
How do I set this to US West Coast or Pacific time ?
Crashplan doesnt bachkup all the files, depending on the mapped volume. Any idea ?
see description : https://saturn.m-christen.net:1000/ns/sharing/hZAOu
with crashplan cancelling the consumer client plan and app, does anyone have found a similarly cheap alternative?
My reason for coming back here too!
I was hoping someone here might be able to construct and document a similarly easy to setup backblaze b2 solution in docker on a Synology. My Synology is slightly older (DS1010+) and therefore no DSM6 available for cloud sync (supports B2 storage). There is also the small issue that cloud sync on the synology does just that, sync. Sync and backup are not the same (I would prefer versioning and the ability to restore from a point in time if something is deleted/corrupted and synced). I managed to almost get there myself with docker, duplicati and B2 however i struggled to get the solution/cofnig to survive a docker or NAS restart. Files were backing up however.
Simon,
I’m working on a Backblaze article now. I’ll add doing a docker solution for backblaze to my list as well.
Thanks,
-Michael
@SimonB83:disqus I’ve published the backblaze article this morning – https://miketabor.com/install-backblaze-synology/
My backup was going very well to date but after having to power cycle my Synology, my list of folders/files on the client shows that they are missing. When I click on ‘Change’ they appear greyed out although they are available on the NAS and I can access them on my Windows machine via network share.
Can someone help please? I’m not sure if I have to reinstall and reinitiate the backup again?
I am having the same trouble here. Any updates?
Hi, any plans to make a crashplan for small business docker now that Crahsplan home is discontinued ?
Hi! I’m just setting up a Synology DS1817+ with a whopping 36.6 TB of usable space. We’ve only got about 10TB filled right now. More as we grow the business.
A couple of questions: –
– is this method stable? My client is not at all technically savvy and it’d be on me (for a service charge) to fix it if it breaks.
– does this still rely on the “backing up a network share to Crashplan” method? Or does the backup happen right from the Synology NAS?
– is there a GUI for backup & restore?
Thanks!
Hi. This looks pretty good. Is there any chance you would share the recipe for creating the container object in the first place? If we could build our own we can stay up-to-date if we want and you can avoid conflicts that CrashPlan might have regarding distribution.
Excellent write up. Might I make one suggestion and ask one question?
Suggestion – Update step 8 for Mac users giving them the path to the file: /Applications/CrashPlan.app/Contents/Resources/Java/conf/ui.properties
Question:
When I try to add directories to be backed up, I can definitely see the root structure (root, storage, volume1). But when I select volume1, nothing else is expanded. Can you confirm if any additional permissions are needed for this to work?
For those seeking to install Crashplan Small Business (formerly Crashplan Pro): I’ve had success following the instructions of Chris Nelson at: http://chrisnelson.ca/2016/05/22/crashplan-and-crashplan-pro-on-synology-using-docker/
Additionally, for the other noobs out there like me: Don’t forget to bind your container’s network connection to “Host” instead of bridge, by adding “–net=host” when performing the “docker run…” command line. This will keep the IP address of the crashplan service the same as your NAS’ (making your “service host” steps easier).
CrashPlan for Home has been discontinued.
https://www.crashplan.com/en-us/consumer/nextsteps/?AID=11669504&PID=6164706&SID=jaxwf8vrse013t3g04337&utm_source=CJ&utm_medium=Affiliate&utm_campaign=CJ_Affiliate
After a few attempts with Patterson package that were keeping breaking and then, the headless computer which got unsupported from version 6, I finally found a tutorial that works with my Synology and CrashPlan Pro. Please follow this tuto at https://crashplanbackup.com/crashplan-pro-crashplan-for-small-business-using-docker-on-synology-march-2018/