Running Ubiquiti UniFi controller in Docker on Synology NAS
Recently I posted how to run the Ubiquiti UniFi Controller in the cloud using services like Linode, Vultr, or DigitalOcean. However, a few people has asked if I could post instructions on how to run the UniFi controller in Docker, similar how I have CrashPlan running in Docker.
For the steps below I’ll be using my Synology DS1815+ NAS which is compatible to run Docker. If you’re unsure if your model support docker or not you can check here.
How to install Ubiquiti UniFi Controller in Docker on Synology NAS
I’ll assume your Synology NAS does support Docker and you’ve already installed the Synology Docker app on your Synology NAS.
- SSH into your Synology NAS using PuTTy or other terminal of your choice, login using your account with admin access.
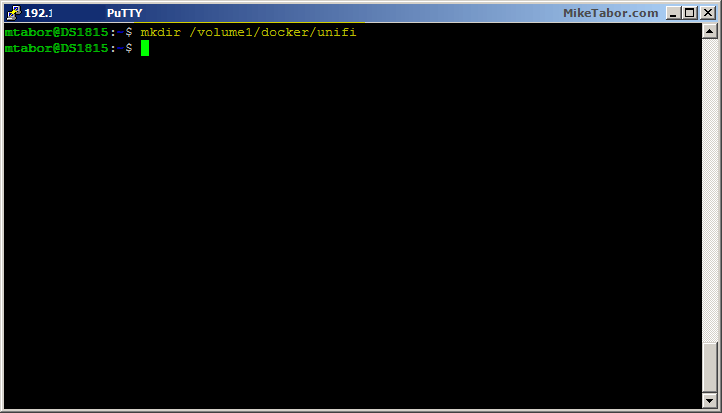
- First lets create a new folder called “unifi” located in “docker“, this will be used to store all our UniFi Controller configs, so when we upgrade the Docker container our configs remain in place. (Replace volume1 with your desired volume)
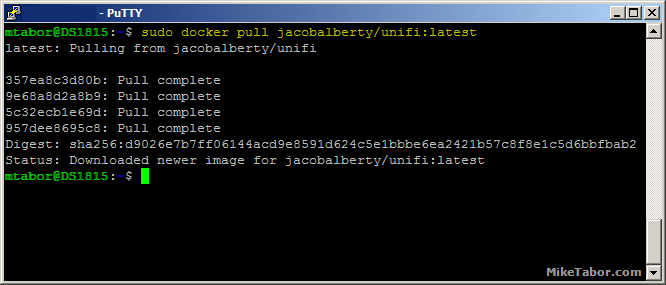
mkdir /volume1/docker/unifi - Now lets pull, or download, the UniFi Controller Docker container from the Docker Hub by typing the following command:
sudo docker pull jacobalberty/unifi:latest - Next lets run the new UniFi Controller container by typing the following, again replacing ‘volume1‘ with the volume you create the unifi folder on.
sudo docker run -d --init --restart=unless-stopped --name=unifi-controller --net=host --volume=/volume1/docker/unifi:/var/lib/unifi -p 8080:8080/tcp -p 8081:8081/tcp -p 8443:8443/tcp -p 8843:8843/tcp -p 8880:8880/tcp -p 8883:8883/tcp -p 3478:3478/udp jacobalberty/unifi:latest - Now finally, open a web browser and go to: https://<SYNOLOGY_IP>:8443
Configuring Ubiquiti UniFi Controller in Docker
Now we’ll just need to finish the UniFi controller setup by following the wizard once you’ve loaded https://<SYNOLOGY_IP>:8443 in your browser from the above steps.
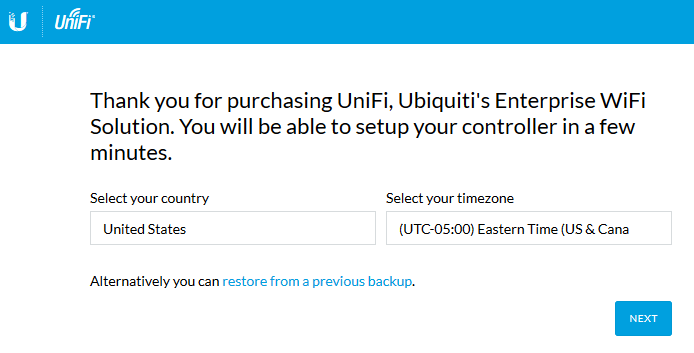
- First, set your country and timezone then click Next.
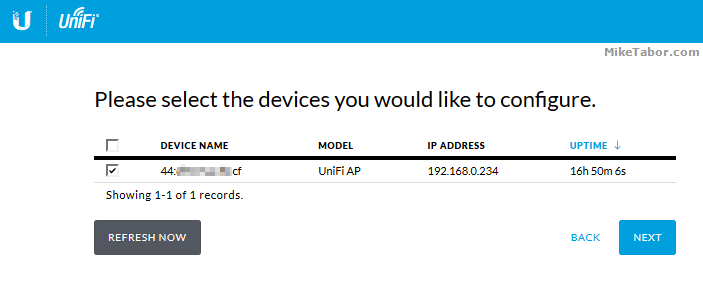
- The UniFi controller will automatically find any access points on the same network, select the access point you’d like to configure for the Docker UniFi controller to manage and click Next.
- Enter the SSID you’d like your wireless network to be named and a password then click Next.
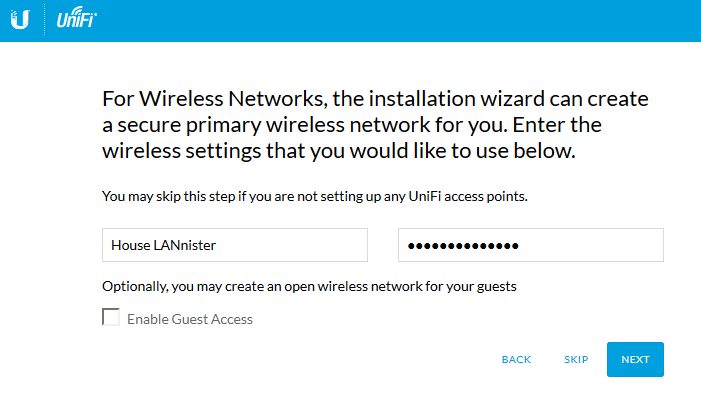
Optionally, you can also configure a guest wireless as well by checking the “Enable Guest Access”. - Now set the login user and password. This will be used to access the Docker UniFi Controller management page. Then press Next.
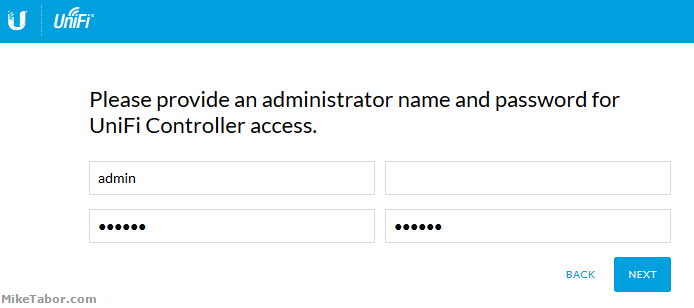
- Finally, review that the SSID and User names both look correct then press Finish.
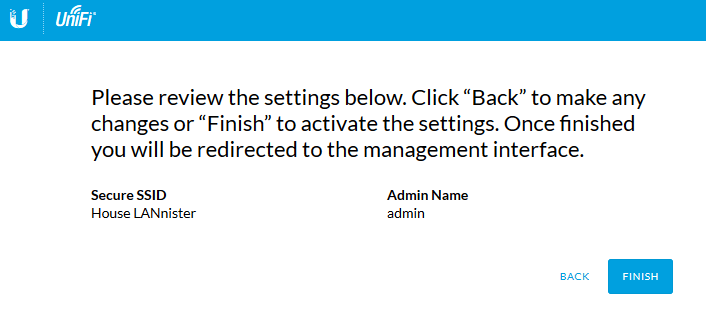
Once the wizard has completed your Ubiquiti access point will be adopted, configured and ready to connect to from any of your wireless devices.
It is a good idea to log into the UniFi Controller management page (https://<SYNOLOGY_IP>:8443) and check the firmware status of the access point. As shown below the access point is still functioning but also showing us that a upgrade for the access point is available. Simply click on the “Upgrade” link and the UniFi controller will automatically upgrade it within just a few minutes.
The benefits of running the Ubiquiti UniFi controller in Docker on the Synology NAS is that it’s free (if you already own the Synology NAS) and super simple to setup. Depending on your Synology specs, such as a Synology DS1815+, you could easily manage several access points and sites using the docker UniFi controller and upgrading to 16GB RAM will certainly help with resources.
I still prefer hosting my UniFi Controller in the cloud using Linode, Vultr, or DigitalOcean if only for the fact my UniFi controller isn’t tied to my home/business network. Which means I’ll get email notifications if an access point goes offline. An important function for me as I manage several access points for other places and people.
Otherwise, if you are looking for a great solution for your home or business then the UniFi Controller in Docker is perfect fit!


Thank you Mr. Tabor for your write up. It works like a charm.
Great write up. I totally love my Synology and Ubiquity is a new find. These things are so Cool I almost want to install 1 in every room. having it run on the Synology is just plain awesome.
Many thanks
Glad to help @clairebinder:disqus !
hi I’m running the latest version of DSM, but the instructions don’t work for me.
these are the steps i followed:
1. start docker from within synology
2. go to register tab
3. in the search bar, i typed in jacobalberty and selected the Unifi (tag: latest)
4. next next next, waiting for the download to complete etc
5. go to Image tab, hit next and then apply (just leave everything as it is by default)
6. go to Container tab, i see that it is running.
Next, i open a browser tab and go to https://192.168.178.31:8443.
Page not found!
what did i do wrong or which steps should be added?
Hi,
I have the same results. I tried both steps,
Any help available?
@r1ckvandelaar:disqus & @disqus_L7X7UTNAKl:disqus – it’s because you did this through the GUI and not the instructions as detailed above.
Sounds like you took all defaults for the GUI install which doesn’t save UniFi configs when the package is updated. It also sets the network to bridge for the container. If you view the container details, under port settings it will show what port 8443 (and others) have actually been mapped to.
i’d suggest following the steps above. For more everyone it’s a simple copy and paste – no need to be afraid of the command line. ;-)
I followed both using the GUI and the CLI and I get ERR_CONNECTION_REFUSED on both when trying to access https://:8443 any pointers?
This may be too late for you guys but for anyone in the future. It sounds like you installed via the GUI and did not customize the ports. When you do this it “AUTO” assigns the port so port 8443 is actually something like 32770. The only way to see this is on the Synology GUI (I am sure there are CLI ways) Docker>Container highlight the container and select Details.
In the window that pops up you will see columns for “Local Port” and “Container Port”. Find the container port marked 8443 and then see which local port it is assigned. Now, for example, if the local port were 32770 change your URI to
https://192.168.178.31:32770
This port will possibly change every time. You can hard code it by stopping the container, clicking on Edit and the ports tab. In all the windows that say auto change it to the specific port you want.
Note: Using the CLI to install as these instructions indicate will attach to the Hosts IP and the ports won’t let you modify them.
Lastly thanks as these instructions were the only ones that worked for me. Installing straight via the GUI did not allow discovery of the devices.
Hope this helps, Dan
I had an issue after shutting the container down and restarting it. It started back up but I could never get back to the portal page for the UniFi… I ran the commands again through the SSH session and started from scratch and its working again but kind of worried if it shuts down it wont start back up.. anything special to do there?
I have the same issue. Created it in the first place, using the instructions above and no problems with the commands, but the portal doesn’t respond. Any ideas, except to start for scratch?
Ok, so I get this thing running, then the Unifi releases an upgrade to the controller software and jacobalberty follows suit, what next? Mike would you consider a revisit to this article detailing the upgrade process?
By the way Unifi in Docker on Synology is great!! I just dont know how to stay up to date..
I don’t actively run my controller on my Synology NAS but luckily I do have an extra UAP-AC-LR laying around. I’ll spin up the Docker image on my NAS and will update this post as soon as I can after testing.
+1 Would love to know the “right” process to update the docker, especially since an update to the Unifi Controller was just released…
I’ve managed to upgrade successfully using the following steps. The idea behind my method is to create a second container in Docker for the new Unifi Controller while keeping the old installation/configuration intact until the upgrade process is complete.
1. “Download Backup” by navigating to the “Maintenance” tab on the Unifi Controller “Settings” page.
2. Go to “Docker” and Stop the “unifi-controller” container.
3. Using the same process as described in this article, create a new directory and download and install the new Unifi Controller, appending the controller version number to the directory name.
. a) mkdir /volume1/docker/unifi5.3.11
. b) sudo docker pull jacobalberty/unifi:latest
. c) sudo docker run -d –name=unifi-controller5.3.11 –net=host –volume=/volume1/docker/unifi5.3.11:/var/lib/unifi -p 8080:8080/tcp -p 8081:8081/tcp -p 8443:8443/tcp -p 8843:8843/tcp -p 8880:8880/tcp -p 3478:3478/udp jacobalberty/unifi:latest
4. You have now created a second Unifi Controller container in “Docker”. You might want to go to “Docker” on your Synology DiskStation and verify that you now have the latest version of the controller installed and that it is the only one running.
5. Navigate to https://:8443 and you should see the new Unifi Controller Setup Wizard.
6. Click on “Restore from a previous backup” on that first page of the wizard and select the backup file you saved in step 1 above.
7. The popup window remains displayed on your screen while the backup is restored, which can take up to 2 minutes. DO NOT CLICK the Close button on the popup window as that will cause the controller to terminate unexpectedly during the restore operation. When the backup is fully restored, the popup will close automatically and you will be redirected to your usual login screen where you can log in using your usual credentials.
8. Log in and verify that all is in order in the new version of the controller.
8. If you have set any container-specific options in “Docker” such as “auto-restart”, “desktop shortcut”, etc., you will have to re-configure those for the new container.
9. Once you are happy with the upgrade you can (optionally) delete the old container from “Docker”. If not, then delete the new container and you will have your previous container with your old configuration untouched.
In all cases, make sure that you DO NOT run more than one version/container of Unifi Controller at a time in Docker as this may cause unexpected behaviour which may result in the corruption of your controller configuration.
+1 for update instruction
You could use Wachtower:
https://www.ctl.io/developers/blog/post/watchtower-automatic-updates-for-docker-containers/
Thanks Mr Tabor for writing this tutorial. I have installed it in a docker image, like you explained. weirdest thing is that i do not see any webpage on port 8443 and 8843, but port 8080 is see the config page of the ubiquitu…..maybe i missed a config setting?
it all works. i should have a waited a bit longer to come up with all the services….
Glad to hear it’s working for you now. Enjoy! ;)
Hi,
Great tutorial, thanks.
I am facing issue since I have to remap some of the ports because they are used on my synology.
I have modified the command like this: 8444:8443/tcp (because 8443 is used on my system).
When I check with netstat, I see the port 8080 and 8444 not being used, although the container is running.
Any clue to help? Thanks
Hi,
I’ve got the controller up and running and it works perfectly. I even
succeeded in updating to the latest version without losing
configuration data.
Now I am facing another challenge: I want to be able to use a
config.gateway.json file and I need to place this in a folder on the
controller. The guide from Unifi itself (https://help.ubnt.com/hc/en-us/articles/215458888-UniFi-How-to-further-customize-USG-configuration-with-config-gateway-json) shows me some locations, but I am unable to find those on the controller.
Do you have any idea where I need to put this config.gateway.json file so it will be picked up by the USG when provisioning?
Hi Mr. Tabor I can see there is a new release of Unifi firmware .15 and i’m running .14, does the controler image after youre description not check for updates automatically and get the updates from same place as an Unifi Cloudkey?
It doesn’t check for updates automatically. You can hit the check for updates button all day. I attempted to follow https://www.3dinfluence.com/post/upgrade-unifi-controller-container/ to upgrade, but ended up deleting the container and starting over. I just restored the settings from a backup. I’m still looking for a good upgrade method to retain historical data.
To update without losing data:
– make backup just in case
– take screenshots of the container settings
– under “Image” tab re-download the latest jacobalberty/unifi
– when downloaded go to ” Container tab and delete the unifi container
– back under ‘Image” tab launch the unifi image
– make sure name is same as before and under the “advanced settings make all settings the same as in the screenshots you made, especially the volume and network settings.
– When everything is the same, save and launch the container.
– You now have the latest with retained data.
Greetings,
Rudy.
Perfect article for setting up the Unifi controller on a Synology NAS. I’ve been running the controller for several months now with no issues. I needed to apply an upgrade to the controller and ended up deleting the container and unifi directory and starting over. I just applied the backup settings to get going again quickly. However, all historical data is lost. Has anyone developed a good upgrade process to retain historical data and not start over?
Excellent work, I ran the docker with bridge instead of host; as i couldn’t get nginx reverse proxy to work for some reason. ” sudo docker run -d –name=unifi-controller –net=bridge –volume=/volume1/docker/unifi:/var/lib/unifi -p 8080:8080/tcp -p 8081:8081/tcp -p 8443:8443/tcp -p 8843:8843/tcp -p 8880:8880/tcp -p 3478:3478/udp jacobalberty/unifi:latest “
Thanks for sharing your workaround Linium!
-Michael
Thank you.
Hi.
I’ve tried several guides now, including this. I just can’t get it to work. I can’t connect to the site, no matter what I do. Found out that Carddav on synology is using the same port, so deleted the app, but still doesn’t work. open ports in router etc etc. Any ideas?
Thank you for this shared. i’m add a new tips, if your NAS can not discover the access points. You can add -p 10001:10001/udp for the bridge mode.
THANK YOU!
Exactly the answer I needed to fix my issue.
You are most welcome. Glad to be of some help!
-Michael
omfg – you are my hero! I was looking for hours now why my devices were not found! That was it!
Cheers mate!
Hello,
first thanks for the instructions!
Unfortunately I’ve followed step by step, but I can’t find my Ubiquiti devices.
Any advice?
Hello,
I’ve tried to follow this guide, but I can’t find any of my Ubiquiti devices ,.. any advice?
It looks like a new version of the controller is out (5.8.40) I tried to download the docker image and it still looks like it is 5.7.X, is it possible to update the docker image?
Hi there, and thanks for the detailed procedure. Would you know how to SSH to the controller, as port 22 naturally takes me back to the Synology?
Just in case anyone comes by this article again, here is the updated command based on the latest release notes from UniFi and suggestions from the container author.
sudo docker run -d --init --restart=unless-stopped --name=unifi-controller --net=host --volume=/volume1/docker/unifi:/var/lib/unifi -p 8080:8080/tcp -p 8081:8081/tcp -p 8443:8443/tcp -p 8843:8843/tcp -p 8880:8880/tcp -p 8883:8883/tcp -p 3478:3478/udp jacobalberty/unifi:latestThank you Mike for an awesome tutorial! Got it running on a Synology NAS thanks to you. One question, how can I ‘copy over’ the SSL Certificate of my Syno NAS over to my Unifi Controller docker so that I won’t get the certificate error when accessing the interface? Again, thank you!
Works perfect for me, great Job thank you very much!
Brilliant work !!
works like a charm
but enough bootlicking , i need the same easy solution for UNMS :-0
(https://community.ui.com/questions/UNMS-on-Synology-NAS-using-Docker/c71808e7-85c9-49d4-8133-9373044b2307)
-Michael
Hi Mike,
This works perfectly in one go! The only thing I had to do was shutdown my Pi 4 that was running my Unifi Controller. After that, everything was discovered and online in the new portal on my Synology nas.
I’m going to spice up my Docker knowledge again on Pluralsight :-)
Thank you so much for this well written article!
Hey, thank you for the great blog! I did this procedure through Docker GUI in my DS920+ , as oppose to the CLI like you, and I was able to reach my Unifi controller I had created in my synology via web browser. The issue is, when I migrate my controller from my laptop and restore from backup on my newly created synology controller, the restarts the controller and for some reason I am not able to log in with my Unifi credentials. If I sign out and back in on the local Unifi controller on my laptop with the same creds, Im able to sign in no problem. Every run into this before? Any help is appreciated thank you!