Upgrade vCenter Server Appliance 6.0 to 6.5
VMware vSphere 6.5 has been released as general available and earlier this week I posted about Installing VMware vCenter Server Appliance 6.5 as a new install, this post will walk through upgrading an existing vCenter Server Appliance 6.0 to 6.5!
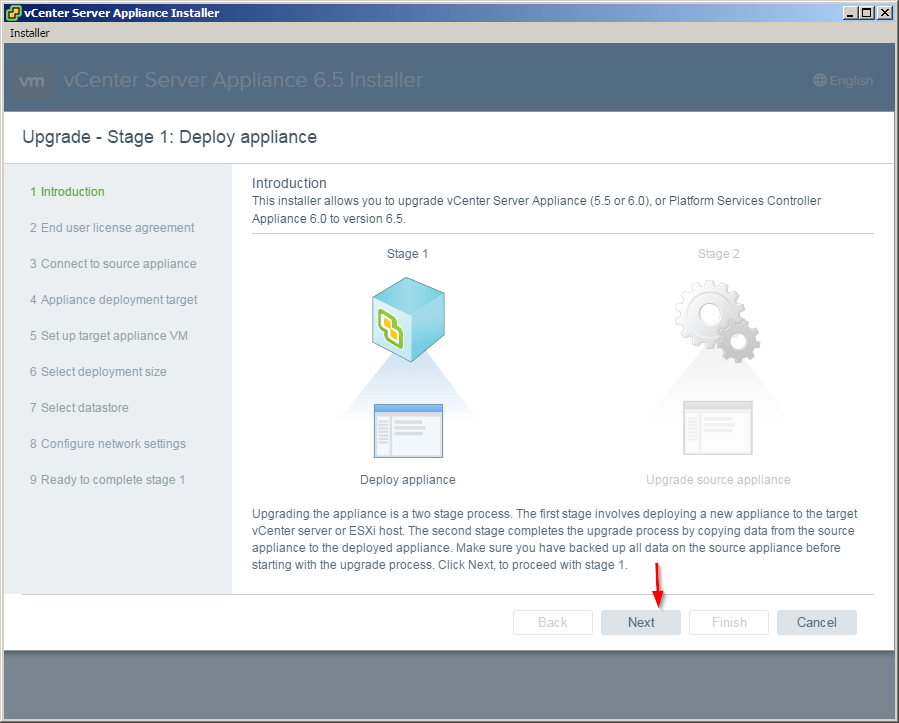
Similar to a fresh VCSA 6.5 install, the VCSA 6.5 upgrade is also broken up into two stages. The first stage is deploying a new vCenter Server Appliance and the second stage is copying data from the 6.0 VCSA to the newly deployed 6.5 VCSA.
How to upgrade vCenter Server Appliance 6.0 to 6.5
If you haven’t already, go ahead and download the VCSA 6.5 ISO and lets get started. It’s also a good idea to check the VMware Interoperability Matrix before performing any upgrade.
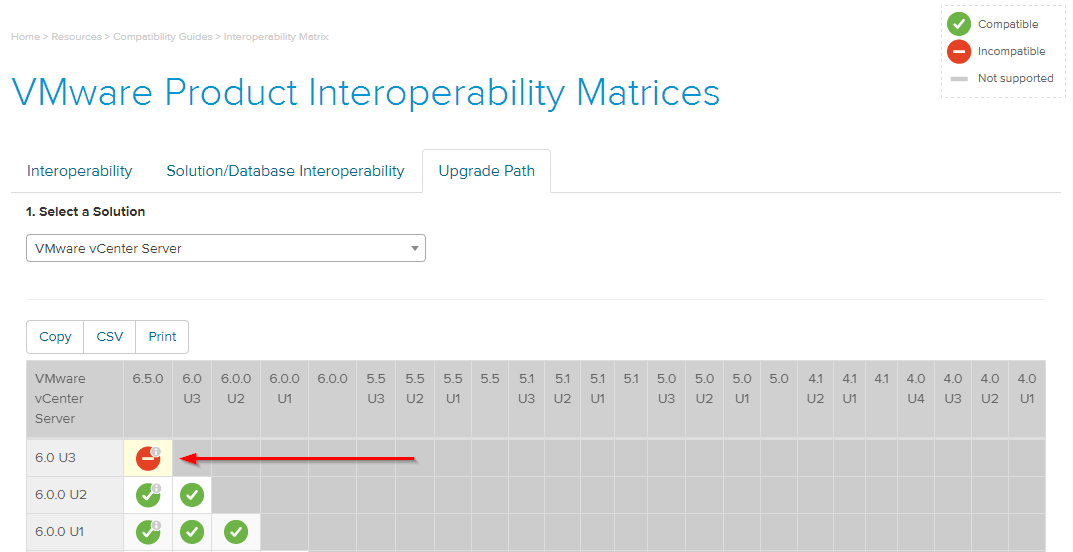
It’s always a good idea to check the VMware Interoperability Matrix before doing any upgrades.
Stage 1 – Deploying vCenter Appliance 6.5
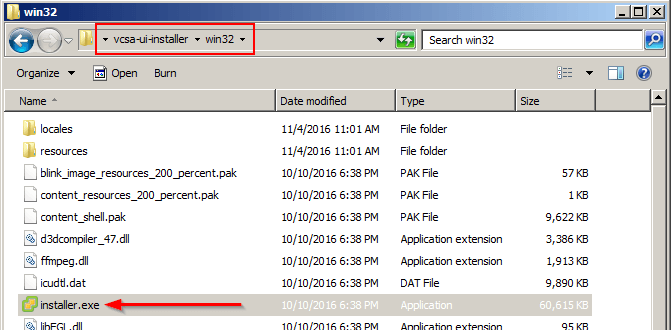
- Mount the ISO and start the vCenter Server Appliance 6.5 installer located at \vcsa-ui-installer\win32
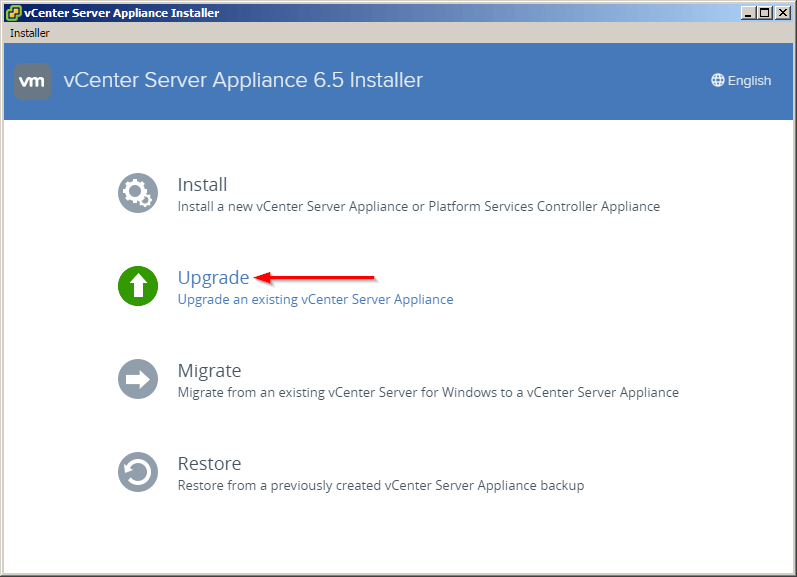
- Select Upgrade from the VMware vCenter Server Appliance 6.5 Installer.
- The introduction shows what I stated above, that the VCSA Upgrade is broken up into two stages – deploy and then copy data. Click on Next.
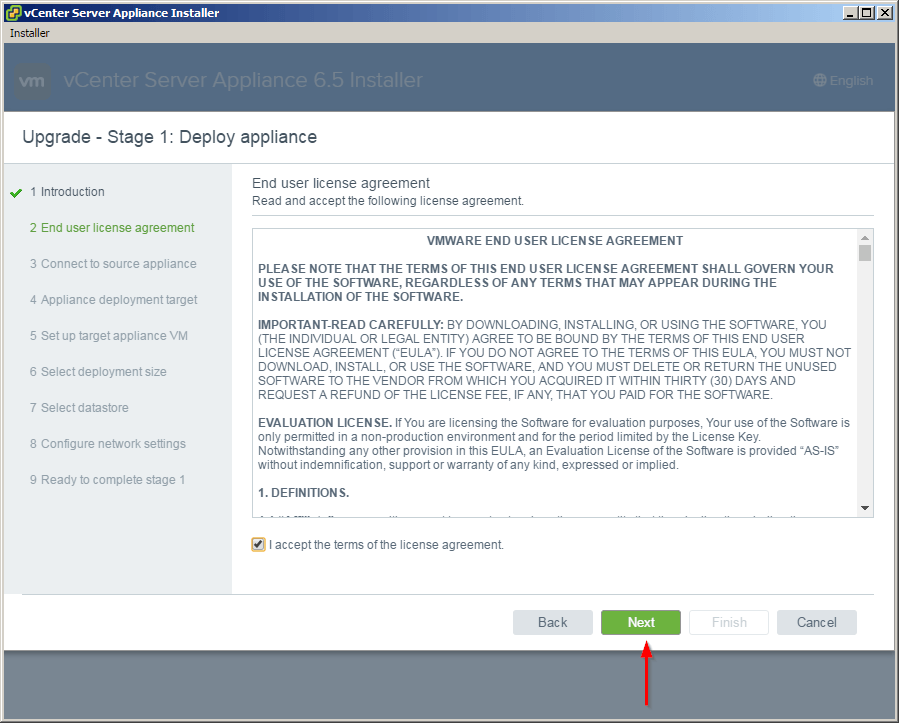
- Accept the End User Licence Agreement.
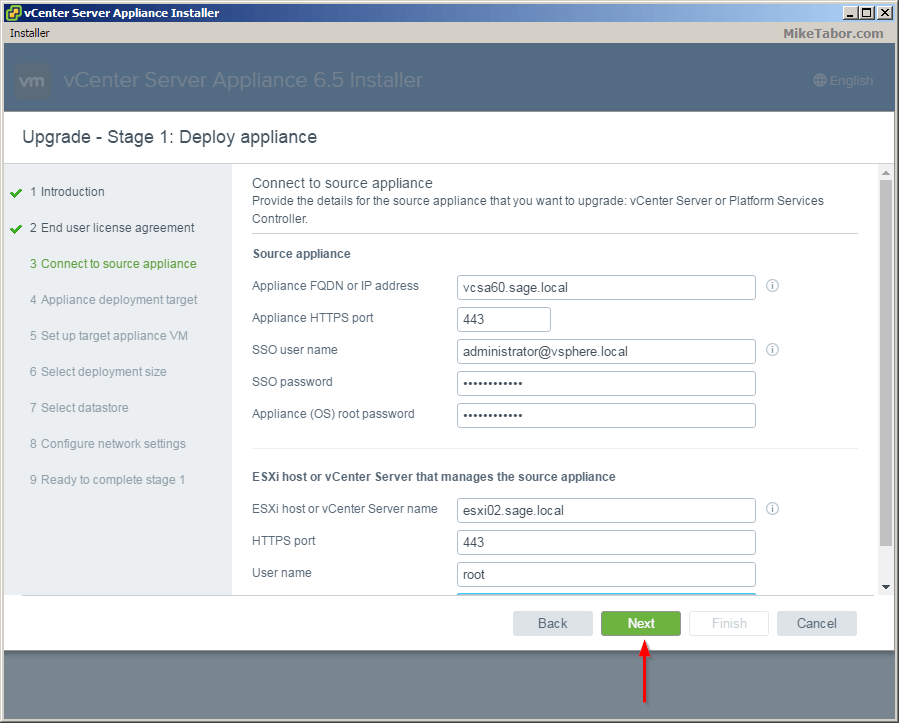
- Enter the FQDN or IP of your existing 6.0 VCSA as well what host the existing VCSA resides on, along with all the login credentials.
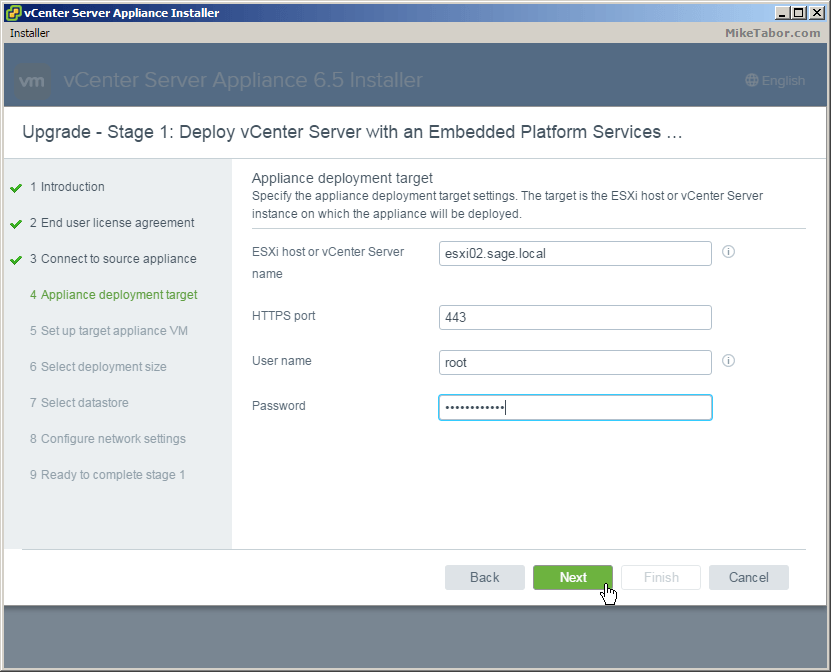
- Now enter the ESXi host you want the new VCSA 6.5 appliance to be deployed.
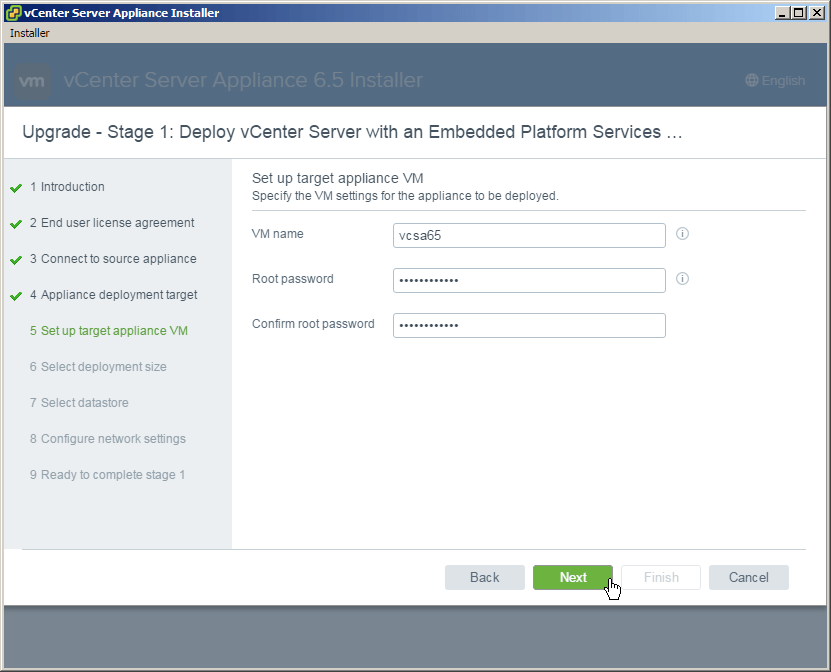
- Enter the name you would like for the appliance VM to be called as well as set a root password.
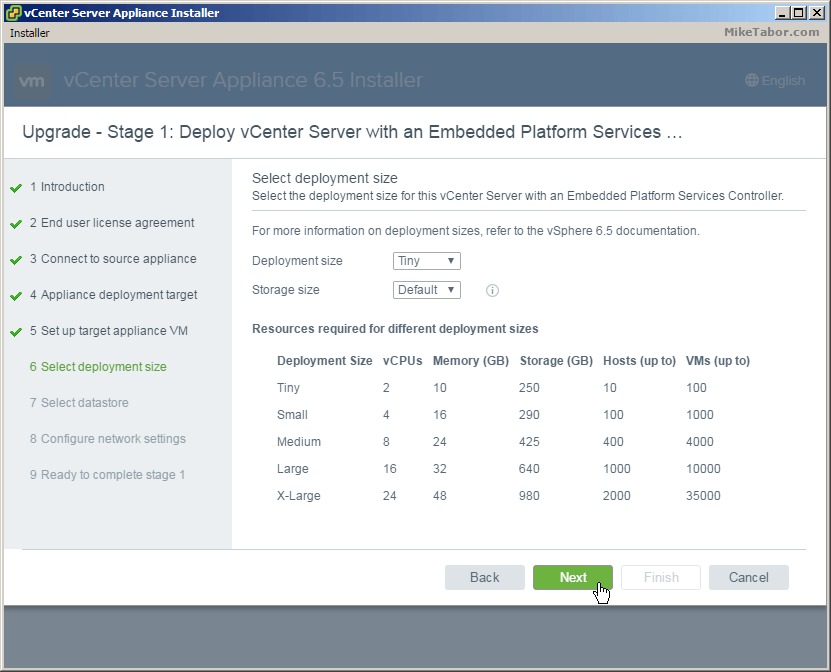
- Next, select the deployment size that best matches your environment. For the home lab I’m selecting Tiny.
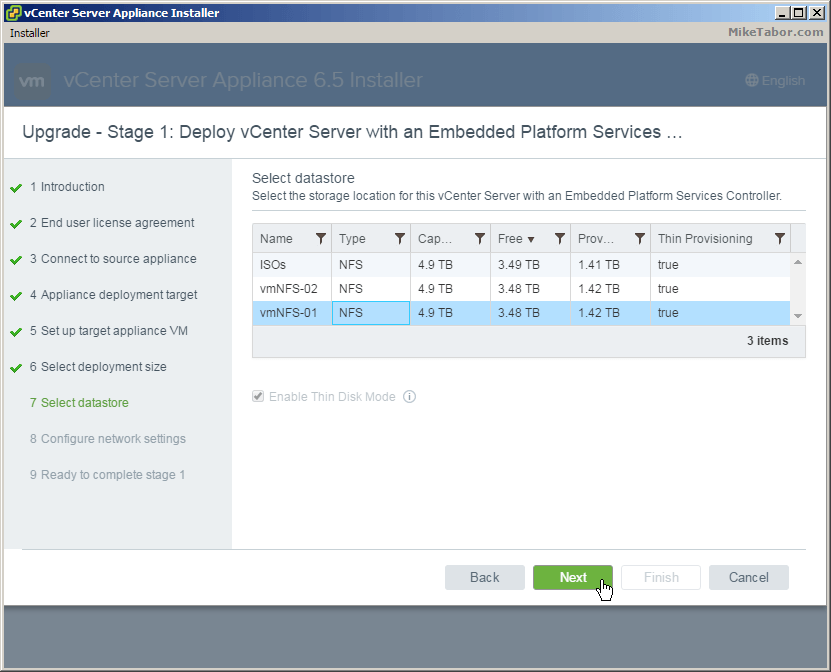
- Select what datastore you want the VCSA 6.5 appliance to be stored.
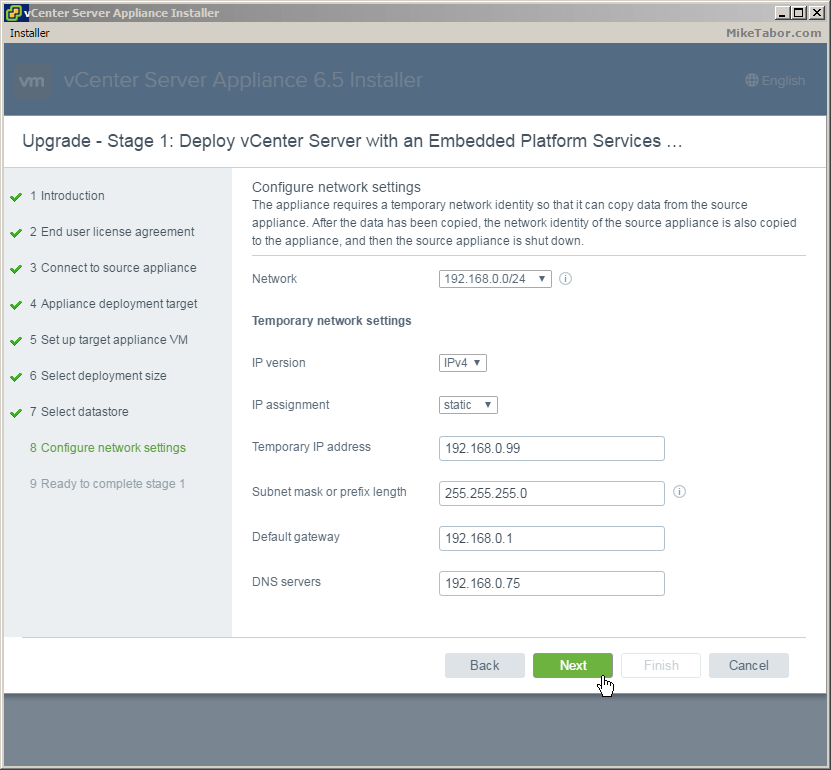
- Configure a TEMPORARY network identity. Once Stage 2 of the upgrade has been completed the 6.5 VCSA will take the network identity of the old existing VCSA.
- Review the summary and click on Finish.

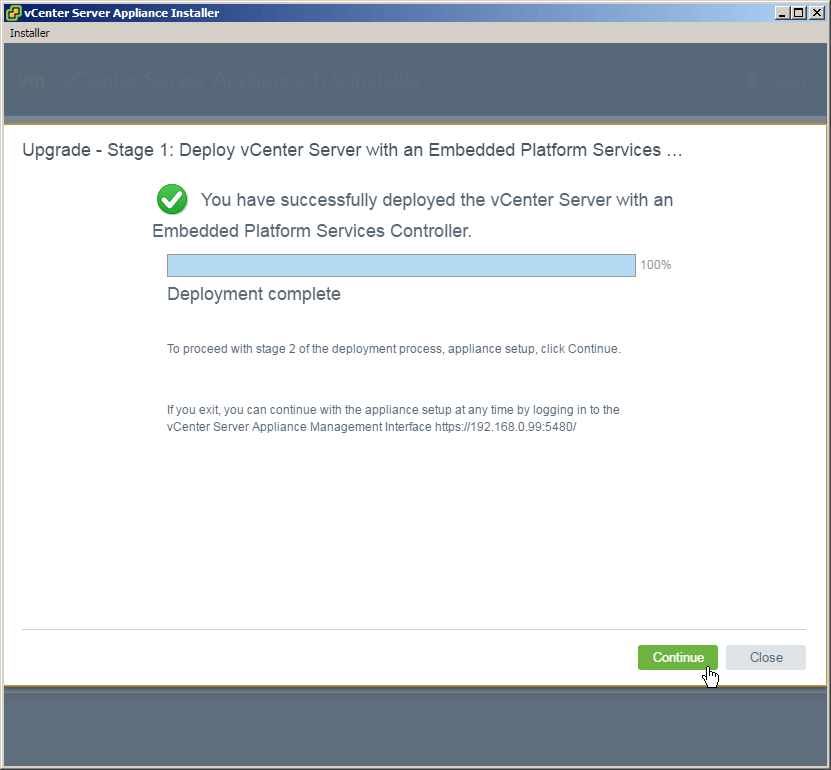
- Once completed you will have the option to continue onto Stage 2 of the upgrade or close. If you close then you can finish the VCSA config by going to https://<TEMP_VCENTER_IP>:5480
Stage 2 – Copying data to VCSA 6.5
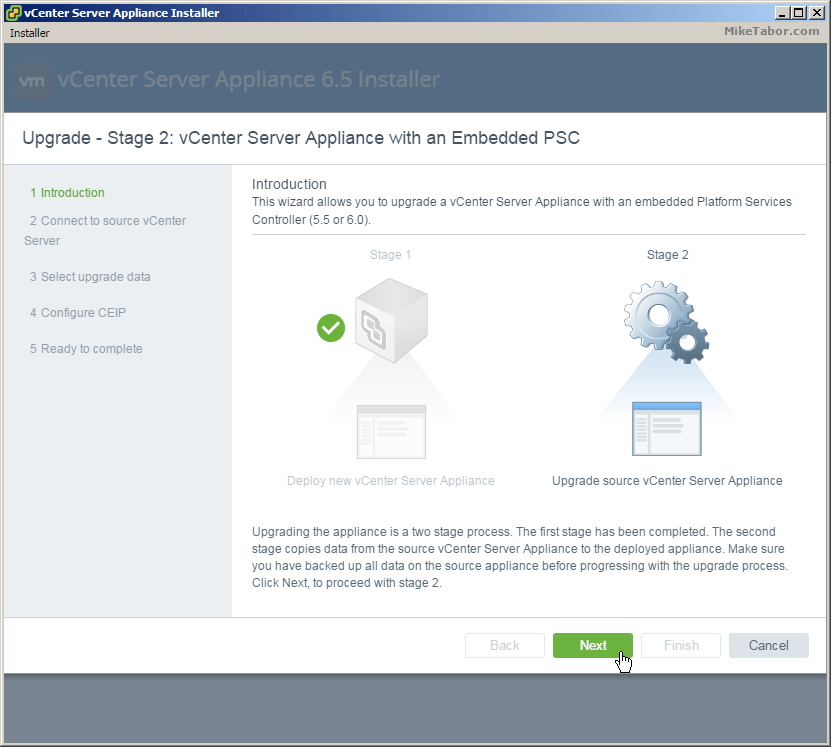
- After clicking Continue from Stage 1 you will be taken to the Stage 2 Upgrade introduction page, click Next.
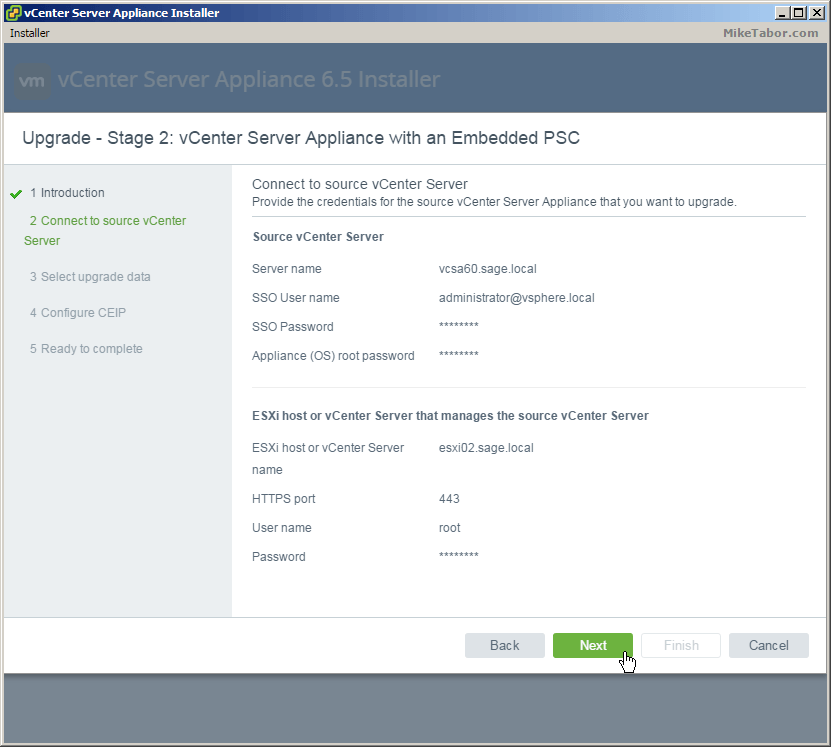
- Confirm the source vCenter Server and ESXi host. This will be pre-populated from Stage 1 unless you closed the Upgrade after Stage 1, then you’ll need to re-supply this info. So just click on Next.
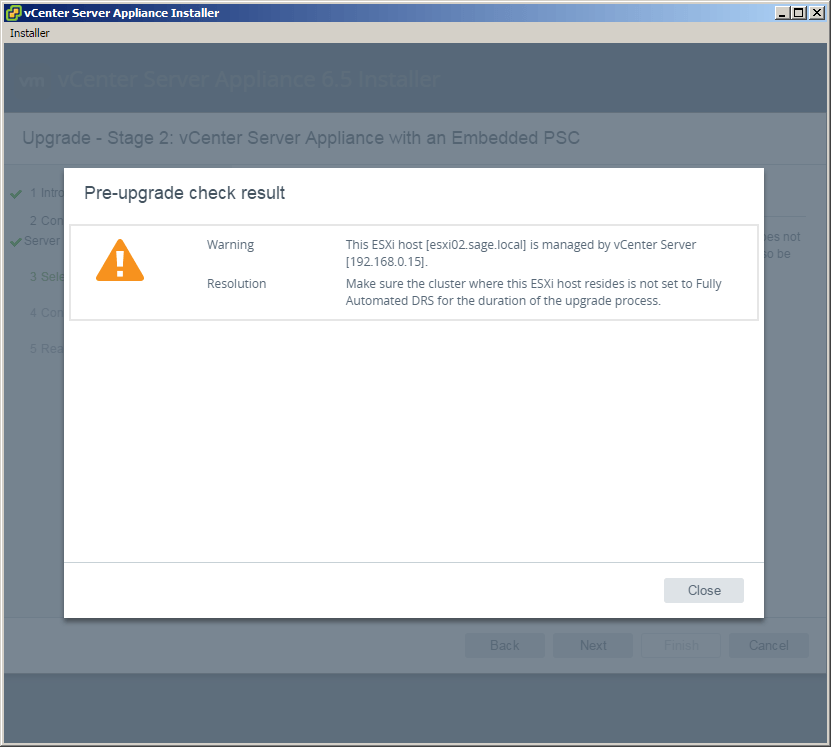
- A pre-upgrade check will then run and show it’s results. Below you’ll see the pre-upgrade tells us we should turn off Fully Automated DRS on the cluster where vCenter Server resides.
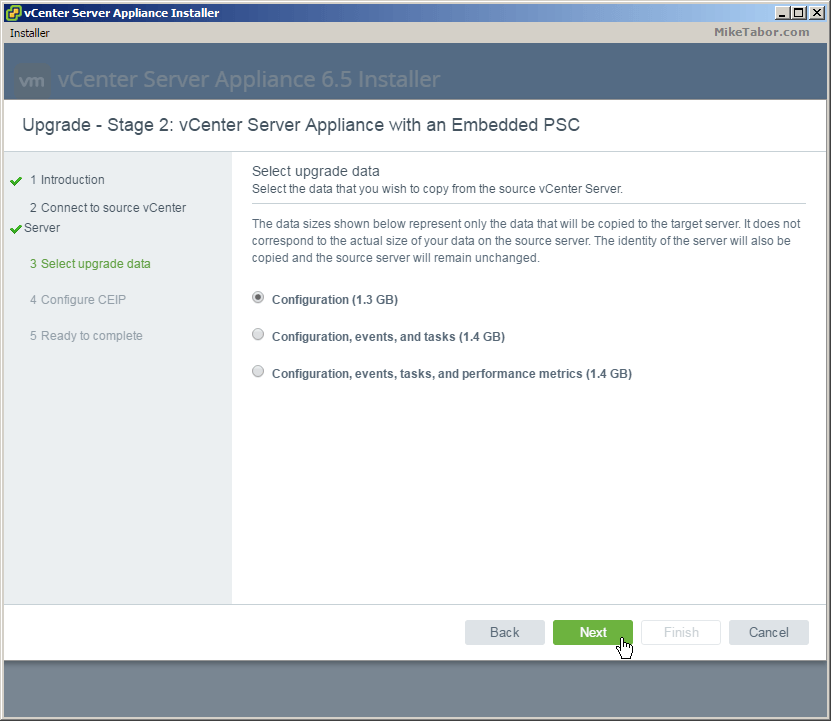
- Select what data you would like to migrate from the existing VCSA 6.0 deployment to the new VCSA 6.5. For my home lab I’m not concerned about all the tasks or performance metrics and will only copy the Configuration data.
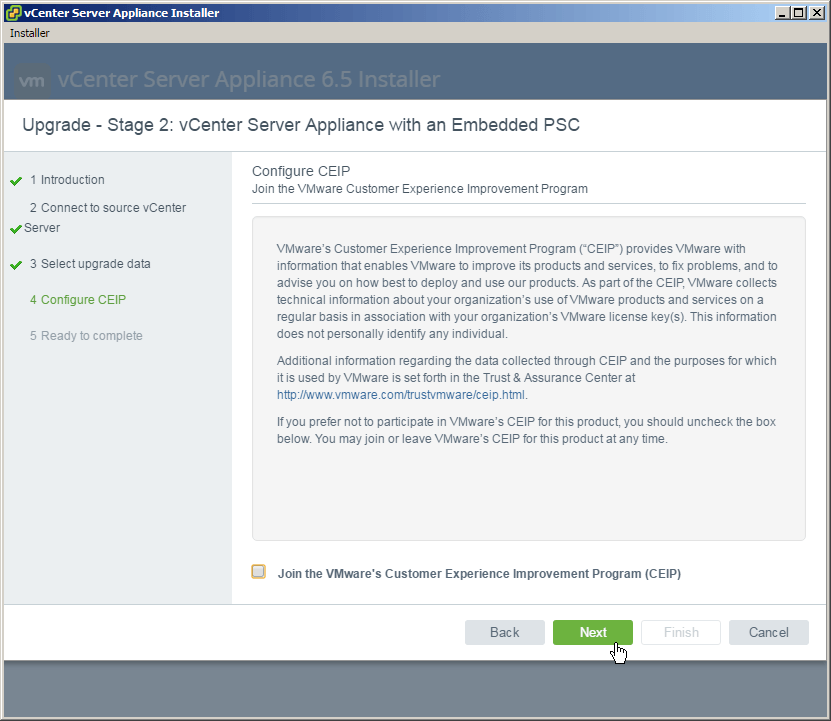
- Check or un-check if you would like to join the Customer Experience Improvement Program (CEIP) and click Next.
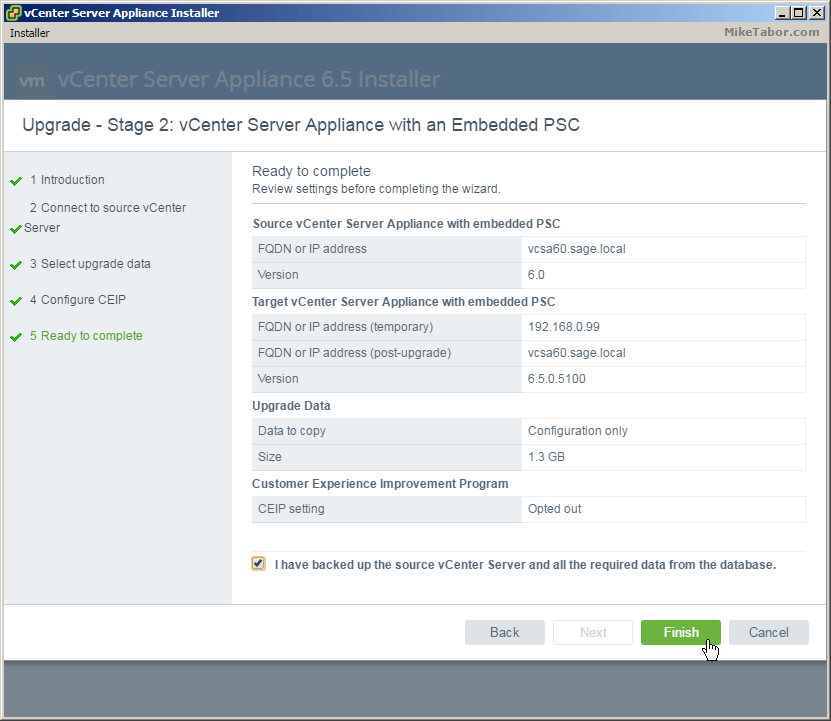
- Again review the summary and check “I have backed up the source vCenter Server and all the required data from the database” and click Finish.
- You’ll receive a notice telling you that the existing VCSA 6.0 appliance will be shut down and it’s network identity will be enabled on the new VCSA 6.5 upgrade.
This is nice as the upgrade does NOT delete your old vCenter Server 6.0 appliance and instead just powers is off. In case something goes wrong you can power off the new vCenter Server 6.5 appliance and power up the 6.0 appliance.
Click on OK.

That’s it! If all goes well and after a few minutes the vCenter Server Appliance upgrade should complete and you should see the following screen.
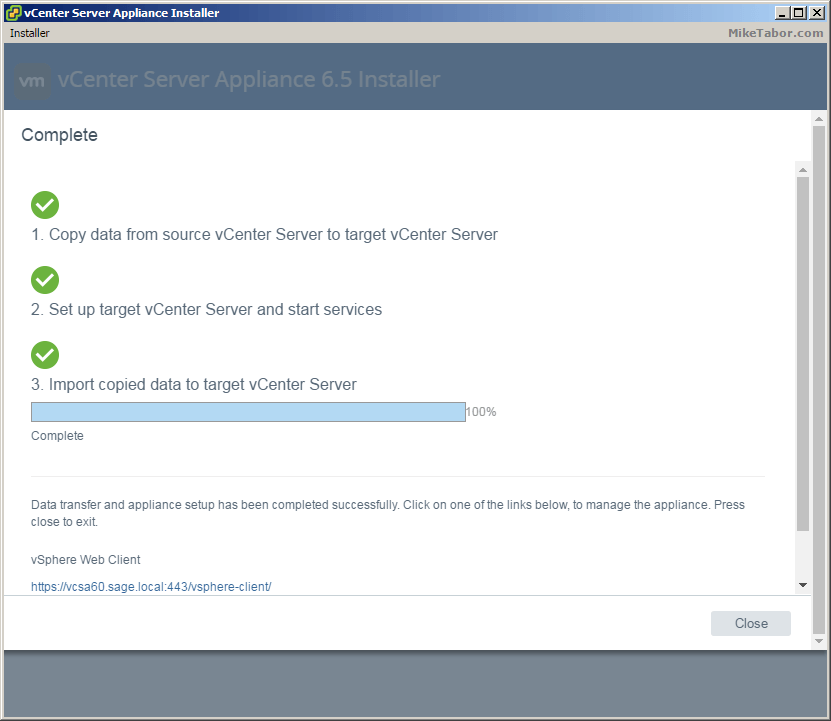
Simply log into the web client by going to: https://<VCENTER_IP>/vsphere-client and start enjoying vCenter Server 6.5!
If you would like more details about vSphere 6.5 check out the VMware vSphere 6.5 release notes here.
Thank you
I got an error on 50% of coping source vCSA and after shutdown source vCSA 6
error saying Invalid IP Adress/Prefix provided 192.168.0.114/24/255.255.255.0
Failed to set network
This IP is for the source seems an issue happend when set target vCSA network with source vCSA after shut it down !!!!
Any advise .
Thank you
Mag
One question, it states to pick a new name for the 6.5 VCSA but i need to have the system named the same as the old one. Can i use the same name as the old one OR do i have the ability to rename the new 6.5 VCSA once the upgrade is complete ?
No you can’t use the same name during the upgrade/migration. You wanted you could rename the machine and host name once you renamed the original vCenter.
Michael, could you elaborate on what you mean? I’m not quite following you.
It is beyond belief that when carrying out an UPGRADE you can’t use the same VM name.
@Squuiid:disqus that’s because upgrading the VCSA isn’t an “upgrade” in the sense of the word. In reality what’s going on during a VCSA upgrade is a new VCSA appliance is deployed and all your data is copied to it. In reality it’s actually a migration.
Do i need to install the new version onto another server or can i install it on the same server?
Same server is fine.
Hello,
When i get to step 7 i can only select X-Large, The other deployment options are not visible.
Do you know how i can make a Tiny one?
Thank you
Same issue here except mine is Medium or larger. Tiny or Small are not listed!
What size is your current appliance?
I had this issue and I cleaned out some log files to get more space (/storage/log). I ran the upgrade again and I had all of the options.
Worked like a charm.. thanks for the help, Had appliance 6.0 U2 and the upgrade was as explained in this website… Keep up the good work..
How does the VUM data get pulled into the VCSA 6.5 or is this a separate issue? Currently have VUM running on a Windows Server VM.
you will be asked to run migration assistant on VUM Windows machine during upgrade to VCSA 6.5.
Migration assistant is folder on VCSA 6.5 ISO, copy folder to VUM Windows machine and run before upgrade
This was very helpful, thanks! The only hangups I ran into were:
1. My root (OS account) on the old 6.0 VCSA had to be changed before I could use it. It must expire without actually being expired. I was able to log in with it via the vmware console but the upgrade process kept complaining about it. Once I logged into the console and change the password it was fine.
2. I had a windows VUM server and needed to copy the migration-assistant folder from the VCSA 6.5 ISO to my VUM host and then run vmware-migration-assistant.exe before the upgrade process could complete.
Thanks Chris, glad I was able to hep.
when performing VCSA upgrade from vCenter Server 6.0 U3b to vCenter Server 6.5.0d
I have pre-upgrade checks error and cannot continue with upgrade.
“The source machine hostname ‘localhost’ resolves to IPv6 address(es) ‘::1’, but IPv6 networking will not be preserved after the upgrade. This will prevent certain services preferring IPv6 from establishing network communication.
Resolution
Either remove the DNS IPv6 entry for hostname ‘localhost’ or change the network configuration of the source machine to pure IPv6 or in case dual networking stack is needed, set a static IPv6 address.”
I have disabled ipv6 via DCUI, disabled ipv6 config in /etc/hosts file. Nothing helps
@pitonsxxl:disqus, upgrading from vCenter Server 6.0 U3 to vCenter Server 6.5 is not supported yet.
You can verify this by viewing the VMware matrix here – https://www.vmware.com/resources/compatibility/sim/interop_matrix.php#upgrade&solution=2
so with 6.5U1 which supports upgrade from 6.0U3 I have upgrade error:
The source machine hostname ‘localhost’ resolves to IPv6 address(es) ‘::1’, but IPv6 networking will not be preserved after the upgrade. This will prevent certain services preferring IPv6 from establishing network communication.
Resolution
Either remove the DNS IPv6 entry for hostname ‘localhost’ or change the network configuration of the source machine to pure IPv6 or in case dual networking stack is needed, set a static IPv6 address.
Hi
Did you figure this out? I am having same problem!
ARkadiy
@arkadiyshapiro:disqus see my reply above and view the VMware Matrix. Upgrading from vCenter 6.0 U3 to 6.5 is not supported at this time.
Ok i think for me it was just hostname was not configured on vCenter, but the error is surely confusing to figure out that this is what i may need to do to fix.
Internal error occurs during vSphere ESX Agent Manager pre-upgrade checks.
=(
I couldn’t continue with stage 2 at that specific time of stage 1 completion. I had to resume almost 12 hours later. Now I can’t finish stage 2 unable to authentication root user. I did not close but I am able to move forward. I attempted to go in through “https://:5480” and it does say that additonal steps (i.e. transfer configuration, etc) but there also I get an unable to authenticate.
thanks for the info on the upgrade. the only item I found missing to launching the migration assistant from the update maanger – https://communities.vmware.com/thread/552573
Mount the ISO and start the vCenter Server Appliance 6.5 installer located at \vcsa-ui-installer\win32 – I have querey here in order to start Here could you please tell me which machine you have used . Is there any machine which is running windows /2012 or your using your Laptop .. Am having a confusion here where we need to mount the ISO & start .. Since I don’t have VUM server.