How to install Ubiquiti UniFi controller on the cloud
Recently I replaced my wireless router, an Asus RT-AC66U, with an Ubiquiti EdgeRouter X router and Ubiquiti UAP-AC-LR access point. Both of which are a HUGE step up over traditional consumer wireless routers.
The Ubiquiti access points use software called the Ubiquiti UniFi controller to configure and control the access points which can be installed locally or in the cloud – allowing you to manage the access points no matter where they are located.
To automate the install process, I created a simple script to deploy the Ubiquiti UniFi Controller in the cloud on a Ubuntu server, and have also tested the script on three popular VPS providers: Linode, Vultr, and DigitalOcean – all three worked perfectly!
Linode would be my first choice as they offer the best performance and with 1CPU and 2GB RAM you’ll have more than plenty of resources to run Ubiquiti UniFi Controller and manage many sites and access points.
If you have a small deployment, Vultr would easily be my choice with 1CPU and 768MB RAM! All three providers also cost less than AWS and Azure.
For my deployment I went with Linode as I plan on using it to control not only my home access points but to control the access points of customers and family as well.
Lets begin…
Create a cloud server for the UniFi Controller
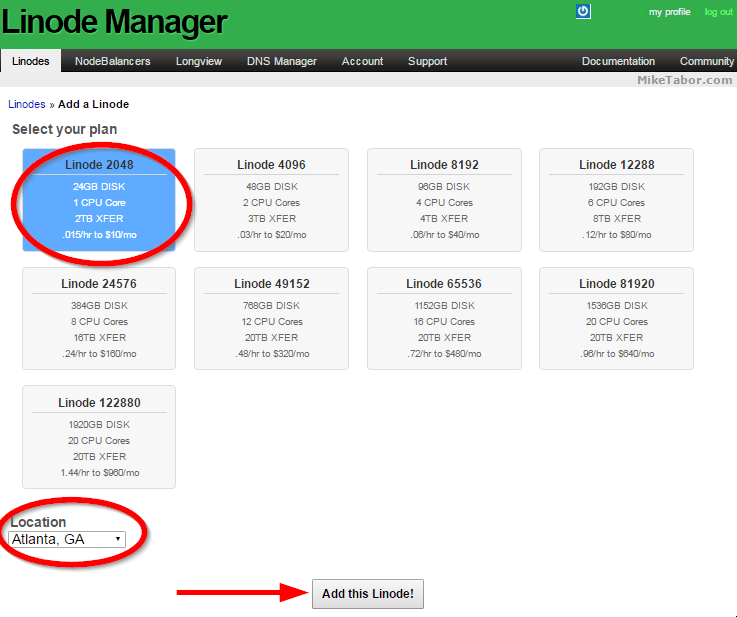
- First step is to create your Linode node and to do so simply select your node size and location and click on “Add this Linode!“.
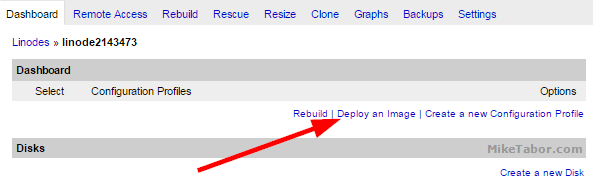
- Next click on “Dashboard“.

- We need to deploy an operating system on our new node so click on “Deploy an Image“.
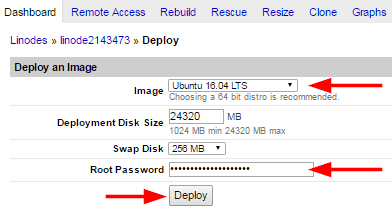
- For image type select “Ubuntu 16.04 LTS” and set your root password then click on “Deploy“.
- Wait until the three Host Job Queues are complete (initial config, disk create, and file system create) and then click on “Boot“.
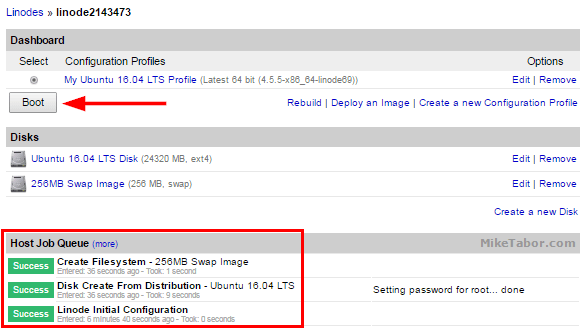
Your new node is now built and ready to have the Ubiquiti UniFi controller installed onto it.
Install Ubiquiti UniFi Controller on Ubuntu
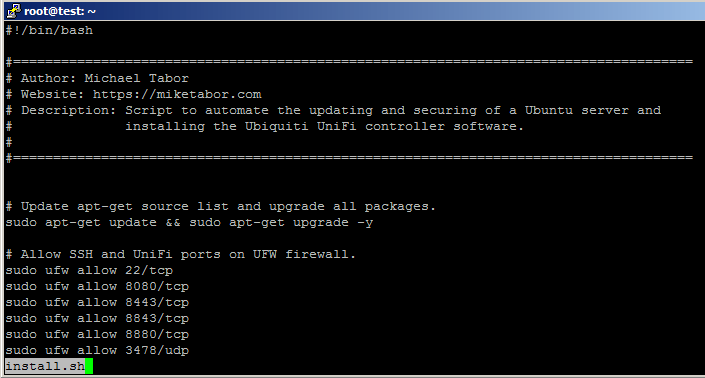
While the Ubiquiti UniFi controller install process is pretty easy, I’ve tried to make the process even easier by scripting it. It’s now as simple as running one single command.
The script is hosted on GitHub (unifi-autoinstall) and I strongly urge everyone to view the source and inspect it before running it as it’s never good practice to blindly run scripts. So with that lets get started…
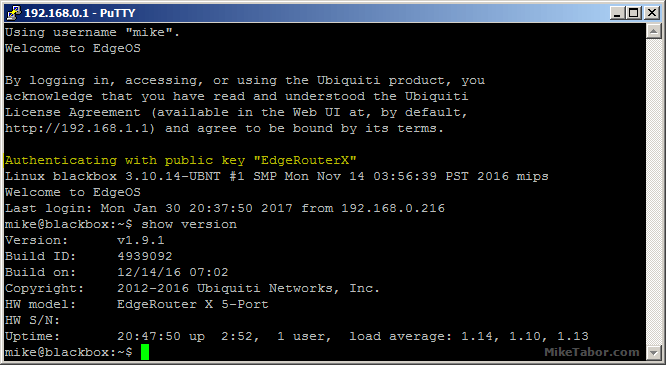
- SSH into your new Linode node using PuTTy or Terminal and type the following command and press Enter to download the script to your server.
wget https://raw.githubusercontent.com/miketabor/unifi-autoinstall/master/install.sh
- Next lets view the script to see what it does by typing the following:
less install.sh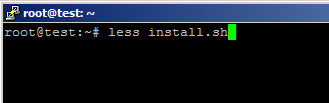
- You can now view the contents of the UniFi autoinstall script, install.sh. Once you’ve viewed it you can press q to exit and continue on.
- Now lets actually run the script. Type the following to start the script to auto configure the firewall, Fail2ban and install the Ubiquiti UniFi Controller.
sudo bash install.sh
- When the script finishes, typically less than 1 minute, you’ll see a message letting you know it’s finished and to log into your new UniFi controller by going to: https://<SERVER_IP>:8443
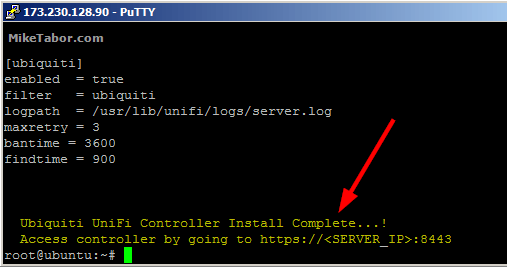
That’s it! The Ubiquiti UniFi Controller is now ready to for use. Now go ahead and go to https://<SERVER_IP>:8443 and finish the UniFi Controller wizard. Finally, beefore we move on to far I wanted to quickly explain what exactly the script is doing.
- First it updates all the packages on Ubuntu.
- Configures UFW to allow only SSH and the needed Ubiquiti UniFi ports (per ubiquiti documentation)
- Installs latest version 5 UniFi controller and its dependencies.
- Finally installs Fail2Ban and configures it to protect SSH (default) as well as the UniFi login page!
Now lets discover and register the new access points to the UniFi controller.
How to register access points to UniFi controller in the cloud
The last step is to register the access point(s) with the UniFi Controller on the cloud, in this case Linode.
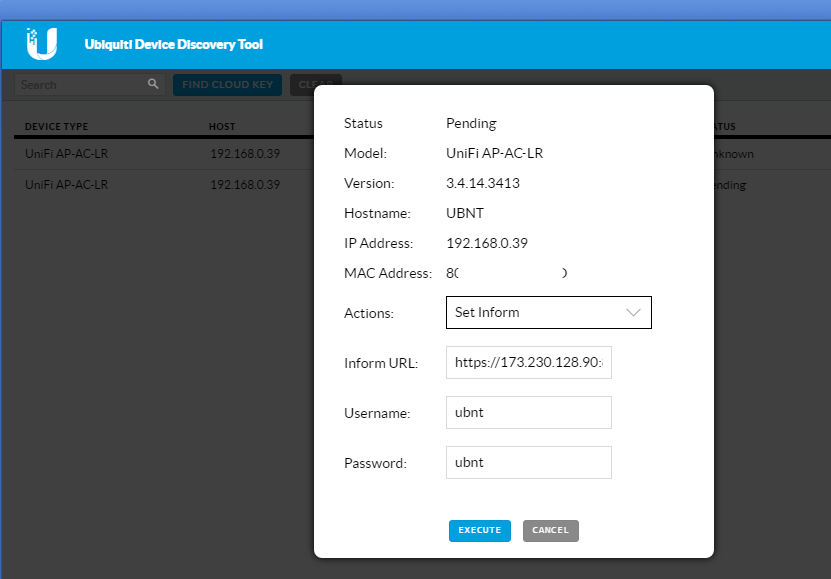
- Open the Ubiquiti Discovery Tool or use the Ubiquiti Chrome extension.
- Typically right away the discovery tool will find all the access points on your local network. Next to the one you want to register with the UniFi controller click on “Action“.
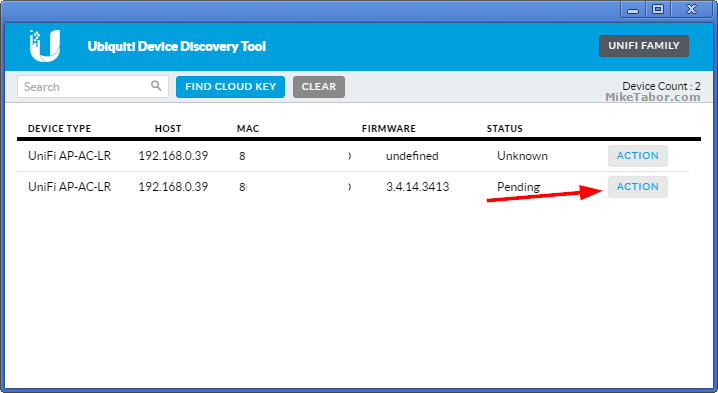
- In the Actions drop down set to “Set Inform” and change the Inform URL to: https://<UniFi_Server_IP–OR–FQDN>:8080/inform
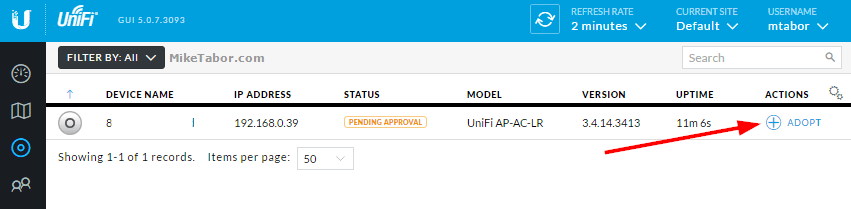
- Now go to your UniFi Controller and the Ubiquiti access point should be listed and awaiting your action. Click on Adopt.
That’s it! That completes setting up a Ubiquiti UniFi controller in the cloud and registering your access point with the new UniFi controller. The only steps left would be to setup your SSID, policies, additional sites, and so on.
Hope this helps and enjoy!
Lets hear from you
Got an idea how to make this process even better, share your thoughts below in the comments!

Did you really just suggest I randomly curl straight into bash from a shortened URL?
I mean, I looked at the script, it was fine. But come on bud. Don’t do that.
bob, I angered the bash gods for sure and have corrected my mistake. Please refresh the page and the CORRECT way of loading this script has been added. :)
Thanks for the comment!
-Michael
Thanks for your time and information. Another option for Synology owner is to use it for run locally the Unify, http://synology.acmenet.ru/.
Best Regards,
Thanks Gabriel! i’m actually working on a post on how to run the UniFi on Docker within a Synology NAS as well.
i followed your guide from “Install Ubiquiti UniFi Controller on Ubuntu” , as i used cloudatcost services and unifi 5.2.9 is running and it sees the UAP when i click adopt it shows adopting for a few minutes then shows disconnected, the UAP is connected to an edgerouter x inside of my ISP router , is there ports i need to open
@rebelbah:disqus you said you are using an EdgeRouterX behind your ISP router? Do you mean your ISP modem or do you really have a router behind a router?
You could also try manually setting the adopt IP via SSH on the access point as shown under SSH on this page: https://help.ubnt.com/hc/en-us/articles/204909754-UniFi-Layer-3-methods-for-UAP-adoption-and-management
Yes it’s a edge router behind my ISP router, I got it working, was not issuing the inform command the second time after I was selecting adopt, thanks for your help
hello, thanks for this script but can we also run it on aws ?
Nice, I have been looking for a way to tie fail2ban in with web login. I had to add a few things to make it work for me though. I was getting a couple errors upon restarting Fail2Ban.
“Failed during configuration: Bad value substitution: section: [ubiquiti] option : action key : port rawval : “, protocol=”%(protocol)s”, chain=”%(chain)s”]”
So for this, I added ‘port=8443′ in my jail.local file under the Ubiquiti chain.
After specifying the port and restarting Fail2Ban I was given a warning, “ignoreregex’ not defined in ‘definition'”
I added ‘ignoreregex=’ to /etc/fail2ban/filter.d/ubiquiti.conf
All is well now I think. Please let me know if you think I should change the way I set Fail2Ban. Was your instance not throwing any errors?
Frank,
Thanks for the suggestions. What OS did you install this on? I did not have any errors during my setup nor am I having any issues with Fail2Ban blocking failed attempts.
-Michael
Michael,
I installed on Ubuntu 14.04.5 LTS. I had everything already installed except the the ubiquiti F2B chain. So I essentially just used line 42-47 of your script to set that up. I’m horrible with regular expressions. If I would have ever tried to set that up, it probably would have taken me a month to do so. I think your script is the only one out there that adds the ubiquiti chain to F2B. Without that in place somebody could try to brute force, 24 hrs a day, 7 days a week, until cracked. If anybody is reading this and wondering if they might need F2B installed with the ubiquiti chain, don’t wonder too long! I’m very thankful for your post.
This is what my configuration looks like:
/etc/fail2ban/jail.local
[ubiquiti]
enabled = true
filter = ubiquiti
logpath = /usr/lib/unifi/logs/server.log
maxretry = 3
bantime = 31557600
findtime = 900
port = 8443,8080
/etc/fail2ban/filter.d/ubiquiti.conf
[Definition]
failregex =^.*Failed .* login .* *s*$
ignoreregex =
@frankabbot:disqus I’m not a security guru but do I do have an interest it in so things like this script above I try to be at least a little security conscious.
I’m glad the Fail2Ban is working fine for you as well. I’ve had little to no problem with people trying to brute force my UniFi controller but it’s nice knowing there’s an extra layer of protection there. ;)
-Michael
Hey Mike, great guide! I was reading this reddit post: https://www.reddit.com/r/Ubiquiti/comments/5n2bti/ubiquiti_device_securityhardening_guides/#bottom-comments
and came upon a comment you left there. Specifically you said “In addition to the script I’ve also locked down SSH to key and only accept connections via my home IP range.” Would you mind sharing a guide on how to do that? Thanks!
@Propupul,
I’ve modified the UFW rule that’s part of the install script above and instead entered the following:
sudo ufw allow from 1.2.3.4 to any port 22
Replacing 1.2.3.4 with your IP address. Now the firewall will only allow SSH (port 22) connections from that IP address!
Hope this helps.
Sorry Mike I thought I had replied! And thanks this works like a charm!!!
hello, thanks for this script. Just copied the fail2ban part to add to my already running unifi controller. I been waiting for a good minute on ubiquiti to add some kind of 2 factor authentication to unifi . I really wonder how many people use their controller in the cloud with this lack of security login ! The same for the aircontrol server. do you think you could provide me the fail2ban configuration for it ? thanks
thanks for the post.
question for you. i ran the script but i keep getting this error. what’s the work around here if you encourted it.
thanks,
[ubiquiti]
enabled = true
filter = ubiquiti
logpath = /usr/lib/unifi/logs/server.log
maxretry = 3
bantime = 3600
findtime = 900
port = 8443
banaction = iptables[name=ubiquiti, port=8443, protocol=tcp]
Job for fail2ban.service failed because the control process exited with error code. See “systemctl status fail2ban.service” and “journalctl -xe” for details.
JSVC_EXTRA_OPTS=”$JSVC_EXTRA_OPTS -Xss1280k”
Hi , Thanks for the script , everything works great, but I cant access the unifi web console , It says that the IP refusses the connection.
I am using LINODE
Axel,
Make sure that :8443 is at the end of the URL.
-Michael
Hi,
Just experienced same issue. Anyone has resolved this? Please help.
What issue?!
my issue was same with Jorge :
[ubiquiti]
enabled = true
filter = ubiquiti
logpath = /usr/lib/unifi/logs/server.log
maxretry = 3
bantime = 3600
findtime = 900
port = 8443
banaction = iptables[name=ubiquiti, port=8443, protocol=tcp]
Job for fail2ban.service failed because the control process exited with error code. See “systemctl status fail2ban.service” and “journalctl -xe” for details.
JSVC_EXTRA_OPTS=”$JSVC_EXTRA_OPTS -Xss1280k”
Hello,
Thanks for the procedure. I have the Linode running smoothly on Ubuntu 16.04 LTS, the install script successfully completed displaying “Access controller by going to https://:8443“. However, when I try to connect to “https://XXXX:8443” with both Chrome or Firefox, using my specific Linode IP address, the connection is refused. What happens? Any idea how I can debug this glitch? Thank you for your insights.
This is no longer working.