How to update VMware ESXi 6.7 to 6.7 Update 1

To go along with the newly released VMware vCenter 6.7 Update 1 release, comes VMware ESXi 6.7 Update 1 as well.

As you might expect with an Update 1 release there are a number of patches, fixes and new additions with ESXi 6.7 U1. If you haven’t already seen, check out the release notes here.

Below are two ways to easily upgrade your ESXi 6.0-6.7 hosts to ESXi 6.7 U1 using the command line or by using VMware Update Manager.

However, before upgrading any of your VMware ESXi hosts, you should have already upgraded your VMware vCenter Server Appliance to 6.7 Update 1.

If you are running VCSA 6.5 you can find instructions on how to upgrade VCSA 6.5 to 6.7 U1 as well.

How to update ESXi 6.7 to 6.7 Update 1 via command line

  1. Place the ESXi host you are about to upgrade into Maintenance Mode.
  2. Now SSH into the host using PuTTY (or any other SSH client/terminal).
  3. Type the following command to open the firewall for outgoing HTTP requests:
    upgrade esxi allow http firewall

    esxcli network firewall ruleset set -e true -r httpClient
  4. Type the following to download and upgrade to ESXi 6.7 U1
    upgrade esxi update esxi 6.7 u1

    esxcli software profile update -d https://hostupdate.vmware.com/software/VUM/PRODUCTION/main/vmw-depot-index.xml -p ESXi-6.7.0-20181002001-standard
  5. After the update has finished disable the HTTP firewall rule by typing:
    upgrade esxi block http firewall

    esxcli network firewall ruleset set -e false -r httpClient
  6. Finally, reboot the ESXi host to complete the upgrade.
    reboot

Note: Once the reboot is completed, I would also recommend disabling SSH on the host for security purposes.

How to upgrade VMware ESXi 6.0-6.7 to ESXi 6.7 U1 using VMware Update Manager (VUM)

You will need the ESXi 6.7 U1 ISO, so download that now if you haven’t already.

  1. First log into your VCSA and click on Update Manager.
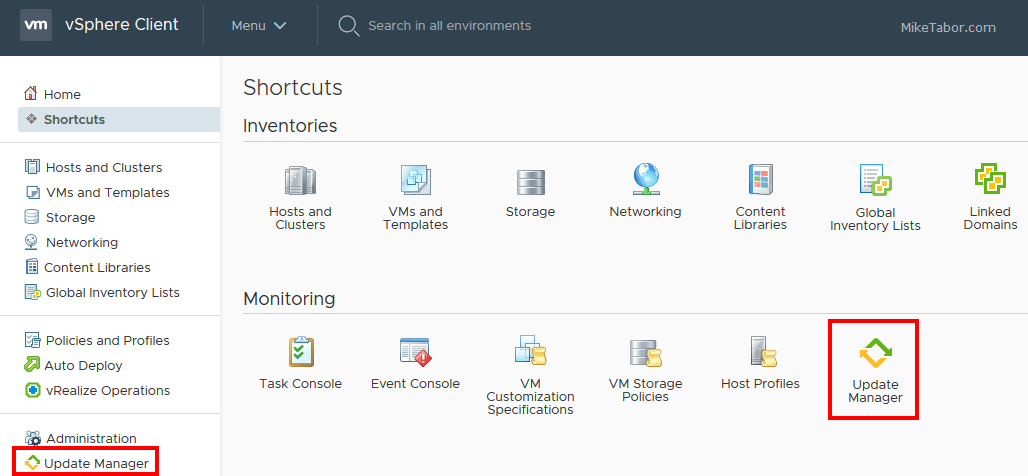
    upgrade esxi 6.7 vum
  2. Next click on ESXi images and then IMPORT.
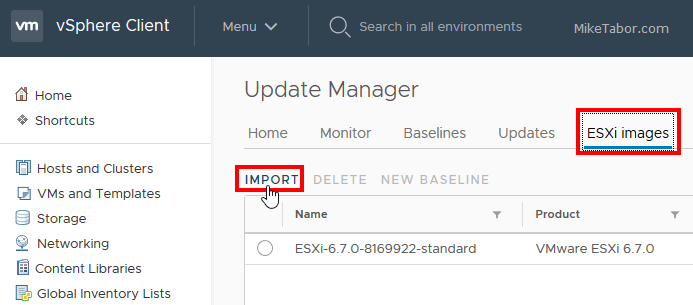
    upgrade esxi 6.7 import image
  3. Browse to the location where you saved the ESXi 6.7 U1 ISO.
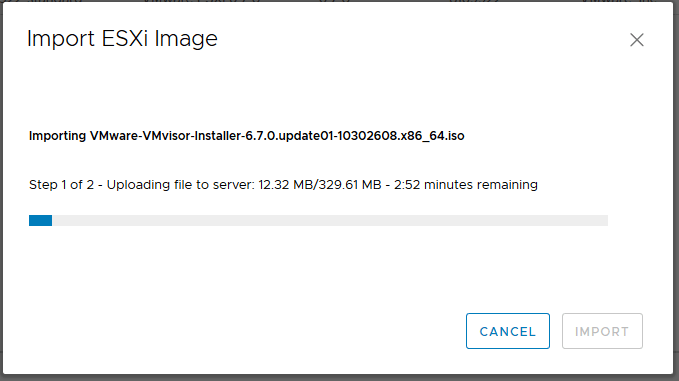
    upgrade esxi 6.7 upload image
  4. Once the import completes, select the new image and click on New Baseline.
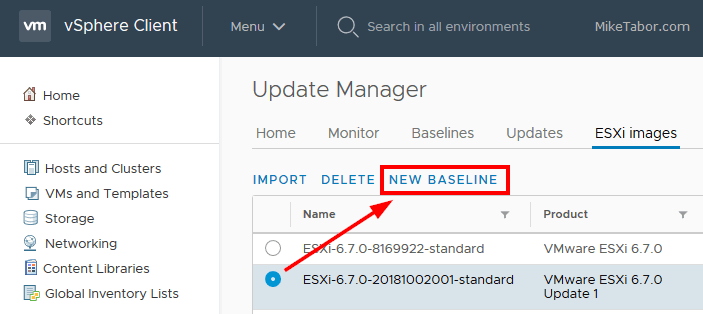
    upgrade esxi 6.7 new baseline
  5. Give your new baseline a name and description and ensure the new ESXi 6.7 U1 image is selected and click on Finish.
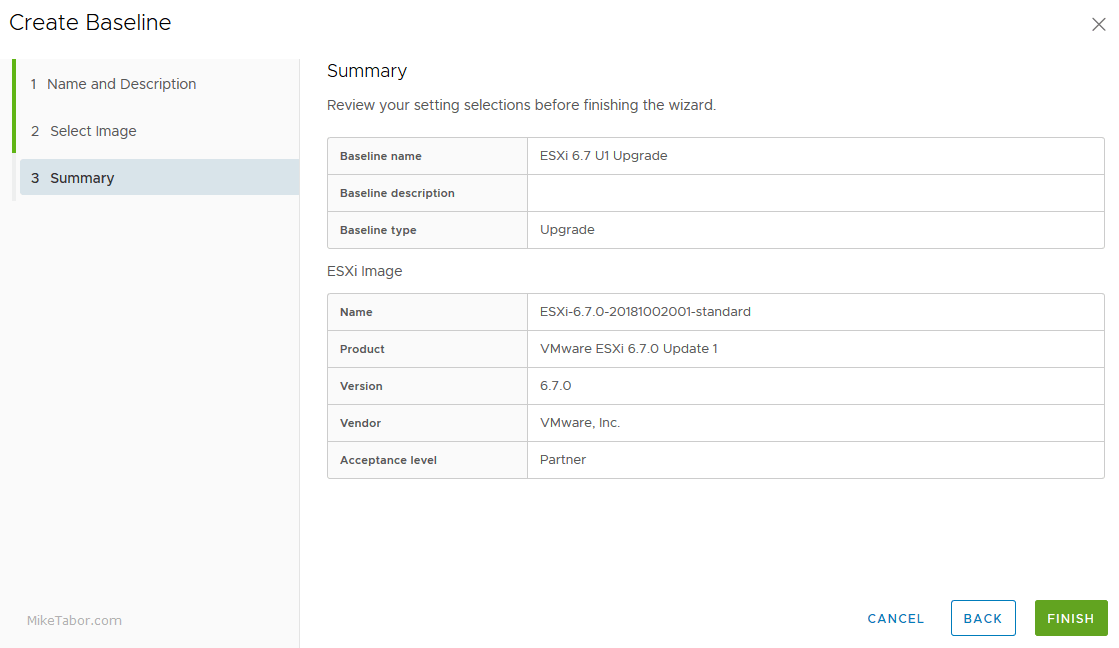
    upgrade esxi 6.7 baseline details
  6. Now we need to attach the new baseline to our hosts. I’m going to add the baseline to the Cluster by selecting the Cluster (#1), then going to the Updates tab (#2), clicking on Host Updates (#3) and finally Attach (#4).
    upgrade esxi 6.7 attach baseline
  7. Select the newly created baseline that you created from above and click on Attach.
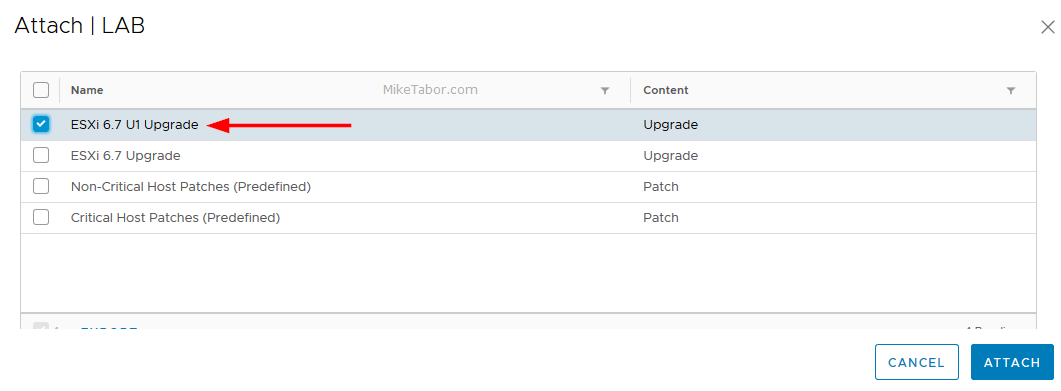
    upgrade esxi 6.7 attach baseline cluster
  8. Next click on the Overview link in VUM and then click on Check Compliance.
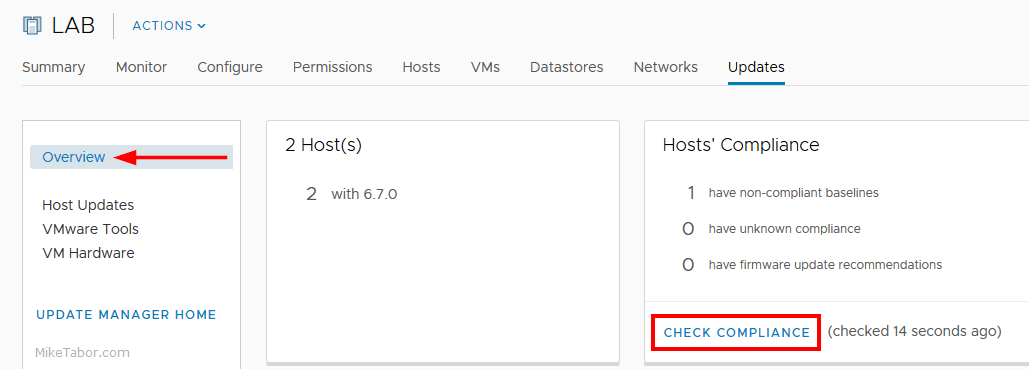
    upgrade esxi 6.7 vum check compliance
  9. Once the compliance scan finishes, it’s time to actually do the ESXi 6.7 U1 upgrade. From the Updates tab, click on Host Updates, select the baseline and then click on Remediate.
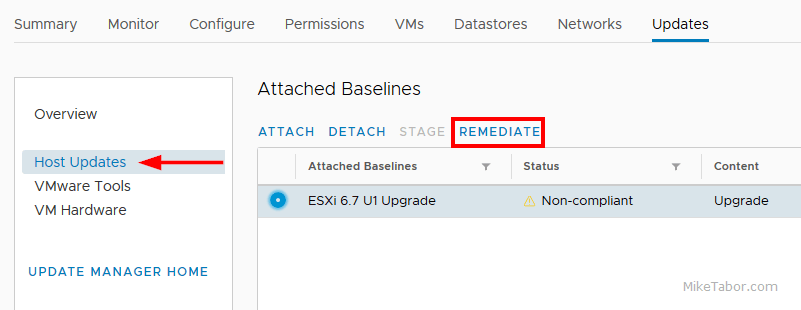
    upgrade esxi 6.7 vum remediate
  10. Accept the EULA and review the host that’s about to be upgraded. If everything looks good, click on Remediate.
    upgrade esxi 6.7 vum remediate confirm

That’s it!

At this point VUM will move any VM’s off of the host (if DRS is enabled) and put the host into maintenance mode and start the upgrade and reboot the host automatically.

If you wish you can also schedule the upgrades via VUM if you don’t wish to remediate them right away.
Similar Posts

  • How to manually delete NetApp SnapMirror snapshots

    The other day, one of our volumes in the lab environment filled up. This volume has a couple large VM’s on it, coupled with a couple different Veeam backup jobs running using the native Veeam backup methods as well as using NetApp snap mirror to snapshot the volume and then using Veeam to ship it out to Azure.

    At any rate the volume filled up to the point where vCenter wasn’t allowing me to migrate VM’s off the datastore. I really didn’t want to expand the volume just so I could move VM’s off of it.

    Instead, I decided to delete some of the older proof of concept snapshots from SnapMirror. Below are the quick and easy steps to clear up some un-used snapshots and free up some space on the datastore.

    Read More “How to manually delete NetApp SnapMirror snapshots”

  • Power off an unresponsive VM using ESXTOP

    Just recently we have some hardware issues in our primary datacenter and during that time had a few VM’s that became unresponsive and needed to get them back online. The VM’s had stopped responding to the normal vSphere commands to reboot, shutdown or even restart. I didn’t want to power cycle the entire ESXi host and instead just power off an unresponsive VM.

    Here is a quick and easy way to do just that using ESXTOP.

    Read More “Power off an unresponsive VM using ESXTOP”

  • Thank you VMware Community!

    VMware vExpert 2014

    So far, 2014 has been a very rewarding year for a number of reasons, two of which has happened in just a week or two span. First, Eric Siebert (@ericsiebert) announced on March 27th, this years results of the 2014 Top VMware & Virtualization Blog voting. My first year entered into voting and made it to 71st place! A huge thanks goes out to not only Eric but just as much so to everyone who voted for me!

    To top it off, yesterday VMware announced 2014’s first quarter VMware vExpert list. While vExpert isn’t a technical certification or even a general measure of VMware expertise. The VMware judges selected people who were engaged with their community and who had developed a substantial personal platform of influence in those communities. There were a lot of very smart, very accomplished people, even VCDXs, that weren’t named as vExpert this year. VMware awarded this title to 754 people this year and on that list of many impressive names you’ll find yours truly, Michael Tabor!

    I’m both honored and humbled by both lists. It’s a great feeling to be recognized by not only my peers through the voting in the Top vBlog but also by VMware themselves through the vExpert title.

    So again THANK YOU very much to the entire VMware community, a spectacular community indeed, and congratulations to everyone else that made the Top vBlog and vExpert lists!

  • Set default printer for View floating desktop and Persona Management

    Sometime ago I asked a question over at the VMware forum about how to set default network printers on a VMware View 5.0 floating pool that used Persona Management as Persona Management wasn’t keeping this user setting on it’s own. The printers would be added to the VM just not remember the default printer setting. I’ll admit I forgot to update the thread, but a work around was devised which I’ll share below.

    Read More “Set default printer for View floating desktop and Persona Management”

  • VMware View client now availabe for Android!

    VMware has announced that they have released a View Client for Android tablets available on the Android Market now. Here are just a few of the features found on the new client.

    • A new look and feel – The View Client for Android features the NEW blue look and feel of the VMware View clients!
    • Multiple broker support – If you have more than one VMware View broker in your organization, you can can easily access your desktop from all of them via the Android client
    • Desktop Shortcuts – Quickly connect with as many as four recent desktop via shortcuts
    • Virtual trackpad – Control your desktop on a granular level just like you would control the mouse on a laptop
    • Custom keyboard toolbar – Super easy access to all of the special keys not found on the Android default keynboard
    • Honeycomb 3.x support – Made from the ground up for the new generation of Android tablets
    • Custom gestures – Invoke keyboard, scrolling, etc are as easy as ever and simple to use
    • VMware View Security Server support (best experience) – No need to have VPN when you use VMware View Security Server
    • Background tasking – Switch between apps on your tablet and come right back

Leave a Reply to Mike Cancel reply

Your email address will not be published. Required fields are marked *

4 Comments